Geonode auth via LDAP
This package provides utilities for using LDAP as an authentication and authorization backend for geonode.
The django_auth_ldap package is a very capable way to add LDAP integration with django projects. It provides a lot of flexibility in mapping LDAP users to geonode users and is able to manage user authentication.
However, in order to provide full support for mapping LDAP groups with geonode’s and enforce group permissions on resources, a custom geonode authentication backend is required. This contrib package provides such a backend, based on django_auth_ldap.
Installation
Installing this contrib package is a matter of:
Installing geonode
Installing system LDAP libraries (development packages needed)
Cloning this repository locally
Change to the ldap directory and install this contrib package
# 1. install geonode (not shown here for brevity)
# 2. install systemwide LDAP libraries
sudo apt install \
    libldap2-dev \
    libsasl2-dev

# 3. get geonode/contribs code
git clone https://github.com/GeoNode/geonode-contribs.git

# 4. install geonode ldap contrib package
cd geonode-contribs/ldap
pip install .
Configuration
Add
geonode_ldap.backend.GeonodeLdapBackendas an additional auth backend.# e.g. by updating your settings.py or local_settings.py AUTHENTICATION_BACKENDS += ( "geonode_ldap.backend.GeonodeLdapBackend", )
You may use additional auth backends, the django authentication framework tries them all according to the order listed in the settings. This means that geonode can be setup in such a way as to permit internal organization users to login with their LDAP credentials, while at the same time allowing for casual users to use their facebook login (as long as you enable facebook social auth provider).
Note
The django’s
django.contrib.auth.backends.ModelBackendmust also be used in order to provide full geonode integration with LDAP. However this is included by default on GeoNodesettings# The GeoNode default settings are the following AUTHENTICATION_BACKENDS = ( 'oauth2_provider.backends.OAuth2Backend', 'django.contrib.auth.backends.ModelBackend', 'guardian.backends.ObjectPermissionBackend', 'allauth.account.auth_backends.AuthenticationBackend', )
Set some additional configuration values. Some of these variables are prefixed with
AUTH_LDAP(these are used directly by django_auth_ldap) while others are prefixed withGEONODE_LDAP(these are used bygeonode_ldap). The geonode custom variables are:GEONODE_LDAP_GROUP_PROFILE_FILTERSTR- This is an LDAP search fragment with the filter that allows querying for existing groups. See example belowGEONODE_LDAP_GROUP_NAME_ATTRIBUTE- This is the name of the LDAP attribute that will be used for deriving the geonode group name. If not specified it will default to cn, which means that the LDAP object’s common name will be used for generating the name of the geonode groupGEONODE_LDAP_GROUP_PROFILE_MEMBER_ATTR- This is the name of the LDAP attribute that will be used for deriving the geonode membership. If not specified it will default tomember
Example configuration:
# add these import lines to the top of your geonode settings file
from django_auth_ldap import config as ldap_config
from geonode_ldap.config import GeonodeNestedGroupOfNamesType
import ldap

# enable logging
import logging
logger = logging.getLogger('django_auth_ldap')
logger.addHandler(logging.StreamHandler())
logger.setLevel(logging.DEBUG)

# add both standard ModelBackend auth and geonode.contrib.ldap auth
AUTHENTICATION_BACKENDS += (
    'geonode_ldap.backend.GeonodeLdapBackend',
)

# django_auth_ldap configuration
AUTH_LDAP_SERVER_URI = os.getenv("LDAP_SERVER_URL")
AUTH_LDAP_BIND_DN = os.getenv("LDAP_BIND_DN")
AUTH_LDAP_BIND_PASSWORD = os.getenv("LDAP_BIND_PASSWORD")
AUTH_LDAP_USER_SEARCH = ldap_config.LDAPSearch(
    os.getenv("LDAP_USER_SEARCH_DN"),
    ldap.SCOPE_SUBTREE,
    os.getenv("LDAP_USER_SEARCH_FILTERSTR")
)
# should LDAP groups be used to spawn groups in GeoNode?
AUTH_LDAP_MIRROR_GROUPS = strtobool(os.getenv("LDAP_MIRROR_GROUPS", 'True'))
AUTH_LDAP_GROUP_SEARCH = ldap_config.LDAPSearch(
    os.getenv("LDAP_GROUP_SEARCH_DN"),
    ldap.SCOPE_SUBTREE,
    os.getenv("LDAP_GROUP_SEARCH_FILTERSTR")
)
AUTH_LDAP_GROUP_TYPE = GeonodeNestedGroupOfNamesType()
AUTH_LDAP_USER_ATTR_MAP = {
    "first_name": "givenName",
    "last_name": "sn",
    "email": "mailPrimaryAddress"
}
AUTH_LDAP_FIND_GROUP_PERMS = True
AUTH_LDAP_MIRROR_GROUPS_EXCEPT = [
    "test_group"
]

# these are not needed by django_auth_ldap - we use them to find and match
# GroupProfiles and GroupCategories
GEONODE_LDAP_GROUP_NAME_ATTRIBUTE = os.getenv("LDAP_GROUP_NAME_ATTRIBUTE", default="cn")
GEONODE_LDAP_GROUP_PROFILE_FILTERSTR = os.getenv("LDAP_GROUP_SEARCH_FILTERSTR", default='(ou=research group)')
GEONODE_LDAP_GROUP_PROFILE_MEMBER_ATTR = os.getenv("LDAP_GROUP_PROFILE_MEMBER_ATTR", default='member')
Example environment variables:
LDAP_SERVER_URL=ldap://<the_ldap_server>
LDAP_BIND_DN=uid=ldapinfo,cn=users,dc=ad,dc=example,dc=org
LDAP_BIND_PASSWORD=<something_secret>
LDAP_USER_SEARCH_DN=dc=ad,dc=example,dc=org
LDAP_USER_SEARCH_FILTERSTR=(&(uid=%(user)s)(objectClass=person))
LDAP_MIRROR_GROUPS=True
LDAP_GROUP_SEARCH_DN=cn=groups,dc=ad,dc=example,dc=org
LDAP_GROUP_SEARCH_FILTERSTR=(|(cn=abt1)(cn=abt2)(cn=abt3)(cn=abt4)(cn=abt5)(cn=abt6))
LDAP_GROUP_PROFILE_MEMBER_ATTR=uniqueMember
The configuration seen in the example above will allow LDAP users to login to geonode with their LDAP credentials.
On first login, a geonode user is created from the LDAP user and its LDAP
attributes cn and sn are used to populate the geonode user’s
first_name and last_name profile fields.
Any groups that the user is a member of in LDAP (under the
cn=groups,dc=ad,dc=example,dc=org search base and belonging to one of
(|(cn=abt1)(cn=abt2)(cn=abt3)(cn=abt4)(cn=abt5)(cn=abt6)) groups) will be mapped to the corresponding
geonode groups, even creating these groups in geonode in case they do not
exist yet. The geonode user is also made a member of these geonode groups.
Upon each login, the user’s geonode group memberships are re-evaluated
according to the information extracted from LDAP. The
AUTH_LDAP_MIRROR_GROUPS_EXCEPT setting can be used to specify groups
whose memberships will not be re-evaluated.
If no LDAP groups shall be mirrored LDAP_MIRROR_GROUPS and LDAP_MIRROR_GROUPS_EXCEPT must be set to False.
Note
Users mapped from LDAP will be marked with an ldap tag. This will be used to keep them in sync.
Warning
If you remove the ldap tag, the users will be threaten as pure internal GeoNode ones.
You may also manually generate the geonode groups in advance, before users login. In this case, when a user logs in and the mapped LDAP group already exists, the user is merely added to the geonode group
Be sure to check out django_auth_ldap for more information on the various configuration options.
Keep Users and Groups Synchronized
In order to constantly keep the remote LDAP Users and Groups synchronized with GeoNode, you will need to run periodically some specific management commands.
*/10 * * * * /opt/geonode/my-geonode/manage.sh updateldapgroups  >> /var/log/cron.log 2>&1
*/10 * * * * /opt/geonode/my-geonode/manage.sh updateldapusers   >> /var/log/cron.log 2>&1
Where the manage.sh is a bash script similar to the following one:
manage.sh
export $(grep -v '^#' /opt/geonode/my-geonode/.env | xargs -d '\n'); /home/<my_user>/.virtualenvs/geonode/bin/python /opt/geonode/my-geonode/manage.py $@
and the /opt/geonode/my-geonode/.env is something similar to the following one:
/opt/geonode/my-geonode/.env
DEBUG=False
DJANGO_ALLOWED_HOSTS=<geonode_public_host>,localhost,127.0.0.1
DJANGO_DATABASE_URL=postgis://my_geonode:**********@localhost:5432/my_geonode_db
DEFAULT_BACKEND_UPLOADER=geonode.importer
DEFAULT_FROM_EMAIL=geonode@example.org
DJANGO_EMAIL_HOST=smtp.example.org
DJANGO_EMAIL_HOST_PASSWORD=**********
DJANGO_EMAIL_HOST_USER=geonode
DJANGO_EMAIL_PORT=465
DJANGO_EMAIL_USE_SSL=True
DJANGO_SETTINGS_MODULE=my_geonode.settings
DJANGO_SECRET_KEY=**********
OAUTH2_API_KEY=**********
PROXY_URL=/proxy/?url=
EXIF_ENABLED=True
EMAIL_ENABLE=True
TIME_ENABLED=True
ACCOUNT_OPEN_SIGNUP=True
ACCOUNT_APPROVAL_REQUIRED=True
ACCOUNT_EMAIL_REQUIRED=True
ACCOUNT_EMAIL_VERIFICATION=optional
AVATAR_GRAVATAR_SSL=True
GEONODE_DB_URL=postgis://my_geonode:**********@localhost:5432/my_geonode_data
GEOSERVER_ADMIN_PASSWORD=**********
GEOSERVER_LOCATION=https://<geonode_public_host>/geoserver/
GEOSERVER_PUBLIC_HOST=<geonode_public_host>
GEOSERVER_PUBLIC_LOCATION=https://<geonode_public_host>/geoserver/
GEOSERVER_WEB_UI_LOCATION=https://<geonode_public_host>/geoserver/
LDAP_SERVER_URL=ldap://<the_ldap_server>
LDAP_BIND_DN=uid=ldapinfo,cn=users,dc=ad,dc=example,dc=org
LDAP_BIND_PASSWORD=<something_secret>
LDAP_USER_SEARCH_DN=dc=ad,dc=example,dc=org
LDAP_USER_SEARCH_FILTERSTR=(&(uid=%(user)s)(objectClass=person))
LDAP_MIRROR_GROUPS=True
LDAP_GROUP_SEARCH_DN=cn=groups,dc=ad,dc=example,dc=org
LDAP_GROUP_SEARCH_FILTERSTR=(|(cn=abt1)(cn=abt2)(cn=abt3)(cn=abt4)(cn=abt5)(cn=abt6))
LDAP_GROUP_PROFILE_MEMBER_ATTR=uniqueMember
OGC_REQUEST_MAX_RETRIES=3
OGC_REQUEST_POOL_CONNECTIONS=100
OGC_REQUEST_POOL_MAXSIZE=100
OGC_REQUEST_TIMEOUT=60
SITEURL=https://<geonode_public_host>/
SITE_HOST_NAME=<geonode_public_host>
FREETEXT_KEYWORDS_READONLY=False
# Advanced Workflow Settings
ADMIN_MODERATE_UPLOADS=False
GROUP_MANDATORY_RESOURCES=False
GROUP_PRIVATE_RESOURCES=False
RESOURCE_PUBLISHING=False
Note
You might want to use the same /opt/geonode/my-geonode/.env for your UWSGI configuration too:
[uwsgi]
socket = 0.0.0.0:8000
uid = <my_user>
gid = www-data

plugins = python3
virtualenv = /home/<my_user>/.virtualenvs/geonode

# set environment variables from .env file
env LANG=en_US.utf8
env LC_ALL=en_US.UTF-8
env LC_LANG=en_US.UTF-8

for-readline = /opt/geonode/my-geonode/.env
    env = %(_)
endfor =

chdir = /opt/geonode/my-geonode
module = my_geonode.wsgi:application

processes = 12
threads = 2
enable-threads = true
master = true

# logging
# path to where uwsgi logs will be saved
logto = /storage/my_geonode/logs/geonode.log
daemonize = /storage/my_geonode/logs/geonode.log
touch-reload = /opt/geonode/my-geonode/my_geonode/wsgi.py
buffer-size = 32768
max-requests = 500
harakiri = 300 # respawn processes taking more than 5 minutes (300 seconds)
# limit-as = 1024 # avoid Errno 12 cannot allocate memory
harakiri-verbose = true
vacuum = true
thunder-lock = true
Geonode Logstash for centralized monitoring/analytics
This contrib app, along with the GeoNode internal monitoring app, lets administrators to configure a service for sending metrics data to a centralized server which comes with Logstash.
So it will be possible to visualize stats and charts about one or more GeoNode instances outside the application. Having a server configured with the ELK stack, it is possible to visualize those information on a Kibana dashboard for example.
If you manage more than one GeoNode instances, that server can receive data from many GeoNode(s) so it can make available both single-instance dashboards (referred to individual instances) and global dashboards (stats calculated on the whole set of instances).
Warning
The centralized monitoring service cannot be active if the settings variables USER_ANALYTICS_ENABLED and monitoring-enabled are set to False.
Overview
By default, GeoNode will send data to the centralized server every 3600 seconds (1 hour) so, if enabled, the monitoring app will collect 1-hour-aggregated data. This time interval can be configured, see the next paragraphs to know how.
Formatted and compressed data will be sent on a TCP connection (on the 443 standard port by default) through a scheduled celery task which basically logs information via python-logstash-async.
Warning
This feature requires python-logstash-async.
Data and events formats
Each time the centralized monitoring service is called, 4 types of JSON formatted events are sent to the server:
Instance overview
{
  "format_version": "1.0",
  "instance": {
    "name": geonode instance HOSTNAME,
    "ip": geonode instance IP
  },
  "time": {
    "startTime": UTC now - 1 hour (default)
    "endTime": UTC now
  },
  "hits": total number of requests,
  "unique_visits": total number of unique sessions,
  "unique_visitors": total number of unique users,
  "registered_users": total number of registered users at the end time,
  "layers": total number of layers at the end time,
  "documents": total number of documents at the end time,
  "maps": total number of maps at the end time,
  "errors": total number of errors
}
Resources details
{
  "format_version": "1.0",
  "instance": {
    "name": geonode instance HOSTNAME,
    "ip": geonode instance IP
  },
  "time": {
    "startTime": UTC now - 1 hour (default)
    "endTime": UTC now
  },
  "resources": [
    …
    {
        "type": resource type,
        "name": resource name,
        "url": resource URL,
        "hits": total number of requests about this resource,
        "unique_visits": total number of unique sessions about this resource,
        "unique_visitors": total number of unique users about this resource,
        "downloads": total number of resource downloads,
        "ogcHits": total number of OGC service requests about this resource,
        "publications": total number of publication events
    },
    …
  ]
}
Countries details
{
  "format_version": "1.0",
  "instance": {
    "name": geonode instance HOSTNAME,
    "ip": geonode instance IP
  },
  "time": {
    "startTime": UTC now - 1 hour (default)
    "endTime": UTC now
  },
  "countries": [
    …
    {
        "name": country name,
        "hits": total number of requests about the country
    },
    …
  ]
}
UA (User Agent) Family details
{
  "format_version": "1.0",
  "instance": {
    "name": geonode instance HOSTNAME,
    "ip": geonode instance IP
  },
  "time": {
    "startTime": UTC now - 1 day
    "endTime": UTC now
  },
  "ua_families": [
    …
    {
        "name": UA family name
        "hits": total number of requests about the UA family
    },
    …
  ]
}
These messages will be gzip compressed in order to improve transport performances and they should be parsed by a logstash filter on the server side (see Logstash configuration).
Configuration
The centralized monitoring service is disabled by default because it needs the internal monitoring to be active and service-specific configurations.
GeoNode configuration

Let’s add one:
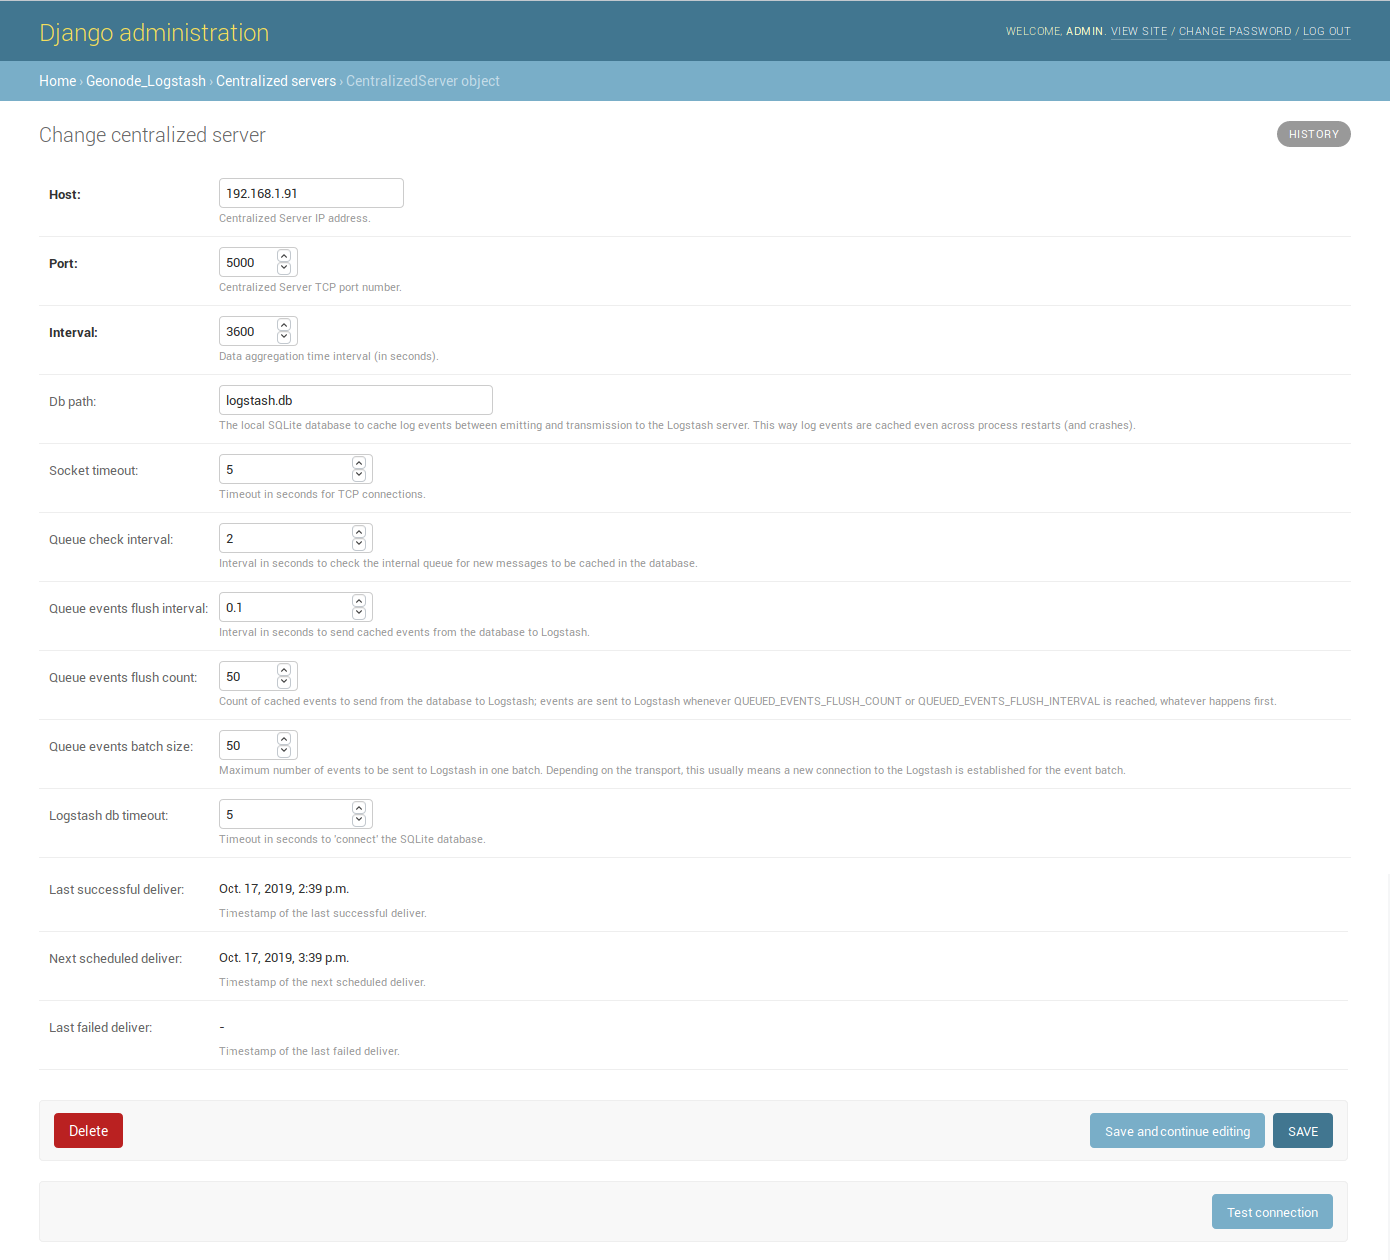
The Host IP address and the Port number are mandatory as well as the time Interval (3600 seconds by default) which defines the service invocation polling (so the time range on which data should be aggregated).
Note
Once the service configured, the user can test the configuration by clicking on Test connection. It will test the connection with the centralized server without saving the configuration.
Other settings come with a default value:
Db path –> the local Spatialite database to cache events between emitting and transmission to the Logstash server (log events are cached even across process restarts and crashes);
Socket timeout –> timeout in seconds for TCP connections;
Queue check interval –> interval in seconds to check the internal queue for new messages to be cached in the database;
Queue events flush interval –> interval in seconds to send cached events from the database to Logstash;
Queue events flush count –> count of cached events to send from the database to Logstash;
Queue events batch size –> maximum number of events to be sent to Logstash in one batch;
Logstash db timeout –> timeout in seconds to ‘connect’ the Spatialite database.
To better understand what these variables mean, it is recommended to read the python-logstash-async options for the asynchronous processing and formatting.
Other three read-only fields will be visible:
Last successful deliver –> timestamp of the last successful deliver (if exists);
Next scheduled deliver –> timestamp of the next scheduled deliver;
Last failed deliver –> timestamp of the last failed deliver (if exists).
Logstash configuration
An example of the logstash configuration:
input {
  tcp {
    port => <logstash_port_number>
    codec => "gzip_lines"
  }
}

filter {
  json {
    source => "message"
  }
  if [format_version] == "1.0" {
    if [countries] {
      split {
        field => "countries"
      }
    }
    if [resources] {
      split {
        field => "resources"
      }
    }
    if [ua_families] {
      split {
        field => "ua_families"
      }
    }
    mutate {
      remove_field => "message"
    }
  }
  geoip {
    source => "[instance][ip]"
  }
}

output {
  elasticsearch {
    hosts => "elasticsearch:<elastic_port_number>"
    index => "logstash-%{[instance][name]}-%{+YYYY.MM.dd}"
    user => "elastic"
    password => "changeme"
  }
  stdout { codec => rubydebug }
}
Usage
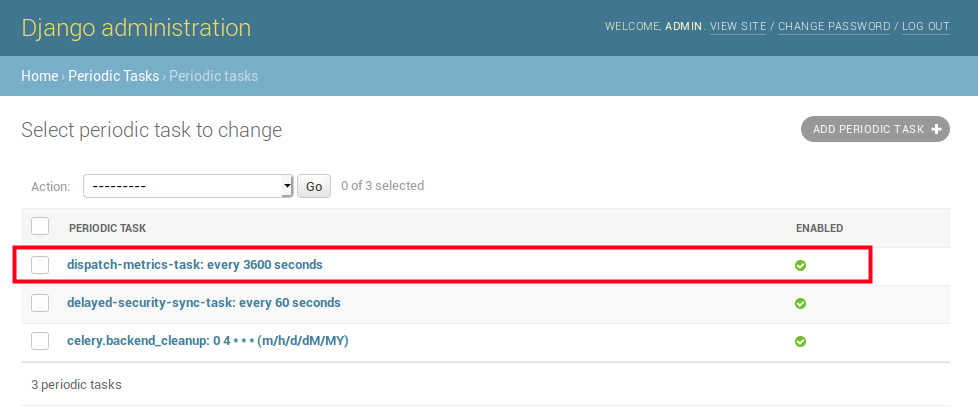
When saving the service configuration, if monitoring enabled, GeoNode will create/update a celery Periodic Task which will be executed at regular intervals based on the interval configured.
You can check this behavior on the Periodic Tasks section of the admin UI:
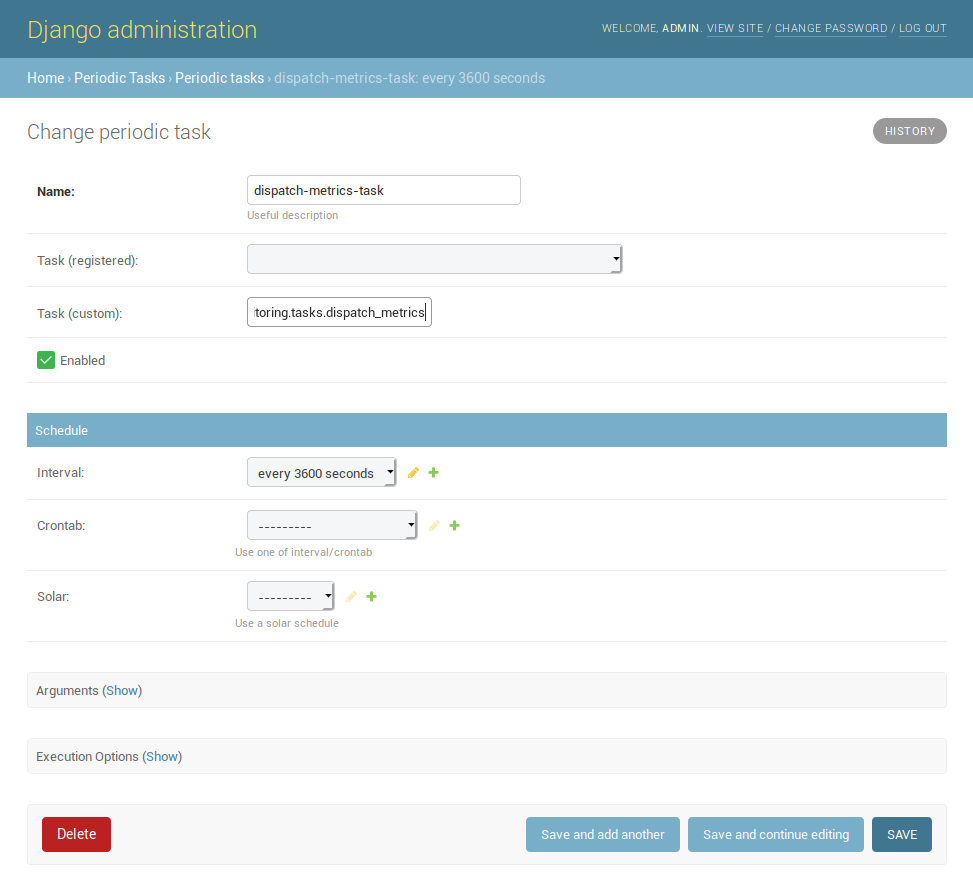
The dispatch-metrics-task task:
The task details:
Warning
When disabling monitoring is a good practice to disable the corresponding Periodic Task too.
Management command
When the monitoring plugin is enabled (USER_ANALYTICS_ENABLED and monitoring-enabled are set to True) and a Geonode Logstash for centralized monitoring/analytics configured, Geonode sends (hourly by default) metrics data to an external server (which comes with Logstash) for stats visualization and analysis.
The command can be launched using the manage.py script.
No options are required.
$ DJANGO_SETTINGS_MODULE=<your_settings_module> python manage.py dispatch_metrics
Possible exceptions raised during the execution will be reported to GeoNode log.