GeoNode Basic Installation
Overview
The followings are the easiest and recommended ways to deploy a full-stack GeoNode server on your host.
First Step: Deploy GeoNode on a local server, running as
http://localhost/service. GeoServer will be also available athttp://localhost/geoserver/Second Step: Deploy GeoNode on a production server, running as
https://my_geonode.geonode.org/service. GeoServer will be also available athttps://my_geonode.geonode.org/geoserver/Third Step: Customize .env to match your needs
Fourth Step: Secure your production deployment; change the admin passwords and OAUth2 keys
Further Production Enhancements
First Step: Deploy GeoNode on a local server
Docker Setup for Ubuntu (22.04)
# install OS level packages..
sudo add-apt-repository universe
sudo apt-get update -y
sudo apt-get install -y git-core git-buildpackage debhelper devscripts python3.10-dev python3.10-venv virtualenvwrapper
sudo apt-get install -y apt-transport-https ca-certificates curl lsb-release gnupg gnupg-agent software-properties-common vim

# add docker repo and packages...
sudo mkdir -p /etc/apt/keyrings
curl -fsSL https://download.docker.com/linux/ubuntu/gpg | sudo gpg --dearmor -o /etc/apt/keyrings/docker.gpg
sudo chmod a+r /etc/apt/keyrings/docker.gpg
echo "deb [arch=$(dpkg --print-architecture) signed-by=/etc/apt/keyrings/docker.gpg] https://download.docker.com/linux/ubuntu $(lsb_release -cs) stable" | sudo tee /etc/apt/sources.list.d/docker.list > /dev/null

sudo apt-get update -y
sudo apt-get install -y docker-ce docker-ce-cli containerd.io docker-compose
sudo apt autoremove --purge

# add your user to the docker group...
sudo usermod -aG docker ${USER}
su ${USER}
Create an instance of your geonode-project
Let’s say your project is named my_geonode perform the following steps:
git clone https://github.com/GeoNode/geonode-project.git

# Checkout the desired branch. For example, 4.2.2 to generate a project for GeoNode 4.2.2

git checkout -b 4.2.2

# Ubuntu
source /usr/share/virtualenvwrapper/virtualenvwrapper.sh
mkvirtualenv --python=/usr/bin/python3 my_geonode

Alterantively you can also create the virtual env like below
python3.8 -m venv /home/geonode/dev/.venvs/my_geonode
source /home/geonode/dev/.venvs/my_geonode/bin/activate

pip install Django==3.2.13

# CentOS
virtualenv -p python3 my_geonode
source my_geonode/bin/activate

django-admin startproject --template=./geonode-project -e py,sh,md,rst,json,yml,ini,env,sample,properties -n monitoring-cron -n Dockerfile my_geonode

# If the previous command does not work for some reason, try the following one
python -m django startproject --template=./geonode-project -e py,sh,md,rst,json,yml,ini,env,sample,properties -n monitoring-cron -n Dockerfile my_geonode
Prepare the .env file
GeoNode uses an .env where the environment variables required by Docker and GeoNode itself must be configured.
A simple way to generate a basic .env is using the create-envfile.py utility command. If run without arguments it will generate a valid .env for a local deployment.
The command accepts the following arguments:
–https: Enable SSL. It’s disabled by default
- –env_type:
When set to prod DEBUG is disabled and the creation of a valid SSL is requested to Letsencrypt’s ACME server
When set to test DEBUG is disabled and a test SSL certificate is generated for local testing
When set to dev DEBUG is enabled and no SSL certificate is generated
–hostname: The URL that will serve GeoNode (localhost by default)
–email: The administrator’s email. Notice that a real email and valid SMPT configurations are required if –env_type is set to prod. Letsencrypt uses email for issuing the SSL certificate
–geonodepwd: GeoNode’s administrator password. A random value is set if left empty
–geoserverpwd: GeoNode’s administrator password. A random value is set if left empty
–pgpwd: PostgreSQL’s administrator password. A random value is set if left empty
–dbpwd: GeoNode DB user role’s password. A random value is set if left empty
–geodbpwd: GeoNode data DB user role’s password. A random value is set if left empty
–clientid: Client id of Geoserver’s GeoNode Oauth2 client. A random value is set if left empty
–clientsecret: Client secret of Geoserver’s GeoNode Oauth2 client. A random value is set if left empty
Build and run
docker compose build
docker compose up -d
You can follow the containers startup by running the following commands from
my_geonoderoot folder:# GeoNode Container docker-compose logs -f django # GeoServer Container docker-compose logs -f geoserver # DB Container docker-compose logs -f db # NGINX Container docker-compose logs -f geonode
If any error occurs, try to catch the error stacktrace by running the following commands from
my_geonoderoot folder:# GeoNode “entrypoint.sh” Logs tail -F -n 300 invoke.log
Connect to http://localhost/
The startup typically takes some time, so be patient…
If everything goes well, you should be able to see from the geonode startup logs a line similar to the following one:
<some date> [UWSGI] Uwsgi running...
Connect to http://localhost/
The default credentials are:
GeoNode (http://localhost/) admin:
username: adminpassword: adminGeoServer (http://localhost/geoserver/) admin:
username: adminpassword: geoserver
Second Step: Deploy GeoNode on a production server
In the case you would like to deploy to, let’s say, https://my_geonode.geonode.org/, you will need to change .env as follows:
DOCKER_ENV=production
SITEURL=https://my_geonode.geonode.org/
NGINX_BASE_URL=https://my_geonode.geonode.org/
ALLOWED_HOSTS=['django',]
GEOSERVER_WEB_UI_LOCATION=https://my_geonode.geonode.org/geoserver/
GEOSERVER_PUBLIC_LOCATION=https://my_geonode.geonode.org/geoserver/
HTTP_HOST=
HTTPS_HOST=my_geonode.geonode.org
HTTP_PORT=80
HTTPS_PORT=443
LETSENCRYPT_MODE=production # This will use Letsencrypt and the ACME server to generate valid SSL certificates
These variables are automatically set by the create-envfile.py script if the --https and --hostname variables are used.
Warning
When LETSENCRYPT_MODE is set to production a valid email and email SMPT server are required to make the system generate a valid certificate.
Restart the containers
Whenever you change someting on .env file, you will need to rebuild the container
Warning
Notche that the following command drops any change you might have done manually inside the containers, except for the static volumes.
docker-compose up -d
Troubleshooting
If for some reason you are not able to reach the server on the HTTPS channel, please check the NGINX configuration files below:
Enter the NGINX container
docker-compose exec geonode sh
Install an editor if not present
apk add nano
Double check that the
nginx.https.enabled.conflink has been correctly createdls -lah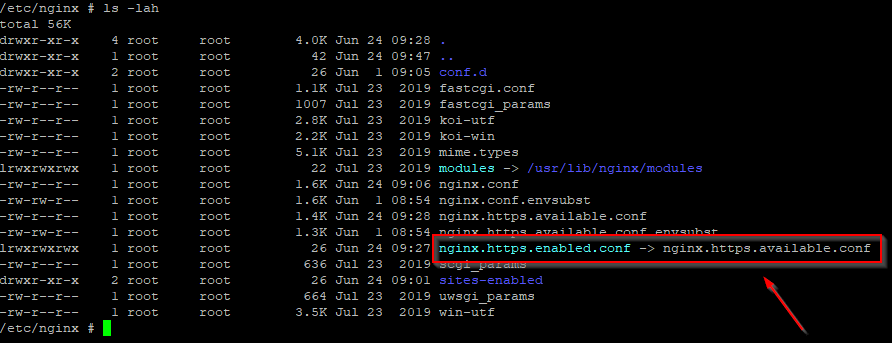
If the list does not match exactly the figure above, please run the following commands, and check again
rm nginx.https.enabled.conf
ln -s nginx.https.available.conf nginx.https.enabled.conf
Inspect the
nginx.https.enabled.confcontentsnano nginx.https.enabled.confMake sure the contents match the following
Warning
Change the Hostname accordingly. This is only an example!
# NOTE : $VARIABLES are env variables replaced by entrypoint.sh using envsubst
# not to be mistaken for nginx variables (also starting with $, but usually lowercase)

# This file is to be included in the main nginx.conf configuration if HTTPS_HOST is set
ssl_session_cache   shared:SSL:10m;
ssl_session_timeout 10m;

# this is the actual HTTPS host
server {
    listen              443 ssl;
    server_name         my_geonode.geonode.org;
    keepalive_timeout   70;

    ssl_certificate     /certificate_symlink/fullchain.pem;
    ssl_certificate_key /certificate_symlink/privkey.pem;
    ssl_protocols       TLSv1 TLSv1.1 TLSv1.2;
    ssl_ciphers         HIGH:!aNULL:!MD5;

    include sites-enabled/*.conf;
}

# if we try to connect from http, we redirect to https
server {
    listen 80;
    server_name  my_geonode.geonode.org; # TODO : once geoserver supports relative urls, we should allow access though both HTTP and HTTPS at the same time and hence remove HTTP_HOST from this line

    # Except for let's encrypt challenge
    location /.well-known {
        alias /geonode-certificates/.well-known;
        include  /etc/nginx/mime.types;
    }

    # Redirect to https
    location / {
    return 302 https://my_geonode.geonode.org/$request_uri; # TODO : we should use 301 (permanent redirect, but not practical for debug)
    }
}
Warning
Save the changes, if any, and exit!
Reload the NGINX configuration
nginx -s reload
2020/06/24 10:00:11 [notice] 112#112: signal process started
/etc/nginx# exit
It may be helpful to disable https to isolate the source of errors. After reverting the HTTPS-related changes in the .env file, repeat the above steps and ensure that the
nginx.http.enabled.conflink has been correctly created.ln -s nginx.conf nginx.http.enabled.conf nano nginx.http.enabled.conf
Customize .env to match your needs
In the case you would like to modify the GeoNode behavior, always use the .env file in order to update the settings.
If you need to change a setting which does not exist in .env, you can force the values inside my_geonode/settings.py
Refer to the section: Settings
You can add here any property referred as
Env:PROPERTY_NAME
Restart the containers
Whenever you change someting on .env file, you will need to rebuild the containers.
Warning
Be careful! The following command drops any change you might have done manually inside the containers, except for the static volumes.
docker-compose up -d django
[Optional] Configure your SSL Certificates
In production deployment mode, GeoNode uses by default Let’s Encrypt certificates
You may want to provide your own certificates to GeoNode
docker exec -it nginx4my_geonode_geonode sh -c 'mkdir /geonode-certificates/my_geonode'

wget --no-check-certificate 'http://<url_to_your_chain.crt>' \
    -O chain.crt

wget --no-check-certificate 'http://<url_to_your_key.key>' \
    -O my_geonode.key

docker cp chain.crt nginx4my_geonode_geonode:/geonode-certificates/my_geonode

docker cp my_geonode.key nginx4my_geonode_geonode:/geonode-certificates/my_geonode

docker-compose exec geonode sh
apk add vim

vim nginx.https.enabled.conf
-ssl_certificate     /certificate_symlink/fullchain.pem;
-ssl_certificate_key /certificate_symlink/privkey.pem;
+ssl_certificate       /geonode-certificates/my_geonode/chain.crt;
+ssl_certificate_key   /geonode-certificates/my_geonode/my_geonode.key;
nginx -s reload
exit