GeoNode Basic Installation
Overview
The followings are the easiest and recommended ways to deploy a full-stack GeoNode server on your host.
First Step: Deploy GeoNode on a local server, running as
http://localhost/service. GeoServer will be also available athttp://localhost/geoserver/Second Step: Deploy GeoNode on a production server, running as
https://my_geonode.geonode.org/service. GeoServer will be also available athttps://my_geonode.geonode.org/geoserver/Third Step: Customize .env to match your needs
Fourth Step: Secure your production deployment; change the admin passwords and OAUth2 keys
Further Production Enhancements
First Step: Deploy GeoNode on a local server (e.g.: http://localhost/)
Ubuntu (18.0 +)
Nota
Recommended version 18.0.4 (Bionic Beaver).
Packages Installation
First, we are going to install all the system packages needed for the GeoNode setup. Login to the target machine and execute the following commands:
sudo apt install -y gdal-bin
sudo apt install -y python3-pip python3-dev python3-virtualenv python3-venv virtualenvwrapper
sudo apt install -y libxml2 libxml2-dev gettext
sudo apt install -y libxslt1-dev libjpeg-dev libpng-dev libpq-dev libgdal-dev
sudo apt install -y software-properties-common build-essential
sudo apt install -y git unzip gcc zlib1g-dev libgeos-dev libproj-dev
sudo apt install -y sqlite3 spatialite-bin libsqlite3-mod-spatialite

# If the following does not work, you can skip it
sudo apt install -y libgdal20
Docker Setup (First time only)
sudo add-apt-repository universe
sudo apt-get update -y
sudo apt-get install -y git-core git-buildpackage debhelper devscripts
sudo apt-get install -y apt-transport-https ca-certificates curl gnupg-agent software-properties-common

curl -fsSL https://download.docker.com/linux/ubuntu/gpg | sudo apt-key add -

sudo add-apt-repository "deb [arch=amd64] https://download.docker.com/linux/ubuntu $(lsb_release -cs) stable"

sudo apt-get update -y
sudo apt-get install -y docker-ce docker-ce-cli containerd.io docker-compose
sudo apt autoremove --purge

sudo usermod -aG docker ${USER}
su ${USER}
CentOS (7.0 +)
Nota
Recommended version 7.0 or higher.
Aviso
Accordingly to the version you use, the packages installation might be a bit different.
Packages Installation
First, we are going to install all the system packages needed for the GeoNode setup. Login to the target machine and execute the following commands:
sudo yum -y install epel-release
sudo yum install -y gdal
sudo yum install -y python3-pip python3-dev python3-virtualenv python3-venv virtualenvwrapper
sudo pip3 install -U pip
sudo pip3 install -U virtualenv
sudo yum install -y libxml2 libxml2-dev gettext
sudo yum install -y libxslt1-dev libjpeg-dev libpng-dev libpq-dev libgdal-dev
sudo yum install -y git unzip gcc zlib1g-dev libgeos-dev libproj-dev

# If the following does not work, you can skip it
sudo apt install -y libgdal20
Docker Setup (First time only)
sudo yum install -y yum-utils device-mapper-persistent-data lvm2
sudo yum-config-manager --add-repo https://download.docker.com/linux/centos/docker-ce.repo
sudo yum install docker-ce docker-ce-cli containerd.io
sudo systemctl start docker

sudo curl -L "https://github.com/docker/compose/releases/download/1.23.1/docker-compose-$(uname -s)-$(uname -m)" -o /usr/local/bin/docker-compose
sudo chmod +x /usr/local/bin/docker-compose

sudo usermod -aG docker ${USER}
su ${USER}
Create an instance of your geonode-project
Let’s say your project is named my_geonode perform the following steps:
git clone https://github.com/GeoNode/geonode-project.git -b 3.2.x

# Ubuntu
source /usr/share/virtualenvwrapper/virtualenvwrapper.sh
mkvirtualenv --python=/usr/bin/python3 my_geonode

Alterantively you can also create the virtual env like below
python3.8 -m venv /home/geonode/dev/.venvs/my_geonode
source /home/geonode/dev/.venvs/my_geonode/bin/activate

pip install Django==3.2

# CentOS
virtualenv -p python3 my_geonode
source my_geonode/bin/activate

django-admin startproject --template=./geonode-project -e py,sh,md,rst,json,yml,ini,env,sample,properties -n monitoring-cron -n Dockerfile my_geonode

# If the previous command does not work for some reason, try the following one
python -m django startproject --template=./geonode-project -e py,sh,md,rst,json,yml,ini,env,sample,properties -n monitoring-cron -n Dockerfile my_geonode
Startup the containers
cd my_geonode
./docker-build.sh
You can follow the containers startup by running the following commands from
my_geonoderoot folder:# GeoNode Container docker-compose logs -f django # GeoServer Container docker-compose logs -f geoserver # DB Container docker-compose logs -f db # NGINX Container docker-compose logs -f geonode
If any error occurs, try to catch the error stacktrace by running the following commands from
my_geonoderoot folder:# GeoNode “entrypoint.sh” Logs tail -F -n 300 invoke.log
Connect to http://localhost/
The startup typically takes some time, so be patient…
If everything goes well, you should be able to see from the geonode startup logs a line similar to the following one:
<some date> [UWSGI] Uwsgi running...
Connect to http://localhost/
The default credentials are:
GeoNode (http://localhost/) admin:
username: adminpassword: adminGeoServer (http://localhost/geoserver/) admin:
username: adminpassword: geoserver
Second Step: Deploy GeoNode on a production server (e.g.: https://my_geonode.geonode.org/)
In the case you would like to deploy to, let’s say, https://my_geonode.geonode.org/, you will need to change .env as follows:
--- geonode-project\.env
+++ my_geonode\.env
@@ -1,7 +1,7 @@
-COMPOSE_PROJECT_NAME={{project_name}}
+COMPOSE_PROJECT_NAME=my_geonode
BACKUPS_VOLUME_DRIVER=local

DOCKER_HOST_IP=
DOCKER_ENV=production
# See https://github.com/geosolutions-it/geonode-generic/issues/28
# to see why we force API version to 1.24
@@ -9,40 +9,40 @@

C_FORCE_ROOT=1
IS_CELERY=false
IS_FIRST_START=true
FORCE_REINIT=false

-SITEURL=http://localhost/
+SITEURL=https://my_geonode.geonode.org/
ALLOWED_HOSTS=['django',]

# LANGUAGE_CODE=pt
# LANGUAGES=(('en','English'),('pt','Portuguese'))

GEONODE_INSTANCE_NAME=geonode
-DJANGO_SETTINGS_MODULE={{project_name}}.settings
-UWSGI_CMD=uwsgi --ini /usr/src/{{project_name}}/uwsgi.ini
+DJANGO_SETTINGS_MODULE=my_geonode.settings
+UWSGI_CMD=uwsgi --ini /usr/src/my_geonode/uwsgi.ini

# #################
# backend
# #################
-GEONODE_DATABASE={{project_name}}
+GEONODE_DATABASE=my_geonode
GEONODE_DATABASE_PASSWORD=geonode
-GEONODE_GEODATABASE={{project_name}}_data
+GEONODE_GEODATABASE=my_geonode_data
GEONODE_GEODATABASE_PASSWORD=geonode

-DATABASE_URL=postgis://{{project_name}}:geonode@db:5432/{{project_name}}
-GEODATABASE_URL=postgis://{{project_name}}_data:geonode@db:5432/{{project_name}}_data
+DATABASE_URL=postgis://my_geonode:geonode@db:5432/my_geonode
+GEODATABASE_URL=postgis://my_geonode_data:geonode@db:5432/my_geonode_data
DEFAULT_BACKEND_DATASTORE=datastore
BROKER_URL=amqp://guest:guest@rabbitmq:5672/

# #################
# geoserver
# #################
-GEOSERVER_WEB_UI_LOCATION=http://localhost/geoserver/
-GEOSERVER_PUBLIC_LOCATION=http://localhost/geoserver/
+GEOSERVER_WEB_UI_LOCATION=https://my_geonode.geonode.org/geoserver/
+GEOSERVER_PUBLIC_LOCATION=https://my_geonode.geonode.org/geoserver/
GEOSERVER_LOCATION=http://geoserver:8080/geoserver/
GEOSERVER_ADMIN_PASSWORD=geoserver

OGC_REQUEST_TIMEOUT=30
OGC_REQUEST_MAX_RETRIES=1
OGC_REQUEST_BACKOFF_FACTOR=0.3
@@ -58,50 +58,50 @@
MOSAIC_ENABLED=False

# #################
# nginx
# HTTPD Server
# #################
-GEONODE_LB_HOST_IP=localhost
+GEONODE_LB_HOST_IP=my_geonode.geonode.org
GEONODE_LB_PORT=80

# IP or domain name and port where the server can be reached on HTTPS (leave HOST empty if you want to use HTTP only)
# port where the server can be reached on HTTPS
-HTTP_HOST=localhost
-HTTPS_HOST=
+HTTP_HOST=
+HTTPS_HOST=my_geonode.geonode.org

HTTP_PORT=80
HTTPS_PORT=443

# Let's Encrypt certificates for https encryption. You must have a domain name as HTTPS_HOST (doesn't work
# with an ip) and it must be reachable from the outside. This can be one of the following :
# disabled : we do not get a certificate at all (a placeholder certificate will be used)
# staging : we get staging certificates (are invalid, but allow to test the process completely and have much higher limit rates)
# production : we get a normal certificate (default)
-LETSENCRYPT_MODE=disabled
+# LETSENCRYPT_MODE=disabled
# LETSENCRYPT_MODE=staging
-# LETSENCRYPT_MODE=production
+LETSENCRYPT_MODE=production

RESOLVER=127.0.0.11

# #################
# Security
# #################
# Admin Settings
ADMIN_PASSWORD=admin
-ADMIN_EMAIL=admin@localhost
+ADMIN_EMAIL=admin@my_geonode.geonode.org

# EMAIL Notifications
EMAIL_ENABLE=False
DJANGO_EMAIL_BACKEND=django.core.mail.backends.smtp.EmailBackend
DJANGO_EMAIL_HOST=localhost
DJANGO_EMAIL_PORT=25
DJANGO_EMAIL_HOST_USER=
DJANGO_EMAIL_HOST_PASSWORD=
DJANGO_EMAIL_USE_TLS=False
DJANGO_EMAIL_USE_SSL=False
-DEFAULT_FROM_EMAIL='GeoNode <no-reply@geonode.org>'
+DEFAULT_FROM_EMAIL='GeoNode <no-reply@my_geonode.geonode.org>'

# Session/Access Control
LOCKDOWN_GEONODE=False
CORS_ORIGIN_ALLOW_ALL=True
SESSION_EXPIRED_CONTROL_ENABLED=True
DEFAULT_ANONYMOUS_VIEW_PERMISSION=True
Restart the containers
Whenever you change someting on .env file, you will need to rebuild the container
Aviso
Be careful! The following command drops any change you might have done manually inside the containers, except for the static volumes.
docker-compose up -d
Troubleshooting
If for some reason you are not able to reach the server on the HTTPS channel, please check the NGINX configuration files below:
Enter the NGINX container
docker-compose exec geonode shInstall an editor if not present
apk add nano
Double check that the
nginx.https.enabled.conflink has been correctly createdls -lah
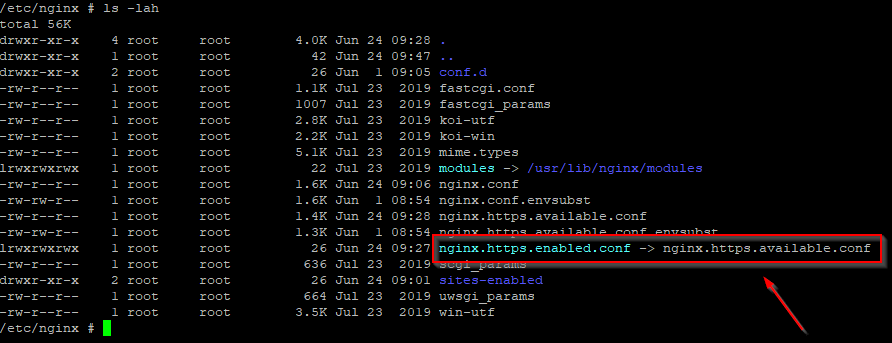
If the list does not match exactly the figure above, please run the following commands, and check again
rm nginx.https.enabled.conf
ln -s nginx.https.available.conf nginx.https.enabled.conf
Inspect the
nginx.https.enabled.confcontentsnano nginx.https.enabled.conf
Make sure the contents match the following
Aviso
Change the Hostname accordingly. This is only an example!
# NOTE : $VARIABLES are env variables replaced by entrypoint.sh using envsubst
# not to be mistaken for nginx variables (also starting with $, but usually lowercase)

# This file is to be included in the main nginx.conf configuration if HTTPS_HOST is set
ssl_session_cache   shared:SSL:10m;
ssl_session_timeout 10m;

# this is the actual HTTPS host
server {
    listen              443 ssl;
    server_name         my_geonode.geonode.org;
    keepalive_timeout   70;

    ssl_certificate     /certificate_symlink/fullchain.pem;
    ssl_certificate_key /certificate_symlink/privkey.pem;
    ssl_protocols       TLSv1 TLSv1.1 TLSv1.2;
    ssl_ciphers         HIGH:!aNULL:!MD5;

    include sites-enabled/*.conf;
}

# if we try to connect from http, we redirect to https
server {
    listen 80;
    server_name  my_geonode.geonode.org; # TODO : once geoserver supports relative urls, we should allow access though both HTTP and HTTPS at the same time and hence remove HTTP_HOST from this line

    # Except for let's encrypt challenge
    location /.well-known {
        alias /geonode-certificates/.well-known;
        include  /etc/nginx/mime.types;
    }

    # Redirect to https
    location / {
    return 302 https://my_geonode.geonode.org/$request_uri; # TODO : we should use 301 (permanent redirect, but not practical for debug)
    }
}
Aviso
Save the changes, if any, and exit!
Reload the NGINX configuration
nginx -s reload
2020/06/24 10:00:11 [notice] 112#112: signal process started
/etc/nginx# exit
It may be helpful to disable https to isolate the source of errors. After reverting the HTTPS-related changes in the .env file, repeat the above steps and ensure that the
nginx.http.enabled.conflink has been correctly created.ln -s nginx.conf nginx.http.enabled.conf nano nginx.http.enabled.conf
Third Step: Customize .env to match your needs
In the case you would like to modify the GeoNode behavior, always use the .env file in order to update the settings.
If you need to change a setting which does not exist in .env, you can force the values inside my_geonode/settings.py
Refer to the section: Settings
You can add here any property referred as
Env:PROPERTY_NAME
Restart the containers
Whenever you change someting on .env file, you will need to rebuild the containers.
Aviso
Be careful! The following command drops any change you might have done manually inside the containers, except for the static volumes.
docker-compose up -d django
Fourth Step: Secure your production deployment; change the admin passwords and OAUth2 keys
GeoServer Setup
OAUth2 REST API Key
Nota
In order to generate new strong random passwords you can use an online service like https://passwordsgenerator.net/
Avoid using Symbols ( e.g. @#$% ) as they might conflict with .env file
OAUth2 REST API Key Update
Update the passwords and keys on .env file
Nota
In order to generate new strong random passwords you can use an online service like https://passwordsgenerator.net/
Avoid using Symbols ( e.g. @#$% ) as they might conflict with .env file
--- my_geonode\.env
+++ my_geonode\.prod.env
@@ -6,13 +6,13 @@
# See https://github.com/geosolutions-it/geonode-generic/issues/28
# to see why we force API version to 1.24
DOCKER_API_VERSION="1.24"

C_FORCE_ROOT=1
IS_CELERY=false
-IS_FIRST_START=true
+IS_FIRST_START=false
FORCE_REINIT=false

SITEURL=https://my_geonode.geonode.org/
ALLOWED_HOSTS=['django',]

# LANGUAGE_CODE=pt
@@ -38,13 +38,14 @@
# #################
# geoserver
# #################
GEOSERVER_WEB_UI_LOCATION=https://my_geonode.geonode.org/geoserver/
GEOSERVER_PUBLIC_LOCATION=https://my_geonode.geonode.org/geoserver/
GEOSERVER_LOCATION=http://geoserver:8080/geoserver/
-GEOSERVER_ADMIN_PASSWORD=geoserver
+GEOSERVER_ADMIN_USER=admin
+GEOSERVER_ADMIN_PASSWORD=<new_geoserver_admin_password>

OGC_REQUEST_TIMEOUT=30
OGC_REQUEST_MAX_RETRIES=1
OGC_REQUEST_BACKOFF_FACTOR=0.3
OGC_REQUEST_POOL_MAXSIZE=10
OGC_REQUEST_POOL_CONNECTIONS=10
@@ -84,13 +85,13 @@
RESOLVER=127.0.0.11

# #################
# Security
# #################
# Admin Settings
-ADMIN_PASSWORD=admin
+ADMIN_PASSWORD=<new_geonode_admin_password>
ADMIN_EMAIL=admin@my_geonode.geonode.org

# EMAIL Notifications
EMAIL_ENABLE=False
DJANGO_EMAIL_BACKEND=django.core.mail.backends.smtp.EmailBackend
DJANGO_EMAIL_HOST=localhost
@@ -114,15 +115,15 @@
ACCOUNT_CONFIRM_EMAIL_ON_GET=False
ACCOUNT_EMAIL_VERIFICATION=optional
ACCOUNT_EMAIL_CONFIRMATION_EMAIL=False
ACCOUNT_EMAIL_CONFIRMATION_REQUIRED=False

# OAuth2
-OAUTH2_API_KEY=
-OAUTH2_CLIENT_ID=Jrchz2oPY3akmzndmgUTYrs9gczlgoV20YPSvqaV
-OAUTH2_CLIENT_SECRET=rCnp5txobUo83EpQEblM8fVj3QT5zb5qRfxNsuPzCqZaiRyIoxM4jdgMiZKFfePBHYXCLd7B8NlkfDBY9HKeIQPcy5Cp08KQNpRHQbjpLItDHv12GvkSeXp6OxaUETv3
+OAUTH2_API_KEY=<new_OAUTH2_API_KEY>
+OAUTH2_CLIENT_ID=<new_OAUTH2_CLIENT_ID>
+OAUTH2_CLIENT_SECRET=<new_OAUTH2_CLIENT_SECRET>

# GeoNode APIs
API_LOCKDOWN=False
TASTYPIE_APIKEY=

# #################
[Optional] Update your SSH Certificates
In production deployment mode, GeoNode uses by default Let’s Encrypt certificates
You may want to provide your own certificates to GeoNode
docker exec -it nginx4my_geonode_geonode sh -c 'mkdir /geonode-certificates/my_geonode'

wget --no-check-certificate 'http://<url_to_your_chain.crt>' \
    -O chain.crt

wget --no-check-certificate 'http://<url_to_your_key.key>' \
    -O my_geonode.key

docker cp chain.crt nginx4my_geonode_geonode:/geonode-certificates/my_geonode

docker cp my_geonode.key nginx4my_geonode_geonode:/geonode-certificates/my_geonode

docker-compose exec geonode sh
apk add vim

vim nginx.https.enabled.conf
-ssl_certificate     /certificate_symlink/fullchain.pem;
-ssl_certificate_key /certificate_symlink/privkey.pem;
+ssl_certificate       /geonode-certificates/my_geonode/chain.crt;
+ssl_certificate_key   /geonode-certificates/my_geonode/my_geonode.key;
nginx -s reload
exit
Restart the GeoNode and NGINX containers
Whenever you change someting on .env file, you will need to rebuild the container
Aviso
Be careful! The following command drops any change you might have done manually inside the containers, except for the static volumes.
docker-compose up -d django
docker-compose restart geonode
Further Production Enhancements
GeoServer Production Settings
JVM Settings: Memory And GeoServer Options
The .env file provides a way to customize GeoServer JVM Options.
The variable GEOSERVER_JAVA_OPTS allows you to tune-up the GeoServer container and to enable specific GeoServer options.
GEOSERVER_JAVA_OPTS=
    -Djava.awt.headless=true -Xms2G -Xmx4G -XX:PerfDataSamplingInterval=500
    -XX:SoftRefLRUPolicyMSPerMB=36000 -XX:-UseGCOverheadLimit -XX:+UseConcMarkSweepGC
    -XX:+UseParNewGC -XX:ParallelGCThreads=4 -Dfile.encoding=UTF8 -Djavax.servlet.request.encoding=UTF-8
    -Djavax.servlet.response.encoding=UTF-8 -Duser.timezone=GMT
    -Dorg.geotools.shapefile.datetime=false -DGEOSERVER_CSRF_DISABLED=true -DPRINT_BASE_URL=http://geoserver:8080/geoserver/pdf
-Djava.awt.headless (true)
Work with graphics-based applications in Java without an actual display, keyboard, or mouse A typical use case of UI components running in a headless environment could be an image converter app. Though it needs graphics data for image processing, a display is not really necessary. The app could be run on a server and converted files saved or sent over the network to another machine for display.
-Xms2G -Xmx4G
This means that your JVM will be started with Xms amount of memory and will be able to use a maximum of Xmx amount of memory. Above will start a JVM like with 2 GB of memory and will allow the process to use up to 4 GB of memory. You need to adjust this value depening on your availabnle RAM.
-DGEOSERVER_CSRF_DISABLED (True)
The GeoServer web admin employs a CSRF (Cross-Site Request Forgery) protection filter that will block any form submissions that didn’t appear to originate from GeoServer. This can sometimes cause problems for certain proxy configurations. You can disable the CSRF filter by setting the GEOSERVER_CSRF_DISABLED property to true. https://docs.geoserver.org/stable/en/user/security/webadmin/csrf.html
Whenever you need to change one or more of the JVM options, you will need to restart the GeoServer Docker container.
# Hard restart of the container: the only way to update the .env variables
docker-compose up -d geoserver
This command will preserve all the GeoServer configuration and data, since the GEOSERVER_DATA_DIR is stored on a Docker static volume.
Nevertheless, any change you have made manually to the container, e.g. added a new plugin to GeoServer or updated some JARs into the WEB-INF/lib library folder, will be lost.
You will need to add the JARs again and restart GeoServer softly
# Soft restart of the container: the .env variables won't be updated
docker-compose restart geoserver
Global And Services Settings
Check the GeoServer Memory usage and status; ensure the
GEOSERVER_DATA_DIRpath points to the static volume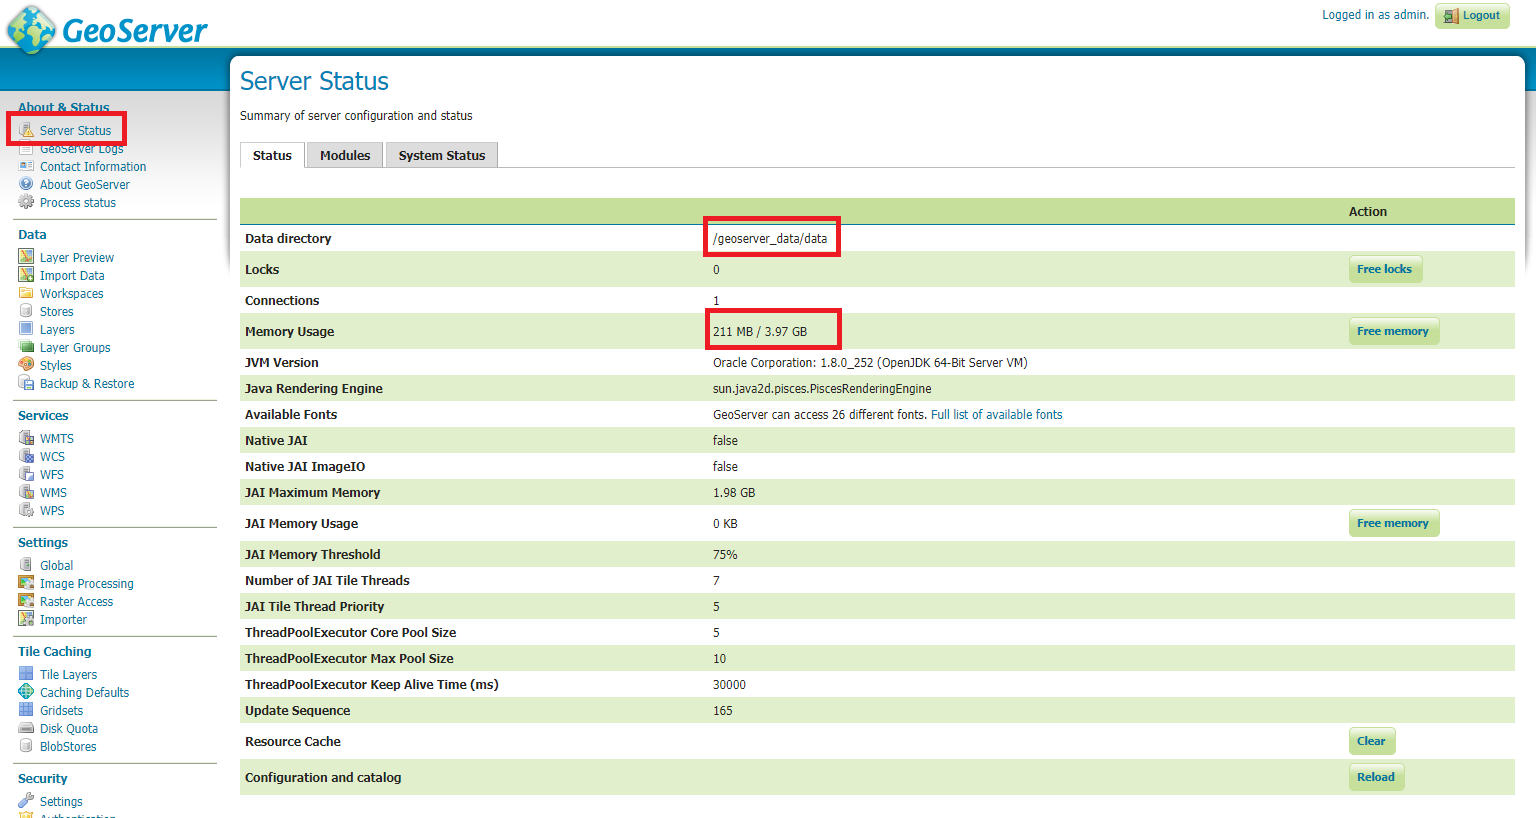
GeoServer Status
GeoServer Global Settings; make sure the
Proxy Base Urlpoints to the publlc URL and theLOGGINGlevels are set to Production Mode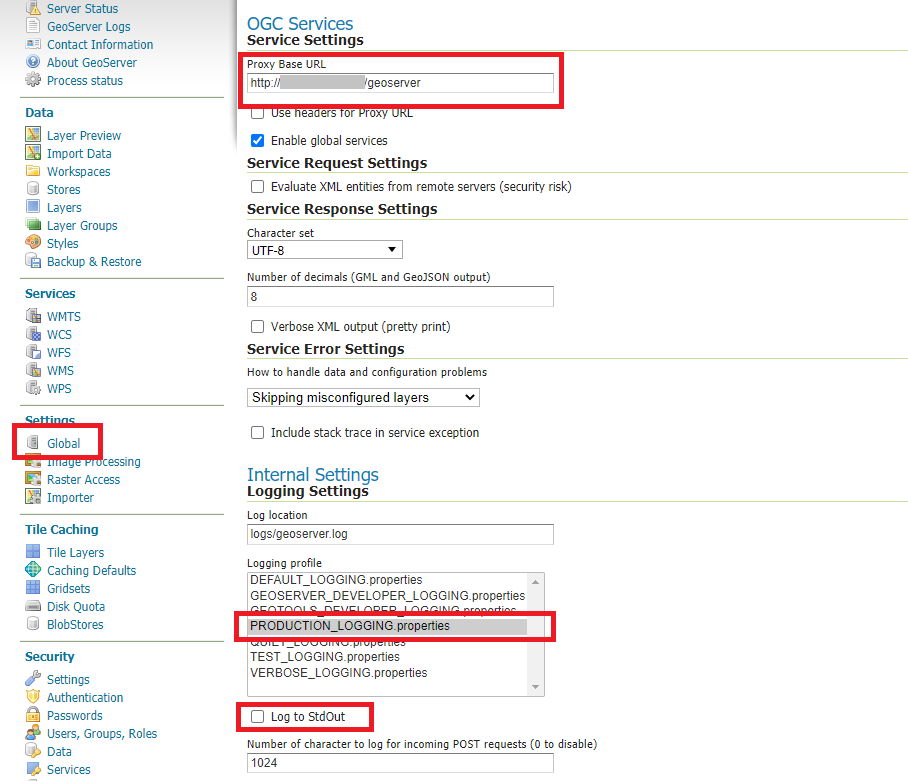
Global Settings
GeoServer Image Processing Settings; unless you are using some specific renderer or GeoServer plugin, use the following recommended options
Nota
Further details at https://docs.geoserver.org/stable/en/user/configuration/image_processing/index.html#image-processing
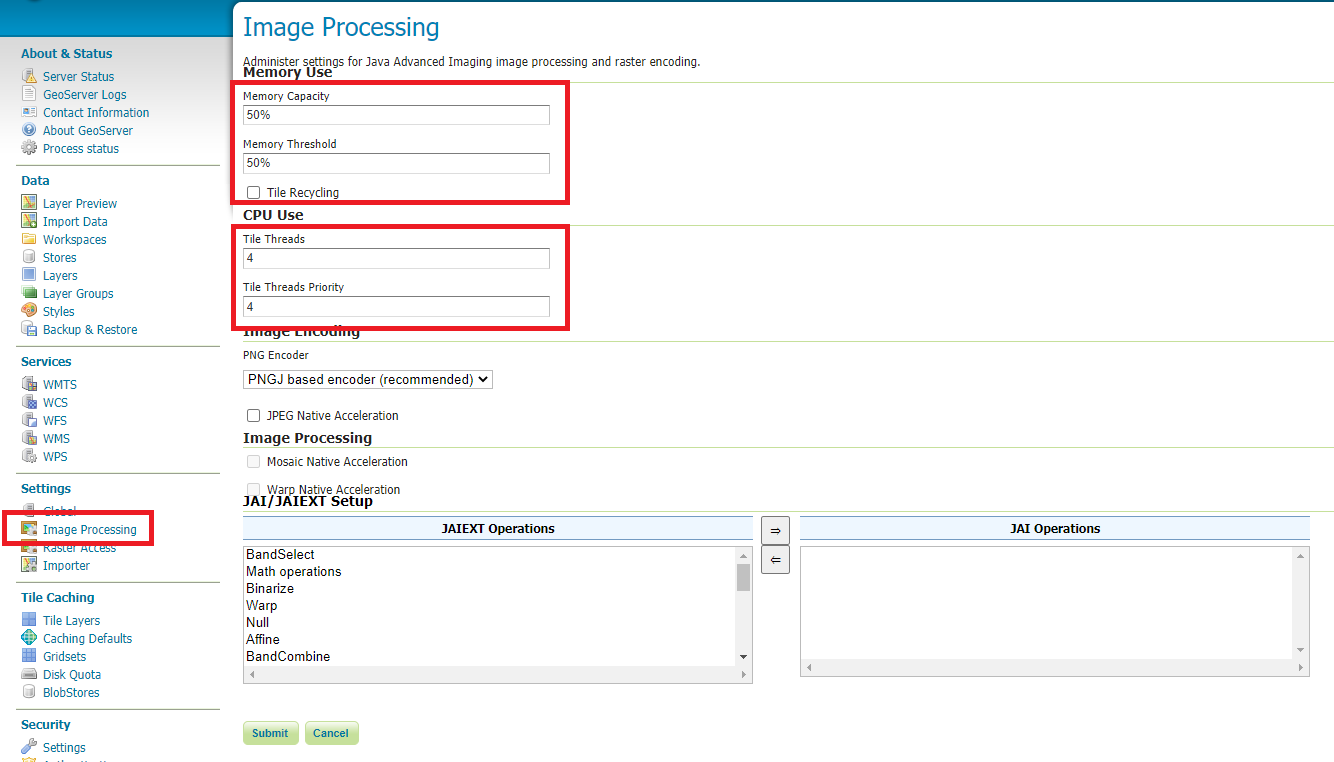
Image Processing Settings
Tune up GeoServer Services Configuration; WCS, WFS, WMS and WPS;
WCS: Update the limits accordingly to your needs. Do not use very high values, this will set GeoServer prone to DoS Attacks.
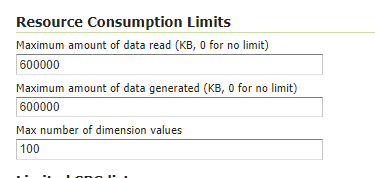
WCS Resource Consuption Limits
WMS: Specify here the SRS List you are going to use. Empty means all the ones supported by GeoServer, but be carefull since the
GetCapabilitiesoutput will become huge.
WMS Supported SRS List
WMS: Raster Rendering Options allows you to tune up the WMS output for better performance or quality. Best Performance:
Nearest Neighbour- Best Quality:BicubicAviso
Raster Images should be always optimized before ingested into GeoNode. The general recommendation is to never upload a non-processed GeoTIFF image to GeoNode.
Further details at:
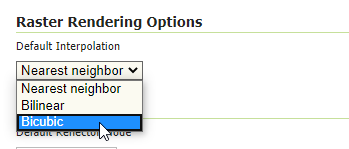
WMS Raster Rendering Options
WMS: Update the limits accordingly to your needs. Do not use very high values, this will set GeoServer prone to DoS Attacks.
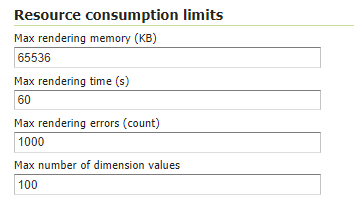
WMS Resource Consuption Limits
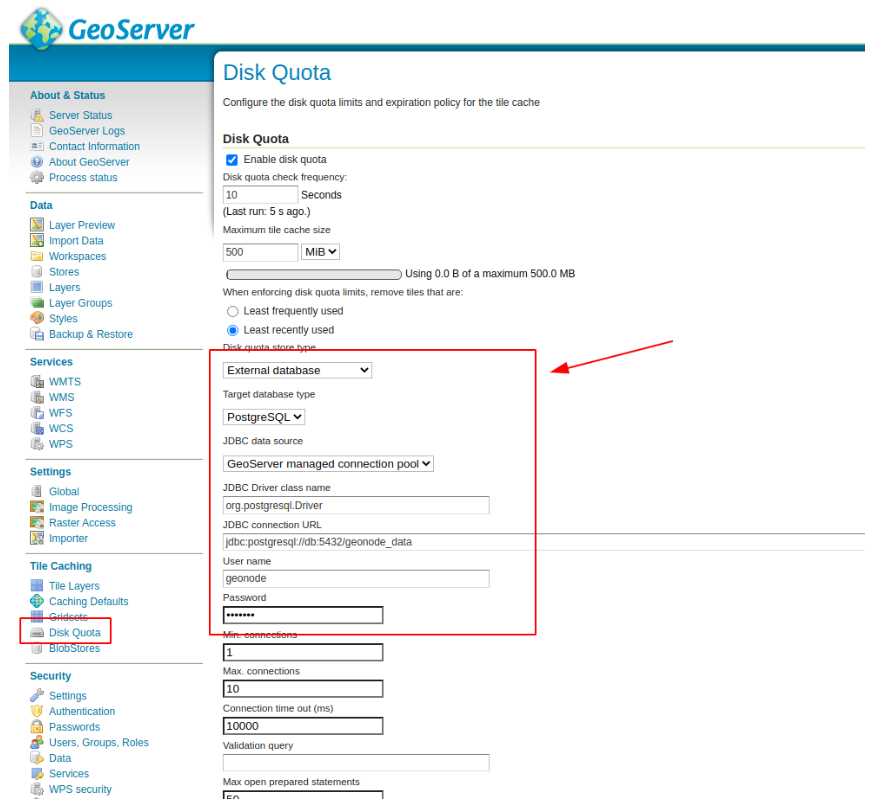
GeoWebCache DiskQuota On Postgis
By default GeoWebCache DiskQuota is disabled. That means that the layers cache might potentially grow up indefinitely.
GeoWebCache DiskQuota should be always enabled on a production system. In the case it is enabled, this must be configured to make use of a DB engine like Postgis to store its indexes.
First of all ensure Tile Caching is enabled on all available layers
Nota
GeoNode tipically does this automatically for you. It is worth to double check anyway.
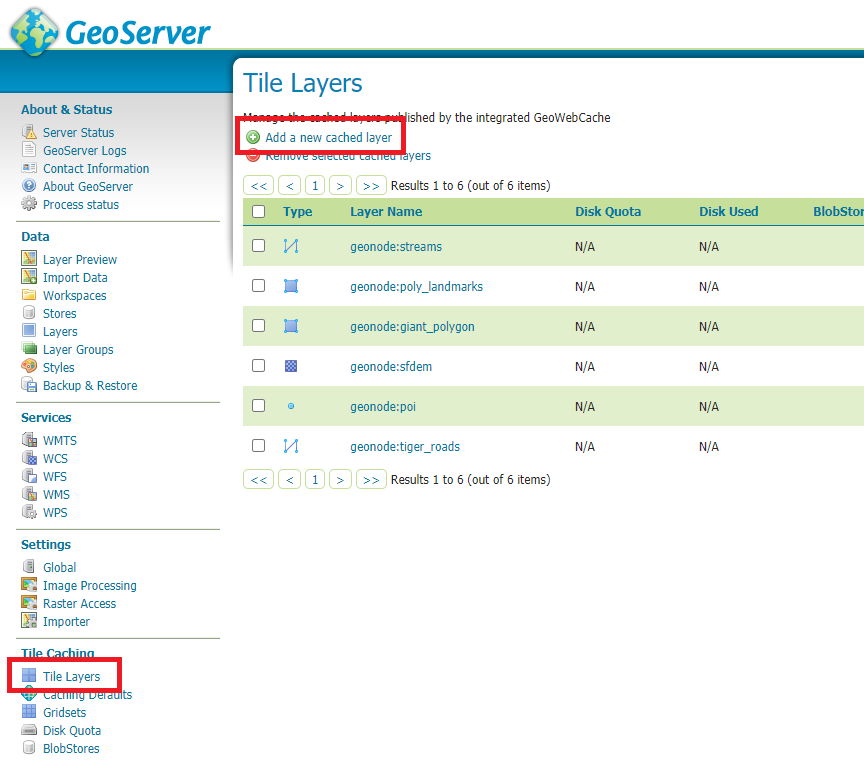
Tile Caching: Tiled Layers
Configure Disk Quota by providing the connection string to the DB Docker Container as specified in the .env file
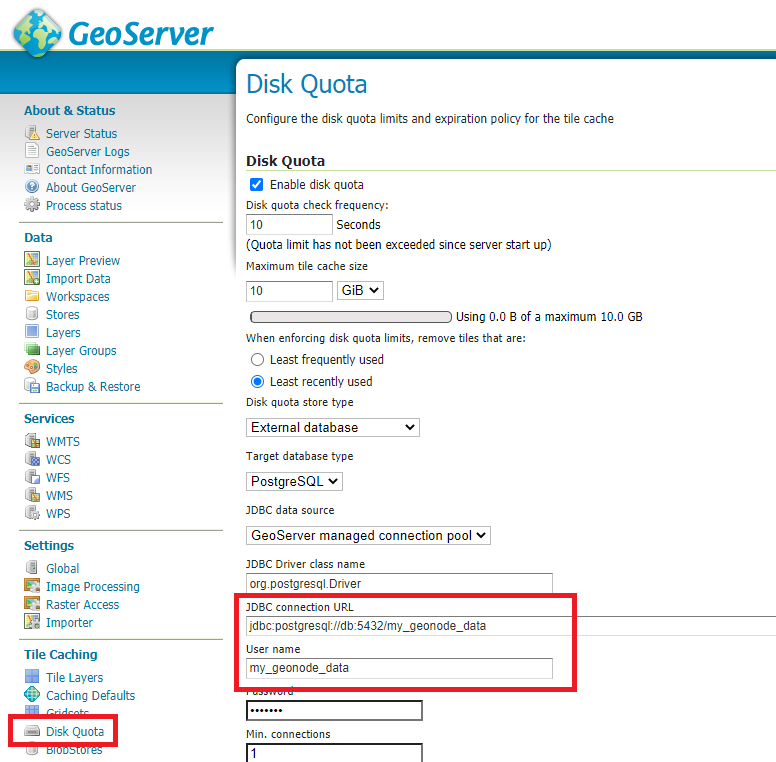
Tile Caching: Disk Quota Configuration
GeoFence Security Rules On Postgis
By default GeoFence stores the security rules on an H2 db.
On a production system, this is not really recommended. You will need to update the GeoServer Docker container in order to enable GeoFence storing the rules into the DB Docker Container instead.
In order to do that, follow the procedure below:
# Enter the GeoServer Docker Container
docker-compose exec geoserver bash

# Install a suitable editor
apt update
apt install nano

# Edit the GeoFence DataStore .properties file
nano /geoserver_data/data/geofence/geofence-datasource-ovr.properties
Nota
Make sure to provide the same connection parameters specified in the .env file
geofenceVendorAdapter.databasePlatform=org.hibernatespatial.postgis.PostgisDialect
geofenceDataSource.driverClassName=org.postgresql.Driver
geofenceDataSource.url=jdbc:postgresql://db:5432/my_geonode_data
geofenceDataSource.username=my_geonode_data
geofenceDataSource.password=********
geofenceEntityManagerFactory.jpaPropertyMap[hibernate.default_schema]=public
# Update the GeoServer WEB-INF/lib JARs accordingly
wget --no-check-certificate "https://www.dropbox.com/s/psolxleimaft0t7/postgis-jdbc-1.3.3.jar?dl=1" -O postgis-jdbc-1.3.3.jar && \
wget --no-check-certificate "https://www.dropbox.com/s/ilowu1vd27j2cs1/hibernate-spatial-postgis-1.1.3.2.jar?dl=1" -O hibernate-spatial-postgis-1.1.3.2.jar && \
rm /usr/local/tomcat/webapps/geoserver/WEB-INF/lib/hibernate-spatial-h2-geodb-1.1.3.1.jar && \
mv hibernate-spatial-postgis-1.1.3.2.jar /usr/local/tomcat/webapps/geoserver/WEB-INF/lib/ && \
mv postgis-jdbc-1.3.3.jar /usr/local/tomcat/webapps/geoserver/WEB-INF/lib/
The container is ready to be restarted now.
Aviso
Remember to do a soft restart otherwise the WEB-INF/lib JARs will be reset to the original state
# Exit the GeoServer container
exit

# Soft Restart GeoServer Docker Container
docker-compose restart geoserver
IMPORTANT: The first time you perform this procedure, GeoFence won’t be able to retrieve the old security rules anymore.
You will need to Fixup GeoNode Layers Permissions in order to regenerate the security rules.
Fixup GeoNode Layers Permissions
The list of the GeoFence Security Rules is available from the GeoFence Data Rules section.
Always double check the list is accessible and the data rules are there. If empty, no layer will be accessible by standard users other than admin.
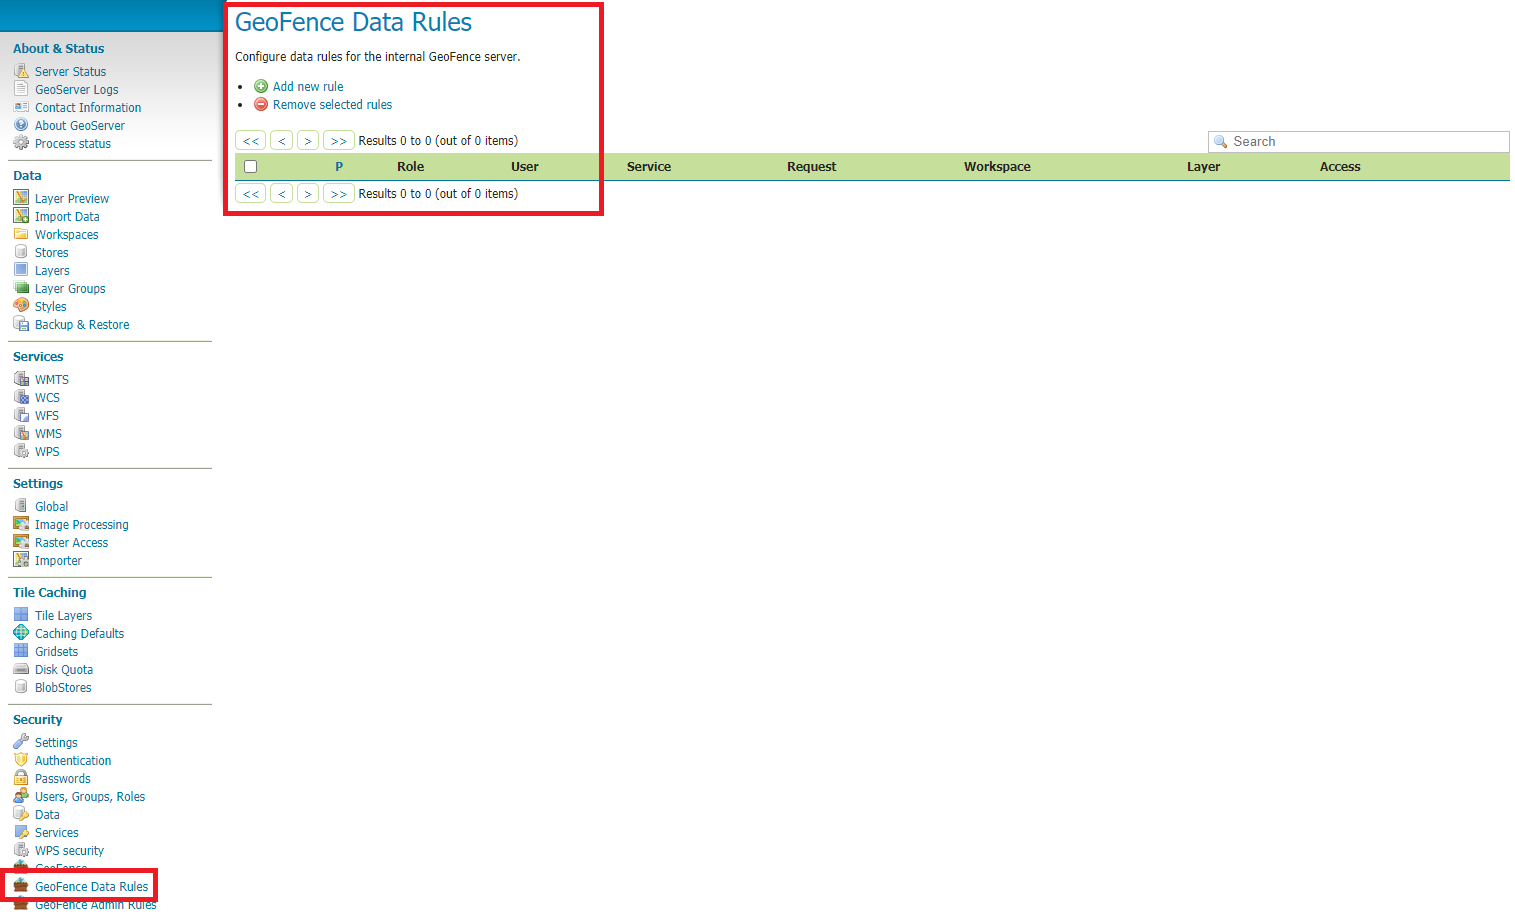
GeoFence Data Rules
In order to re-sync the GeoFence security rules, follow the procedure below:
# Enter the GeoNode Docker Container
docker-compose exec django bash

# Run the `sync_geonode_layers` management command
./manage.sh sync_geonode_layers --updatepermissions
Regenerate GeoNode Layers Thumbnails
The following procedure allows you to batch regenerate all Layers Thumbnails:
# Enter the GeoNode Docker Container
docker-compose exec django bash

# Run the `sync_geonode_layers` management command
./manage.sh sync_geonode_layers --updatethumbnails
Fixup GeoNode Layers Metadata And Download Links
The following procedure allows you to fix-up broken or incorrect Metadata Links:
# Enter the GeoNode Docker Container
docker-compose exec django bash

# Run the `set_all_layers_metadata` management command
./manage.sh set_all_layers_metadata -d
It is also possible to force purging the links before regenerating:
# Enter the GeoNode Docker Container
docker-compose exec django bash

# Run the `set_all_layers_metadata` management command
./manage.sh set_all_layers_metadata -d --prune
Migrate GeoNode To A New Hostname
In the case you will need to move your instance to another domain, as an example from https://my_geonode.geonode.org/ to https://prod_geonode.geonode.org/, follow the procedure below:
Update the .env file by specifyig the new name accordingly.
Restart the GeoNode Docker Container.
docker-compose up -d geonode
Run the following management commands from inside the GeoNode Docker Container.
# Enter the GeoNode Docker Container
docker-compose exec django bash

# Run the `migrate_baseurl` management command
./manage.sh migrate_baseurl --source-address=my_geonode.geonode.org --target-address=prod_geonode.geonode.org

# Run the `set_all_layers_metadata` management command
./manage.sh set_all_layers_metadata -d
Add Huge Or DB Datasets To Your Instance
Uploaing huge datasets, or DB tables, to GeoNode from the Web Upload Interface is not really possible sometimes.
The suggested procedure in such cases is the following one:
Add the dataset to GeoServer first directly.
You must upload the data into the GeoServer Docker Container Static Volume first and then adding manually the layer throught the GeoServer Admin GUI.
Once the dataset is correctly configured on GeoServer, run the following management command from inside the GeoNode Docker Container
# Enter the GeoNode Docker Container
docker-compose exec django bash

# Run the `updatelayers` management command
./manage.sh updatelayers -w <workspace_name> -f <layer_name>
Update GeoNode Core To The Latest Commit
In the case you will need to update the GeoNode Core codebase to a specific version or commit, please follow the steps below:
# Enter the GeoNode Docker Container
docker-compose exec django bash

# Update GeoNode
cd /usr/src/geonode/
git fetch --all --prune
git checkout <commit or branch>

# Update the pip dependencies
pip install -r requirements.txt --upgrade --no-cache
pip install -e . --upgrade

# Synchronize the GeoNode Project
cd /usr/src/my_geonode/
./manage.sh makemigrations
./manage.sh migrate
./manage.sh collectstatic

# Refresh UWSGI Daemons
touch /usr/src/my_geonode/my_geonode/wsgi.py

# Follow the logs and make sure non errors occur
tail -F -n 30 /var/log/geonode.log