GeoNode Core
Overview
The following steps will guide you to a fresh setup of GeoNode.
All guides will first install and configure the system to run it in DEBUG mode (also known as DEVELOPMENT mode)
and then by configuring an HTTPD server to serve GeoNode through the standard HTTP (80) port.
Aviso
Those guides are not meant to be used on a production system.
There will be dedicated chapters that will show you some hints to optimize GeoNode for a production-ready machine.
In any case, we strongly suggest to task an experienced DevOp or System Administrator before exposing your server to the WEB.
Ubuntu 20.04LTS
This part of the documentation describes the complete setup process for GeoNode on an Ubuntu 20.04LTS 64-bit clean environment (Desktop or Server).
All examples use shell commands that you must enter on a local terminal or a remote shell.
If you have a graphical desktop environment you can open the terminal application after login;
if you are working on a remote server the provider or sysadmin should has given you access through an ssh client.
1. Install the dependencies
In this section, we are going to install all the basic packages and tools needed for a complete GeoNode installation.
Aviso
To follow this guide, a basic knowledge about Ubuntu Server configuration and working with a shell is required.
Nota
This guide uses vim as the editor; fill free to use nano, gedit or others.
Upgrade system packages
Check that your system is already up-to-date with the repository running the following commands:
sudo add-apt-repository ppa:ubuntugis/ubuntugis-unstable
sudo apt update -y; sudo apt upgrade -y;
Packages Installation
Nota
You don’t need to install the system packages if you want to run the project using Docker
We will use example.org as fictitious Domain Name.
First, we are going to install all the system packages needed for the GeoNode setup. Login to the target machine and execute the following commands:
# Install packages from GeoNode core
sudo apt install -y build-essential gdal-bin \
    python3.8-dev python3.8-venv virtualenvwrapper \
    libxml2 libxml2-dev gettext \
    libxslt1-dev libjpeg-dev libpng-dev libpq-dev libgdal-dev \
    software-properties-common build-essential \
    git unzip gcc zlib1g-dev libgeos-dev libproj-dev \
    sqlite3 spatialite-bin libsqlite3-mod-spatialite libsqlite3-dev

# Install Openjdk
sudo apt install openjdk-8-jdk-headless default-jdk-headless -y
sudo update-java-alternatives --jre-headless --jre --set java-1.8.0-openjdk-amd64

# Verify GDAL version
gdalinfo --version
  $> GDAL 3.0.4, released 2020/01/28

# Verify Python version
python3.8 --version
  $> Python 3.8.5

which python3.8
  $> /usr/bin/python3.8

# Verify Java version
java -version
  $> openjdk version "1.8.0_265"
  $> OpenJDK Runtime Environment (build 1.8.0_265-8u265-b01-0ubuntu2~20.04-b01)
  $> OpenJDK 64-Bit Server VM (build 25.265-b01, mixed mode)

# Install VIM
sudo apt install -y vim

# Cleanup the packages
sudo apt update -y; sudo apt upgrade -y; sudo apt autoremove --purge
Aviso
GeoNode 3.x is not compatible with Python < 3.7
2. GeoNode Installation
This is the most basic installation of GeoNode. It won’t use any external server like Apache Tomcat, PostgreSQL or HTTPD.
First of all we need to prepare a new Python Virtual Environment
Since geonode needs a large number of different python libraries and packages, its recommended to use a python virtual environment to avoid conflicts on dependencies with system wide python packages and other installed software. See also documentation of Virtualenvwrapper package for more information
Nota
The GeoNode Virtual Environment must be created only the first time. You won’t need to create it again everytime.
which python3.8  # copy the path of python executable

# Create the GeoNode Virtual Environment (first time only)
export WORKON_HOME=~/.virtualenvs
source /usr/share/virtualenvwrapper/virtualenvwrapper.sh
mkvirtualenv --python=/usr/bin/python3.8 geonode  # Use the python path from above

# Alterantively you can also create the virtual env like below
mkdir -p ~/.virtualenvs
python3.8 -m venv ~/.virtualenvs/geonode
source ~/.virtualenvs/geonode/bin/activate
At this point your command prompt shows a (geonode) prefix, this indicates that your virtualenv is active.
Nota
The next time you need to access the Virtual Environment just run
source /usr/share/virtualenvwrapper/virtualenvwrapper.sh
workon geonode

# Alterantively you can also create the virtual env like below
source ~/.virtualenvs/geonode/bin/activate
Nota
In order to save permanently the virtualenvwrapper environment
vim ~/.bashrc

# Write to the bottom of the file the following lines
export WORKON_HOME=~/.virtualenvs
source /usr/share/virtualenvwrapper/virtualenvwrapper.sh
# Let's create the GeoNode core base folder and clone it
sudo mkdir -p /opt/geonode/; sudo usermod -a -G www-data $USER; sudo chown -Rf $USER:www-data /opt/geonode/; sudo chmod -Rf 775 /opt/geonode/

# Clone the GeoNode source code on /opt/geonode
cd /opt; git clone https://github.com/GeoNode/geonode.git -b 3.2.x geonode
# Install the Python packages
cd /opt/geonode
pip install -r requirements.txt --upgrade --no-cache --no-cache-dir
pip install -e . --upgrade
pip install pygdal=="`gdal-config --version`.*"
3. Postgis database Setup
Be sure you have successfully completed all the steps of the section 1. Install the dependencies.
In this section, we are going to setup users and databases for GeoNode in PostgreSQL.
Install and Configure the PostgreSQL Database System
In this section we are going to install the PostgreSQL packages along with the PostGIS extension. Those steps must be done only if you don’t have the DB already installed on your system.
# Ubuntu 20.04 (focal)
sudo sh -c 'echo "deb http://apt.postgresql.org/pub/repos/apt/ `lsb_release -cs`-pgdg main" >> /etc/apt/sources.list.d/pgdg.list'
sudo wget --no-check-certificate --quiet -O - https://www.postgresql.org/media/keys/ACCC4CF8.asc | sudo apt-key add -
sudo apt update -y; sudo apt install -y postgresql-13 postgresql-13-postgis-3 postgresql-13-postgis-3-scripts postgresql-13 postgresql-client-13
We now must create two databases, geonode and geonode_data, belonging to the role geonode.
Aviso
This is our default configuration.
You can use any database or role you need.
The connection parameters must be correctly configured on settings, as we will see later in this section.
Databases and Permissions
First, create the geonode user. GeoNode is going to use this user to access the database
sudo service postgresql start
sudo -u postgres createuser -P geonode

# Use the password: geonode
You will be prompted asked to set a password for the user. Enter geonode as password.
Aviso
This is a sample password used for the sake of simplicity. This password is very weak and should be changed in a production environment.
Create database geonode and geonode_data with owner geonode
sudo -u postgres createdb -O geonode geonode
sudo -u postgres createdb -O geonode geonode_data
Next let’s create PostGIS extensions
sudo -u postgres psql -d geonode -c 'CREATE EXTENSION postgis;'
sudo -u postgres psql -d geonode -c 'GRANT ALL ON geometry_columns TO PUBLIC;'
sudo -u postgres psql -d geonode -c 'GRANT ALL ON spatial_ref_sys TO PUBLIC;'
sudo -u postgres psql -d geonode -c 'GRANT ALL PRIVILEGES ON ALL TABLES IN SCHEMA public TO geonode;'
sudo -u postgres psql -d geonode -c 'GRANT ALL PRIVILEGES ON ALL SEQUENCES IN SCHEMA public TO geonode;'

sudo -u postgres psql -d geonode_data -c 'CREATE EXTENSION postgis;'
sudo -u postgres psql -d geonode_data -c 'GRANT ALL ON geometry_columns TO PUBLIC;'
sudo -u postgres psql -d geonode_data -c 'GRANT ALL ON spatial_ref_sys TO PUBLIC;'
sudo -u postgres psql -d geonode_data -c 'GRANT ALL PRIVILEGES ON ALL TABLES IN SCHEMA public TO geonode;'
sudo -u postgres psql -d geonode_data -c 'GRANT ALL PRIVILEGES ON ALL SEQUENCES IN SCHEMA public TO geonode;'
Final step is to change user access policies for local connections in the file pg_hba.conf
sudo vim /etc/postgresql/13/main/pg_hba.conf
Scroll down to the bottom of the document. We want to make local connection trusted for the default user.
Make sure your configuration looks like the one below.
...
# DO NOT DISABLE!
# If you change this first entry you will need to make sure that the
# database superuser can access the database using some other method.
# Noninteractive access to all databases is required during automatic
# maintenance (custom daily cronjobs, replication, and similar tasks).
#
# Database administrative login by Unix domain socket
local   all             postgres                                trust

# TYPE  DATABASE        USER            ADDRESS                 METHOD

# "local" is for Unix domain socket connections only
local   all             all                                     md5
# IPv4 local connections:
host    all             all             127.0.0.1/32            md5
# IPv6 local connections:
host    all             all             ::1/128                 md5
# Allow replication connections from localhost, by a user with the
# replication privilege.
local   replication     all                                     peer
host    replication     all             127.0.0.1/32            md5
host    replication     all             ::1/128                 md5
Aviso
If your PostgreSQL database resides on a separate/remote machine, you’ll have to allow remote access to the databases in the /etc/postgresql/13/main/pg_hba.conf to the geonode user and tell PostgreSQL to accept non-local connections in your /etc/postgresql/13/main/postgresql.conf file
Restart PostgreSQL to make the change effective.
sudo service postgresql restart
PostgreSQL is now ready. To test the configuration, try to connect to the geonode database as geonode role.
psql -U postgres geonode
# This should not ask for any password

psql -U geonode geonode
# This should ask for the password geonode

# Repeat the test with geonode_data DB
psql -U postgres geonode_data
psql -U geonode geonode_data
4. Install GeoServer
In this section, we are going to install the Apache Tomcat 8 Servlet Java container, which will be started by default on the internal port 8080.
We will also perform several optimizations to:
Correctly setup the Java VM Options, like the available heap memory and the garbage collector options.
Externalize the
GeoServerandGeoWebcachecatalogs in order to allow further updates without the risk of deleting our datasets.
Nota
This is still a basic setup of those components. More details will be provided on sections of the documentation concerning the hardening of the system in a production environment. Nevertheless, you will need to tweak a bit those settings accordingly with your current system. As an instance, if your machine does not have enough memory, you will need to lower down the initial amount of available heap memory. Warnings and notes will be placed below the statements that will require your attention.
Install Apache Tomcat 9 (ref. https://yallalabs.com/linux/ubuntu/how-to-install-apache-tomcat-9-ubuntu-20-04/)
Aviso
Apache Tomcat 9 requires Java 8 or newer to be installed on the server. Check the steps before in order to be sure you have OpenJDK 8 correctly installed on your system.
First, it is not recommended to run Apache Tomcat as user root, so we will create a new system user which will run the Apache Tomcat server
sudo useradd -m -U -d /opt/tomcat -s /bin/bash tomcat
sudo usermod -a -G www-data tomcat
Aviso
Now, go to the official Apache Tomcat website and download the most recent version of the software to your server. But don’t use Tomcat10 because there are still some errors between Geoserver and Tomcat.
VERSION=9.0.48; wget https://www-eu.apache.org/dist/tomcat/tomcat-9/v${VERSION}/bin/apache-tomcat-${VERSION}.tar.gz
Once the download is complete, extract the tar file to the /opt/tomcat directory:
sudo tar -xf apache-tomcat-${VERSION}.tar.gz -C /opt/tomcat/; rm apache-tomcat-${VERSION}.tar.gz
Apache Tomcat is updated regulary. So, to have more control over versions and updates, we’ll create a symbolic link as below:
sudo ln -s /opt/tomcat/apache-tomcat-${VERSION} /opt/tomcat/latest
Now, let’s change the ownership of all Apache Tomcat files as below:
sudo chown -R tomcat:www-data /opt/tomcat/
Make the shell scripts inside the bin directory executable:
sudo sh -c 'chmod +x /opt/tomcat/latest/bin/*.sh'
Create the a systemd file with the following content:
# Check the correct JAVA_HOME location
JAVA_HOME=$(readlink -f /usr/bin/java | sed "s:bin/java::")
echo $JAVA_HOME
  $> /usr/lib/jvm/java-8-openjdk-amd64/jre/

# Let's create a symbolic link to the JRE
sudo ln -s /usr/lib/jvm/java-8-openjdk-amd64/jre/ /usr/lib/jvm/jre

# Let's create the tomcat service
sudo vim /etc/init.d/tomcat9
#!/bin/bash

### BEGIN INIT INFO
# Provides:             tomcat9
# Required-Start:       $local_fs $remote_fs $network $time
# Required-Stop:        $local_fs $remote_fs $network $time
# Should-Start:         $syslog
# Should-Stop:          $syslog
# Default-Start:        2 3 4 5
# Default-Stop:         0 1 6
# Short-Description:    Apache Tomcat init script
### END INIT INFO

#Location of JAVA_HOME (bin files)
export JAVA_HOME=/usr/lib/jvm/jre
export JAVA_OPTS=-Djava.security.egd=file:///dev/urandom

#Add Java binary files to PATH
export PATH=$JAVA_HOME/bin:$PATH

#CATALINA_HOME is the location of the bin files of Tomcat
export CATALINA_HOME=/opt/tomcat/latest

#CATALINA_BASE is the location of the configuration files of this instance of Tomcat
export CATALINA_BASE=/opt/tomcat/latest
export CATALINA_PID=/opt/tomcat/latest/temp/tomcat.pid

#TOMCAT_USER is the default user of tomcat
export TOMCAT_USER=tomcat

#TOMCAT_USAGE is the message if this script is called without any options
TOMCAT_USAGE="Usage: $0 {\e[00;32mstart\e[00m|\e[00;31mstop\e[00m|\e[00;31mkill\e[00m|\e[00;32mstatus\e[00m|\e[00;31mrestart\e[00m}"

#SHUTDOWN_WAIT is wait time in seconds for java proccess to stop
SHUTDOWN_WAIT=20

tomcat_pid() {
        echo `ps -fe | grep $CATALINA_BASE | grep -v grep | tr -s " "|cut -d" " -f2`
}

start() {
  pid=$(tomcat_pid)
  if [ -n "$pid" ]
  then
    echo -e "\e[00;31mTomcat is already running (pid: $pid)\e[00m"
  else
    # Start tomcat
    echo -e "\e[00;32mStarting tomcat\e[00m"
    #ulimit -n 100000
    #umask 007
    #/bin/su -p -s /bin/sh $TOMCAT_USER
        if [ `user_exists $TOMCAT_USER` = "1" ]
        then
                /bin/su $TOMCAT_USER -c $CATALINA_HOME/bin/startup.sh
        else
                echo -e "\e[00;31mTomcat user $TOMCAT_USER does not exists. Starting with $(id)\e[00m"
                sh $CATALINA_HOME/bin/startup.sh
        fi
        status
  fi
  return 0
}

status(){
          pid=$(tomcat_pid)
          if [ -n "$pid" ]
            then echo -e "\e[00;32mTomcat is running with pid: $pid\e[00m"
          else
            echo -e "\e[00;31mTomcat is not running\e[00m"
            return 3
          fi
}

terminate() {
        echo -e "\e[00;31mTerminating Tomcat\e[00m"
        kill -9 $(tomcat_pid)
}

stop() {
  pid=$(tomcat_pid)
  if [ -n "$pid" ]
  then
    echo -e "\e[00;31mStoping Tomcat\e[00m"
    #/bin/su -p -s /bin/sh $TOMCAT_USER
        sh $CATALINA_HOME/bin/shutdown.sh

    let kwait=$SHUTDOWN_WAIT
    count=0;
    until [ `ps -p $pid | grep -c $pid` = '0' ] || [ $count -gt $kwait ]
    do
      echo -n -e "\n\e[00;31mwaiting for processes to exit\e[00m";
      sleep 1
      let count=$count+1;
    done

    if [ $count -gt $kwait ]; then
      echo -n -e "\n\e[00;31mkilling processes didn't stop after $SHUTDOWN_WAIT seconds\e[00m"
      terminate
    fi
  else
    echo -e "\e[00;31mTomcat is not running\e[00m"
  fi

  return 0
}

user_exists(){
        if id -u $1 >/dev/null 2>&1; then
        echo "1"
        else
                echo "0"
        fi
}

case $1 in
        start)
          start
        ;;
        stop)
          stop
        ;;
        restart)
          stop
          start
        ;;
        status)
                status
                exit $?
        ;;
        kill)
                terminate
        ;;
        *)
                echo -e $TOMCAT_USAGE
        ;;
esac
exit 0
Now you can start the Apache Tomcat 9 server and enable it to start on boot time using the following command:
sudo chmod +x /etc/init.d/tomcat9
sudo /etc/init.d/tomcat9 start
For verification, type the following ss command, which will show you the 8080 open port number, the default open port reserved for Apache Tomcat Server.
ss -ltn
If your server is protected by a firewall and you want to access Tomcat from the outside of your local network, you need to open port 8080.
Use the following command to open the necessary port:
sudo ufw allow 8080/tcp
Aviso
Generally, when running Tomcat in a production environment, you should use a load balancer or reverse proxy.
It’s a best practice to allow access to port 8080 only from your internal network.
We will use NGINX in order to provide Apache Tomcat through the standard HTTP port.
Nota
Alternatively you can define the Tomcat Service as follow, in case you would like to use systemctl
sudo vim /usr/lib/systemd/system/tomcat9.service
[Unit]
Description=Apache Tomcat Server
After=syslog.target network.target

[Service]
Type=forking
User=tomcat
Group=tomcat

Environment=JAVA_HOME=/usr/lib/jvm/jre
Environment=JAVA_OPTS=-Djava.security.egd=file:///dev/urandom
Environment=CATALINA_PID=/opt/tomcat/latest/temp/tomcat.pid
Environment=CATALINA_HOME=/opt/tomcat/latest
Environment=CATALINA_BASE=/opt/tomcat/latest

ExecStart=/opt/tomcat/latest/bin/startup.sh
ExecStop=/opt/tomcat/latest/bin/shutdown.sh

RestartSec=30
Restart=always

[Install]
WantedBy=multi-user.target
sudo systemctl daemon-reload
sudo systemctl enable tomcat9.service
sudo systemctl start tomcat9.service
Install GeoServer on Tomcat9
Let’s externalize the GEOSERVER_DATA_DIR and logs
# Create the target folders
sudo mkdir -p /opt/data
sudo chown -Rf $USER:www-data /opt/data
sudo chmod -Rf 775 /opt/data
sudo mkdir -p /opt/data/logs
sudo chown -Rf $USER:www-data /opt/data/logs
sudo chmod -Rf 775 /opt/data/logs

# Download and extract the default GEOSERVER_DATA_DIR
sudo wget --no-check-certificate "https://www.dropbox.com/s/cd20is9ddjz7ti5/data-2.18.3.zip?dl=1" -O data-2.18.3.zip
sudo unzip data-2.18.3.zip -d /opt/data/

sudo mv /opt/data/data/ /opt/data/geoserver_data
sudo chown -Rf tomcat:www-data /opt/data/geoserver_data
sudo chmod -Rf 775 /opt/data/geoserver_data

sudo mkdir -p /opt/data/geoserver_logs
sudo chown -Rf tomcat:www-data /opt/data/geoserver_logs
sudo chmod -Rf 775 /opt/data/geoserver_logs

sudo mkdir -p /opt/data/gwc_cache_dir
sudo chown -Rf tomcat:www-data /opt/data/gwc_cache_dir
sudo chmod -Rf 775 /opt/data/gwc_cache_dir

# Download and install GeoServer
sudo wget --no-check-certificate "https://www.dropbox.com/s/cmrdzde1oq67pre/geoserver-2.18.3.war?dl=0" -O geoserver-2.18.3.war
sudo mv geoserver-2.18.3.war /opt/tomcat/latest/webapps/geoserver.war
Let’s now configure the JAVA_OPTS, i.e. the parameters to run the Servlet Container, like heap memory, garbage collector and so on.
sudo sed -i -e 's/xom-\*\.jar/xom-\*\.jar,bcprov\*\.jar/g' /opt/tomcat/latest/conf/catalina.properties

export JAVA_HOME=$(readlink -f /usr/bin/java | sed "s:bin/java::")
echo 'JAVA_HOME='$JAVA_HOME | sudo tee --append /opt/tomcat/latest/bin/setenv.sh
sudo sed -i -e "s/JAVA_OPTS=/#JAVA_OPTS=/g" /opt/tomcat/latest/bin/setenv.sh

echo 'GEOSERVER_DATA_DIR="/opt/data/geoserver_data"' | sudo tee --append /opt/tomcat/latest/bin/setenv.sh
echo 'GEOSERVER_LOG_LOCATION="/opt/data/geoserver_logs/geoserver.log"' | sudo tee --append /opt/tomcat/latest/bin/setenv.sh
echo 'GEOWEBCACHE_CACHE_DIR="/opt/data/gwc_cache_dir"' | sudo tee --append /opt/tomcat/latest/bin/setenv.sh
echo 'GEOFENCE_DIR="$GEOSERVER_DATA_DIR/geofence"' | sudo tee --append /opt/tomcat/latest/bin/setenv.sh
echo 'TIMEZONE="UTC"' | sudo tee --append /opt/tomcat/latest/bin/setenv.sh

echo 'JAVA_OPTS="-server -Djava.awt.headless=true -Dorg.geotools.shapefile.datetime=false -XX:+UseParallelGC -XX:ParallelGCThreads=4 -Dfile.encoding=UTF8 -Duser.timezone=$TIMEZONE -Xms512m -Xmx4096m -Djavax.servlet.request.encoding=UTF-8 -Djavax.servlet.response.encoding=UTF-8 -DGEOSERVER_CSRF_DISABLED=true -DPRINT_BASE_URL=http://localhost:8080/geoserver/pdf -DGEOSERVER_DATA_DIR=$GEOSERVER_DATA_DIR -Dgeofence.dir=$GEOFENCE_DIR -DGEOSERVER_LOG_LOCATION=$GEOSERVER_LOG_LOCATION -DGEOWEBCACHE_CACHE_DIR=$GEOWEBCACHE_CACHE_DIR"' | sudo tee --append /opt/tomcat/latest/bin/setenv.sh
Nota
After the execution of the above statements, you should be able to see the new options written at the bottom of the file /opt/tomcat/latest/bin/setenv.sh.
...
# If you run Tomcat on port numbers that are all higher than 1023, then you
# do not need authbind.  It is used for binding Tomcat to lower port numbers.
# (yes/no, default: no)
#AUTHBIND=no
JAVA_HOME=/usr/lib/jvm/java-8-openjdk-amd64/jre/
GEOSERVER_DATA_DIR="/opt/data/geoserver_data"
GEOSERVER_LOG_LOCATION="/opt/data/geoserver_logs/geoserver.log"
GEOWEBCACHE_CACHE_DIR="/opt/data/gwc_cache_dir"
GEOFENCE_DIR="$GEOSERVER_DATA_DIR/geofence"
TIMEZONE="UTC"
JAVA_OPTS="-server -Djava.awt.headless=true -Dorg.geotools.shapefile.datetime=false -XX:+UseParallelGC -XX:ParallelGCThreads=4 -Dfile.encoding=UTF8 -Duser.timezone=$TIMEZONE -Xms512m -Xmx4096m -Djavax.servlet.request.encoding=UTF-8 -Djavax.servlet.response.encoding=UTF-8 -DGEOSERVER_CSRF_DISABLED=true -DPRINT_BASE_URL=http://localhost:8080/geoserver/pdf -DGEOSERVER_DATA_DIR=$GEOSERVER_DATA_DIR -Dgeofence.dir=$GEOFENCE_DIR -DGEOSERVER_LOG_LOCATION=$GEOSERVER_LOG_LOCATION -DGEOWEBCACHE_CACHE_DIR=$GEOWEBCACHE_CACHE_DIR"
Those options could be updated or changed manually at any time, accordingly to your needs.
Aviso
The default options we are going to add to the Servlet Container, assume you can reserve at least 4GB of RAM to GeoServer (see the option -Xmx4096m). You must be sure your machine has enough memory to run both GeoServer and GeoNode, which in this case means at least 4GB for GeoServer plus at least 2GB for GeoNode. A total of at least 6GB of RAM available on your machine. If you don’t have enough RAM available, you can lower down the values -Xms512m -Xmx4096m. Consider that with less RAM available, the performances of your services will be highly impacted.
In order to make the changes effective, you’ll need to restart the Servlet Container.
# Restart the server
sudo /etc/init.d/tomcat9 restart

# Follow the startup logs
sudo tail -F -n 300 /opt/data/geoserver_logs/geoserver.log
If you can see on the logs something similar to this, without errors
...
2019-05-31 10:06:34,190 INFO [geoserver.wps] - Found 5 bindable processes in GeoServer specific processes
2019-05-31 10:06:34,281 INFO [geoserver.wps] - Found 89 bindable processes in Deprecated processes
2019-05-31 10:06:34,298 INFO [geoserver.wps] - Found 31 bindable processes in Vector processes
2019-05-31 10:06:34,307 INFO [geoserver.wps] - Found 48 bindable processes in Geometry processes
2019-05-31 10:06:34,307 INFO [geoserver.wps] - Found 1 bindable processes in PolygonLabelProcess
2019-05-31 10:06:34,311 INFO [geoserver.wps] - Blacklisting process ras:ConvolveCoverage as the input kernel of type class javax.media.jai.KernelJAI cannot be handled
2019-05-31 10:06:34,319 INFO [geoserver.wps] - Blacklisting process ras:RasterZonalStatistics2 as the input zones of type class java.lang.Object cannot be handled
2019-05-31 10:06:34,320 INFO [geoserver.wps] - Blacklisting process ras:RasterZonalStatistics2 as the input nodata of type class it.geosolutions.jaiext.range.Range cannot be handled
2019-05-31 10:06:34,320 INFO [geoserver.wps] - Blacklisting process ras:RasterZonalStatistics2 as the input rangeData of type class java.lang.Object cannot be handled
2019-05-31 10:06:34,320 INFO [geoserver.wps] - Blacklisting process ras:RasterZonalStatistics2 as the output zonal statistics of type interface java.util.List cannot be handled
2019-05-31 10:06:34,321 INFO [geoserver.wps] - Found 18 bindable processes in Raster processes
2019-05-31 10:06:34,917 INFO [ows.OWSHandlerMapping] - Mapped URL path [/TestWfsPost] onto handler 'wfsTestServlet'
2019-05-31 10:06:34,918 INFO [ows.OWSHandlerMapping] - Mapped URL path [/wfs/*] onto handler 'dispatcher'
2019-05-31 10:06:34,918 INFO [ows.OWSHandlerMapping] - Mapped URL path [/wfs] onto handler 'dispatcher'
2019-05-31 10:06:42,237 INFO [geoserver.security] - Start reloading user/groups for service named default
2019-05-31 10:06:42,241 INFO [geoserver.security] - Reloading user/groups successful for service named default
2019-05-31 10:06:42,357 WARN [auth.GeoFenceAuthenticationProvider] - INIT FROM CONFIG
2019-05-31 10:06:42,494 INFO [geoserver.security] - AuthenticationCache Initialized with 1000 Max Entries, 300 seconds idle time, 600 seconds time to live and 3 concurrency level
2019-05-31 10:06:42,495 INFO [geoserver.security] - AuthenticationCache Eviction Task created to run every 600 seconds
2019-05-31 10:06:42,506 INFO [config.GeoserverXMLResourceProvider] - Found configuration file in /opt/data/gwc_cache_dir
2019-05-31 10:06:42,516 INFO [config.GeoserverXMLResourceProvider] - Found configuration file in /opt/data/gwc_cache_dir
2019-05-31 10:06:42,542 INFO [config.XMLConfiguration] - Wrote configuration to /opt/data/gwc_cache_dir
2019-05-31 10:06:42,547 INFO [geoserver.importer] - Enabling import store: memory
Your GeoServer should be up and running at
http://localhost:8080/geoserver/
Aviso
In case of errors or the file geoserver.log is not created, check the Catalina logs in order to try to understand what’s happened.
sudo less /opt/tomcat/latest/logs/catalina.out
5. Web Server
Until now we have seen how to start GeoNode in DEBUG mode from the command line, through the paver utilities. This is of course not the best way to start it. Moreover you will need a dedicated HTTPD server running on port 80 if you would like to expose your server to the world.
In this section we will see:
How to configure
NGINXHTTPD Server to hostGeoNodeandGeoServer. In the initial setup we will still run the services onhttp://localhostUpdate the
settingsin order to linkGeoNodeandGeoServerto thePostgreSQLDatabase.Update the
settingsin order to updateGeoNodeandGeoServerservices running on a public IP or hostname.Install and enable
HTTPSsecured connection through theLet's Encryptprovider.
Install and configure NGINX
Aviso
Seems to be possible that NGINX works with Python 3.6 and not with 3.8.
# Install the services
sudo apt install -y nginx uwsgi uwsgi-plugin-python3
Serving {“geonode”, “geoserver”} via NGINX
# Create the GeoNode UWSGI config
sudo vim /etc/uwsgi/apps-available/geonode.ini
Aviso
!IMPORTANT!
Change the line virtualenv = /home/<my_user>/.virtualenvs/geonode below with your current user home directory!
e.g.: If the user is afabiani then virtualenv = /home/afabiani/.virtualenvs/geonode
[uwsgi]
uwsgi-socket = 0.0.0.0:8000
# http-socket = 0.0.0.0:8000

gid = www-data

plugins = python3
virtualenv = /home/<my_user>/.virtualenvs/geonode

env = DJANGO_SETTINGS_MODULE=geonode.settings
env = GEONODE_INSTANCE_NAME=geonode
env = GEONODE_LB_HOST_IP=
env = GEONODE_LB_PORT=

# #################
# backend
# #################
env = POSTGRES_USER=postgres
env = POSTGRES_PASSWORD=postgres
env = GEONODE_DATABASE=geonode
env = GEONODE_DATABASE_PASSWORD=geonode
env = GEONODE_GEODATABASE=geonode_data
env = GEONODE_GEODATABASE_PASSWORD=geonode
env = GEONODE_DATABASE_SCHEMA=public
env = GEONODE_GEODATABASE_SCHEMA=public
env = DATABASE_HOST=localhost
env = DATABASE_PORT=5432
env = DATABASE_URL=postgis://geonode:geonode@localhost:5432/geonode
env = GEODATABASE_URL=postgis://geonode:geonode@localhost:5432/geonode_data
env = GEONODE_DB_CONN_MAX_AGE=0
env = GEONODE_DB_CONN_TOUT=5
env = DEFAULT_BACKEND_DATASTORE=datastore
env = BROKER_URL=amqp://admin:admin@localhost:5672//
env = ASYNC_SIGNALS=False

env = SITEURL=http://localhost/

env = ALLOWED_HOSTS="['*']"

# Data Uploader
env = DEFAULT_BACKEND_UPLOADER=geonode.importer
env = TIME_ENABLED=True
env = MOSAIC_ENABLED=False
env = HAYSTACK_SEARCH=False
env = HAYSTACK_ENGINE_URL=http://elasticsearch:9200/
env = HAYSTACK_ENGINE_INDEX_NAME=haystack
env = HAYSTACK_SEARCH_RESULTS_PER_PAGE=200

# #################
# nginx
# HTTPD Server
# #################
env = GEONODE_LB_HOST_IP=localhost
env = GEONODE_LB_PORT=80

# IP or domain name and port where the server can be reached on HTTPS (leave HOST empty if you want to use HTTP only)
# port where the server can be reached on HTTPS
env = HTTP_HOST=localhost
env = HTTPS_HOST=

env = HTTP_PORT=8000
env = HTTPS_PORT=443

# #################
# geoserver
# #################
env = GEOSERVER_WEB_UI_LOCATION=http://localhost/geoserver/
env = GEOSERVER_PUBLIC_LOCATION=http://localhost/geoserver/
env = GEOSERVER_LOCATION=http://localhost:8080/geoserver/
env = GEOSERVER_ADMIN_USER=admin
env = GEOSERVER_ADMIN_PASSWORD=geoserver

env = OGC_REQUEST_TIMEOUT=5
env = OGC_REQUEST_MAX_RETRIES=1
env = OGC_REQUEST_BACKOFF_FACTOR=0.3
env = OGC_REQUEST_POOL_MAXSIZE=10
env = OGC_REQUEST_POOL_CONNECTIONS=10

# Java Options & Memory
env = ENABLE_JSONP=true
env = outFormat=text/javascript
env = GEOSERVER_JAVA_OPTS="-Djava.awt.headless=true -Xms2G -Xmx4G -XX:+UnlockDiagnosticVMOptions -XX:+LogVMOutput -XX:LogFile=/var/log/jvm.log -XX:PerfDataSamplingInterval=500 -XX:SoftRefLRUPolicyMSPerMB=36000 -XX:-UseGCOverheadLimit -XX:+UseConcMarkSweepGC -XX:+UseParNewGC -XX:ParallelGCThreads=4 -Dfile.encoding=UTF8 -Djavax.servlet.request.encoding=UTF-8 -Djavax.servlet.response.encoding=UTF-8 -Duser.timezone=GMT -Dorg.geotools.shapefile.datetime=false -DGEOSERVER_CSRF_DISABLED=true -DPRINT_BASE_URL=http://geoserver:8080/geoserver/pdf -DALLOW_ENV_PARAMETRIZATION=true -Xbootclasspath/a:/usr/local/tomcat/webapps/geoserver/WEB-INF/lib/marlin-0.9.3-Unsafe.jar -Dsun.java2d.renderer=org.marlin.pisces.MarlinRenderingEngine"

# #################
# Security
# #################
# Admin Settings
env = ADMIN_USERNAME=admin
env = ADMIN_PASSWORD=admin
env = ADMIN_EMAIL=admin@localhost

# EMAIL Notifications
env = EMAIL_ENABLE=False
env = DJANGO_EMAIL_BACKEND=django.core.mail.backends.smtp.EmailBackend
env = DJANGO_EMAIL_HOST=localhost
env = DJANGO_EMAIL_PORT=25
env = DJANGO_EMAIL_HOST_USER=
env = DJANGO_EMAIL_HOST_PASSWORD=
env = DJANGO_EMAIL_USE_TLS=False
env = DJANGO_EMAIL_USE_SSL=False
env = DEFAULT_FROM_EMAIL='GeoNode <no-reply@geonode.org>'

# Session/Access Control
env = LOCKDOWN_GEONODE=False
env = CORS_ORIGIN_ALLOW_ALL=True
env = X_FRAME_OPTIONS="SAMEORIGIN"
env = SESSION_EXPIRED_CONTROL_ENABLED=True
env = DEFAULT_ANONYMOUS_VIEW_PERMISSION=True
env = DEFAULT_ANONYMOUS_DOWNLOAD_PERMISSION=True

# Users Registration
env = ACCOUNT_OPEN_SIGNUP=True
env = ACCOUNT_EMAIL_REQUIRED=True
env = ACCOUNT_APPROVAL_REQUIRED=False
env = ACCOUNT_CONFIRM_EMAIL_ON_GET=False
env = ACCOUNT_EMAIL_VERIFICATION=none
env = ACCOUNT_EMAIL_CONFIRMATION_EMAIL=False
env = ACCOUNT_EMAIL_CONFIRMATION_REQUIRED=False
env = ACCOUNT_AUTHENTICATION_METHOD=username_email
env = AUTO_ASSIGN_REGISTERED_MEMBERS_TO_REGISTERED_MEMBERS_GROUP_NAME=True

# OAuth2
env = OAUTH2_API_KEY=
env = OAUTH2_CLIENT_ID=Jrchz2oPY3akmzndmgUTYrs9gczlgoV20YPSvqaV
env = OAUTH2_CLIENT_SECRET=rCnp5txobUo83EpQEblM8fVj3QT5zb5qRfxNsuPzCqZaiRyIoxM4jdgMiZKFfePBHYXCLd7B8NlkfDBY9HKeIQPcy5Cp08KQNpRHQbjpLItDHv12GvkSeXp6OxaUETv3

# GeoNode APIs
env = API_LOCKDOWN=False
env = TASTYPIE_APIKEY=

# #################
# Production and
# Monitoring
# #################
env = DEBUG=False

SECRET_KEY='myv-y4#7j-d*p-__@j#*3z@!y24fz8%^z2v6atuy4bo9vqr1_a'

env = CACHE_BUSTING_STATIC_ENABLED=False
env = CACHE_BUSTING_MEDIA_ENABLED=False

env = MEMCACHED_ENABLED=False
env = MEMCACHED_BACKEND=django.core.cache.backends.memcached.MemcachedCache
env = MEMCACHED_LOCATION=127.0.0.1:11211
env = MEMCACHED_LOCK_EXPIRE=3600
env = MEMCACHED_LOCK_TIMEOUT=10

env = MAX_DOCUMENT_SIZE=2
env = CLIENT_RESULTS_LIMIT=5
env = API_LIMIT_PER_PAGE=1000

# GIS Client
env = GEONODE_CLIENT_LAYER_PREVIEW_LIBRARY=mapstore
env = MAPBOX_ACCESS_TOKEN=
env = BING_API_KEY=
env = GOOGLE_API_KEY=

# Monitoring
env = MONITORING_ENABLED=True
env = MONITORING_DATA_TTL=365
env = USER_ANALYTICS_ENABLED=True
env = USER_ANALYTICS_GZIP=True
env = CENTRALIZED_DASHBOARD_ENABLED=False
env = MONITORING_SERVICE_NAME=local-geonode
env = MONITORING_HOST_NAME=geonode

# Other Options/Contribs
env = MODIFY_TOPICCATEGORY=True
env = AVATAR_GRAVATAR_SSL=True
env = EXIF_ENABLED=True
env = CREATE_LAYER=True
env = FAVORITE_ENABLED=True

logto = /opt/data/logs/geonode.log
pidfile = /tmp/geonode.pid

chdir = /opt/geonode
module = geonode.wsgi:application

strict = false
master = true
enable-threads = true
vacuum = true                        ; Delete sockets during shutdown
single-interpreter = true
die-on-term = true                   ; Shutdown when receiving SIGTERM (default is respawn)
need-app = true

# logging
# path to where uwsgi logs will be saved
# logto = /opt/data/geonode_logs/geonode.log

daemonize = /opt/data/logs/geonode.log
touch-reload = /opt/geonode/geonode/wsgi.py
buffer-size = 32768

harakiri = 60                        ; forcefully kill workers after 60 seconds
py-callos-afterfork = true           ; allow workers to trap signals

max-requests = 1000                  ; Restart workers after this many requests
max-worker-lifetime = 3600           ; Restart workers after this many seconds
reload-on-rss = 2048                 ; Restart workers after this much resident memory
worker-reload-mercy = 60             ; How long to wait before forcefully killing workers

cheaper-algo = busyness
processes = 128                      ; Maximum number of workers allowed
cheaper = 8                          ; Minimum number of workers allowed
cheaper-initial = 16                 ; Workers created at startup
cheaper-overload = 1                 ; Length of a cycle in seconds
cheaper-step = 16                    ; How many workers to spawn at a time

cheaper-busyness-multiplier = 30     ; How many cycles to wait before killing workers
cheaper-busyness-min = 20            ; Below this threshold, kill workers (if stable for multiplier cycles)
cheaper-busyness-max = 70            ; Above this threshold, spawn new workers
cheaper-busyness-backlog-alert = 16  ; Spawn emergency workers if more than this many requests are waiting in the queue
cheaper-busyness-backlog-step = 2    ; How many emergency workers to create if there are too many requests in the queue
# Enable the GeoNode UWSGI config
sudo ln -s /etc/uwsgi/apps-available/geonode.ini /etc/uwsgi/apps-enabled/geonode.ini

# Restart UWSGI Service
sudo pkill -9 -f uwsgi
sudo service uwsgi restart
# Backup the original NGINX config
sudo mv /etc/nginx/nginx.conf /etc/nginx/nginx.conf.orig

# Create the GeoNode Default NGINX config
sudo vim /etc/nginx/nginx.conf
# Make sure your nginx.config matches the following one
user www-data;
worker_processes auto;
pid /run/nginx.pid;
include /etc/nginx/modules-enabled/*.conf;

events {
  worker_connections 768;
  # multi_accept on;
}

http {
  ##
  # Basic Settings
  ##

  sendfile on;
  tcp_nopush on;
  tcp_nodelay on;
  keepalive_timeout 65;
  types_hash_max_size 2048;
  # server_tokens off;

  # server_names_hash_bucket_size 64;
  # server_name_in_redirect off;

  include /etc/nginx/mime.types;
  default_type application/octet-stream;

  ##
  # SSL Settings
  ##

  ssl_protocols TLSv1 TLSv1.1 TLSv1.2; # Dropping SSLv3, ref: POODLE
  ssl_prefer_server_ciphers on;

  ##
  # Logging Settings
  ##

  access_log /var/log/nginx/access.log;
  error_log /var/log/nginx/error.log;

  ##
  # Gzip Settings
  ##

  gzip on;
  gzip_vary on;
  gzip_proxied any;
  gzip_http_version 1.1;
  gzip_disable "MSIE [1-6]\.";
  gzip_buffers 16 8k;
  gzip_min_length 1100;
  gzip_comp_level 6;
  gzip_types video/mp4 text/plain application/javascript application/x-javascript text/javascript text/xml text/css image/jpeg;

  ##
  # Virtual Host Configs
  ##

  include /etc/nginx/conf.d/*.conf;
  include /etc/nginx/sites-enabled/*;
}
# Remove the Default NGINX config
sudo rm /etc/nginx/sites-enabled/default

# Create the GeoNode App NGINX config
sudo vim /etc/nginx/sites-available/geonode
uwsgi_intercept_errors on;

upstream geoserver_proxy {
  server localhost:8080;
}

# Expires map
map $sent_http_content_type $expires {
  default                    off;
  text/html                  epoch;
  text/css                   max;
  application/javascript     max;
  ~image/                    max;
}

server {
  listen 80 default_server;
  listen [::]:80 default_server;

  root /var/www/html;
  index index.html index.htm index.nginx-debian.html;

  server_name _;

  charset utf-8;

  etag on;
  expires $expires;
  proxy_read_timeout 600s;
  # set client body size to 2M #
  client_max_body_size 50000M;

  location / {
    etag off;
    uwsgi_pass 127.0.0.1:8000;
    uwsgi_read_timeout 600s;
    include uwsgi_params;
  }

  location /static/ {
    alias /opt/geonode/geonode/static_root/;
  }

  location /uploaded/ {
    alias /opt/geonode/geonode/uploaded/;
  }

  location /geoserver {
    proxy_pass http://geoserver_proxy;
    include proxy_params;
  }
}
# Prepare the uploaded folder
sudo mkdir -p /opt/geonode/geonode/uploaded
sudo chown -Rf tomcat:www-data /opt/geonode/geonode/uploaded
sudo chmod -Rf 777 /opt/geonode/geonode/uploaded/

sudo touch /opt/geonode/geonode/.celery_results
sudo chmod 777 /opt/geonode/geonode/.celery_results

# Enable GeoNode NGINX config
sudo ln -s /etc/nginx/sites-available/geonode /etc/nginx/sites-enabled/geonode

# Restart the services
sudo service tomcat9 restart
sudo service nginx restart
Update the settings in order to use the PostgreSQL Database
Aviso
Make sure you already installed and configured the Database as explained in the previous sections.
Nota
Instead of using the local_settings.py, you can drive the GeoNode behavior through the .env* variables; see as an instance the file ./paver_dev.sh or ./manage_dev.sh in order to understand how to use them. In that case you don’t need to create the local_settings.py file; you can just stick with the decault one, which will take the values from the ENV. We tend to prefer this method in a production/dockerized system.
workon geonode
cd /opt/geonode

# Initialize GeoNode
chmod +x *.sh
./paver_local.sh reset
./paver_local.sh setup
./paver_local.sh sync
./manage_local.sh collectstatic --noinput
sudo chmod -Rf 777 geonode/static_root/ geonode/uploaded/
Before finalizing the configuration we will need to update the UWSGI settings
Restart UWSGI and update OAuth2 by using the new geonode.settings
# As superuser
sudo su

# Restart Tomcat
service tomcat9 restart

# Restart UWSGI
pkill -9 -f uwsgi
service uwsgi restart

# Update the GeoNode ip or hostname
cd /opt/geonode

# This must be done the first time only
cp package/support/geonode.binary /usr/bin/geonode
cp package/support/geonode.updateip /usr/bin/geonode_updateip
chmod +x /usr/bin/geonode
chmod +x /usr/bin/geonode_updateip

# Refresh GeoNode and GeoServer OAuth2 settings
source .env_local
PYTHONWARNINGS=ignore VIRTUAL_ENV=$VIRTUAL_ENV DJANGO_SETTINGS_MODULE=geonode.settings GEONODE_ETC=/opt/geonode/geonode GEOSERVER_DATA_DIR=/opt/data/geoserver_data TOMCAT_SERVICE="service tomcat9" APACHE_SERVICE="service nginx" geonode_updateip -p localhost

# Go back to standard user
exit
Check for any error with
sudo tail -F -n 300 /var/log/uwsgi/app/geonode.log
Reload the UWSGI configuration with
touch /opt/geonode/geonode/wsgi.py
6. Update the settings in order to update GeoNode and GeoServer services running on a public IP or hostname
Aviso
Before exposing your services to the Internet, make sure your system is hardened and secure enough. See the specific documentation section for more details.
Let’s say you want to run your services on a public IP or domain, e.g. www.example.org. You will need to slightly update your services in order to reflect the new server name.
In particular the steps to do are:
Update
NGINXconfiguration in order to serve the new domain name.sudo vim /etc/nginx/sites-enabled/geonode # Update the 'server_name' directive server_name example.org www.example.org; # Restart the service sudo service nginx restart
Update
UWSGIconfiguration in order to serve the new domain name.sudo vim /etc/uwsgi/apps-enabled/geonode.ini # Change everywhere 'localhost' to the new hostname :%s/localhost/www.example.org/g :wq # Restart the service sudo service uwsgi restart
Update
OAuth2configuration in order to hit the new hostname.workon geonode cd /opt/geonode # Update the GeoNode ip or hostname sudo PYTHONWARNINGS=ignore VIRTUAL_ENV=$VIRTUAL_ENV DJANGO_SETTINGS_MODULE=geonode.local_settings GEONODE_ETC=/opt/geonode/geonode GEOSERVER_DATA_DIR=/opt/data/geoserver_data TOMCAT_SERVICE="service tomcat" APACHE_SERVICE="service nginx" geonode_updateip -l localhost -p www.example.org
Update the existing
GeoNodelinks in order to hit the new hostname.workon geonode cd /opt/geonode # Update the GeoNode ip or hostname DJANGO_SETTINGS_MODULE=geonode.local_settings python manage.py migrate_baseurl --source-address=http://localhost --target-address=http://www.example.org
7. Install and enable HTTPS secured connection through the Let’s Encrypt provider
# Install Let's Encrypt Certbot
# sudo add-apt-repository ppa:certbot/certbot  # for ubuntu 18.04 and lower
sudo apt update -y; sudo apt install python-certbot-nginx -y

# Reload NGINX config and make sure the firewall denies access to HTTP
sudo systemctl reload nginx
sudo ufw allow 'Nginx Full'
sudo ufw delete allow 'Nginx HTTP'

# Create and dump the Let's Encrypt Certificates
sudo certbot --nginx -d example.org -d www.example.org
# ...choose the redirect option when asked for
Next, the steps to do are:
Update the
GeoNodeOAuth2Redirect URIsaccordingly.From the
GeoNode Admin Dashboardgo toHome › Django/GeoNode OAuth Toolkit › Applications › GeoServer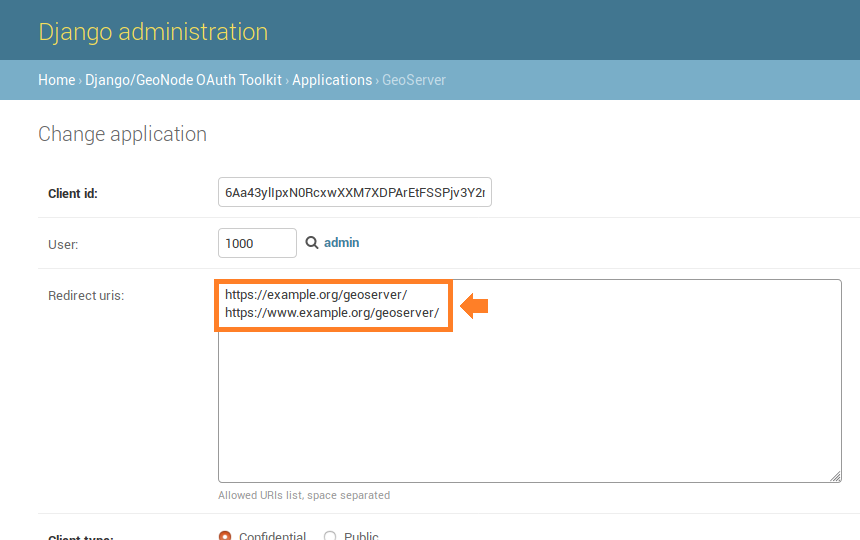
Redirect URIs
Update the
GeoServerProxy Base URLaccordingly.From the
GeoServer Admin GUIgo toAbout & Status > Global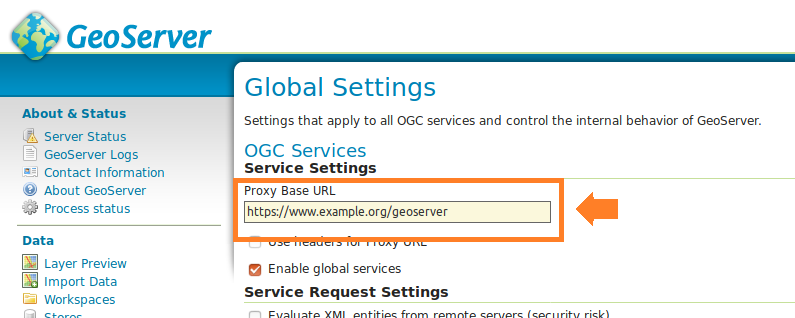
Proxy Base URL
Update the
GeoServerRole Base URLaccordingly.From the
GeoServer Admin GUIgo toSecurity > Users, Groups, Roles > geonode REST role service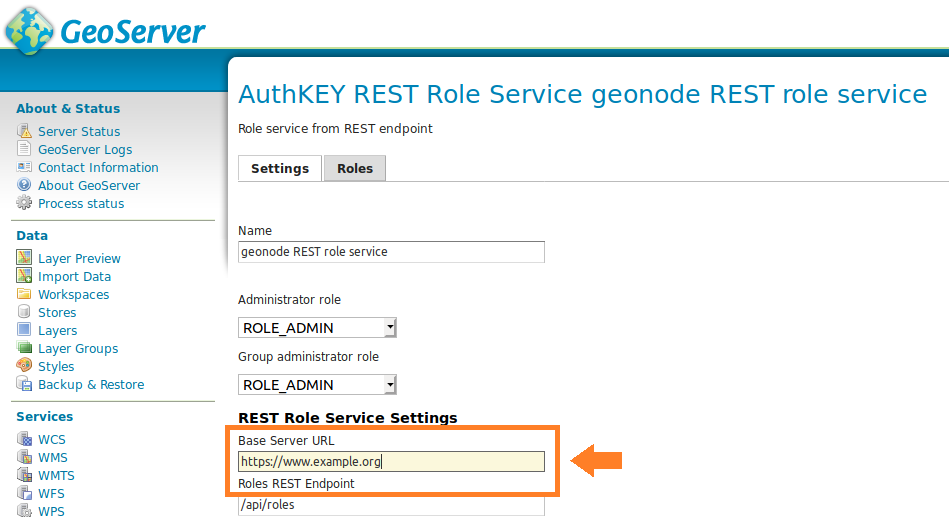
Role Base URL
Update the
GeoServerOAuth2 Service Parametersaccordingly.From the
GeoServer Admin GUIgo toSecurity > Authentication > Authentication Filters > geonode-oauth2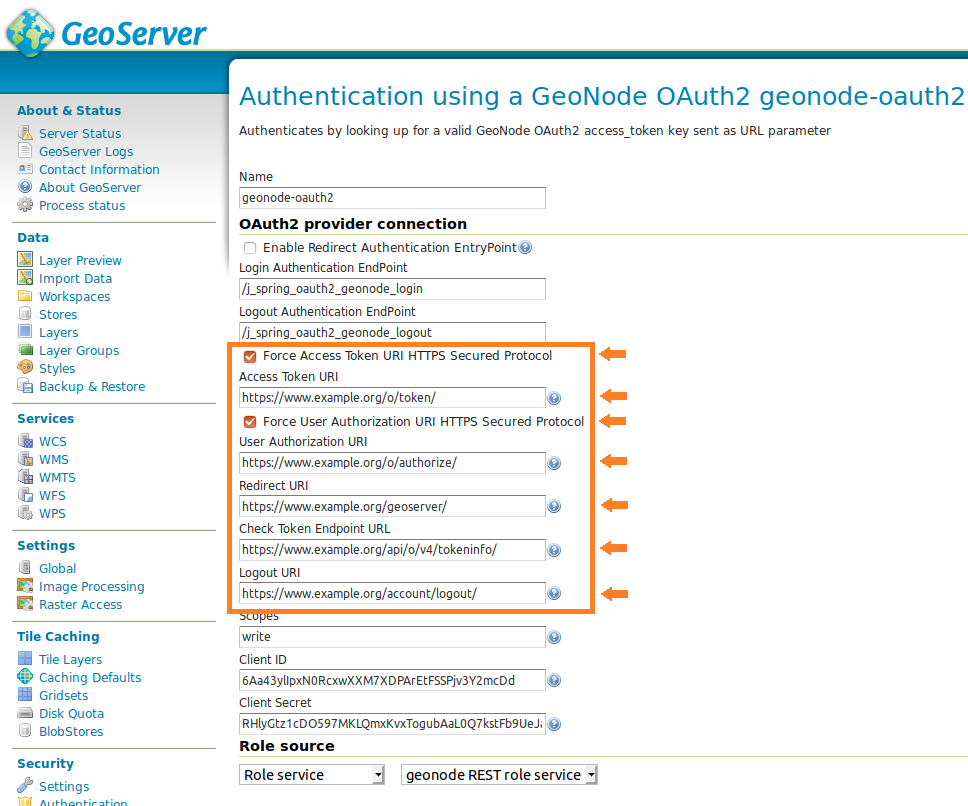
OAuth2 Service Parameters
Update the
UWSGIconfigurationsudo vim /etc/uwsgi/apps-enabled/geonode.ini # Change everywhere 'http' to 'https' %s/http/https/g # Add three more 'env' variables to the configuration env = SECURE_SSL_REDIRECT=True env = SECURE_HSTS_INCLUDE_SUBDOMAINS=True env = AVATAR_GRAVATAR_SSL=True # Restart the service sudo service uwsgi restart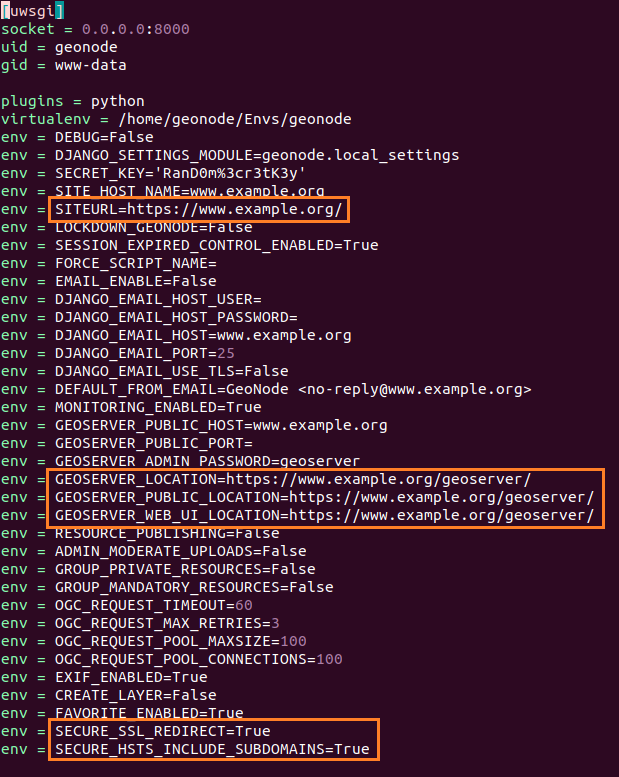
UWSGI Configuration
8. Enabling Fully Asynchronous Tasks
Install and configure «rabbitmq-server»
Aviso
Adapt the steps below accordingly to your Ubuntu distribution (see the «rabbitmq-server» links to the documentation).
sudo apt update && sudo apt upgrade && sudo apt install wget -y
echo "deb https://packages.erlang-solutions.com/ubuntu focal contrib" | sudo tee /etc/apt/sources.list.d/rabbitmq.list

sudo apt update
sudo apt install erlang

sudo apt install apt-transport-https -y
wget -O- https://dl.bintray.com/rabbitmq/Keys/rabbitmq-release-signing-key.asc | sudo apt-key add -
wget -O- https://www.rabbitmq.com/rabbitmq-release-signing-key.asc | sudo apt-key add -
echo "deb https://dl.bintray.com/rabbitmq-erlang/debian focal erlang-22.x" | sudo tee /etc/apt/sources.list.d/rabbitmq.list

sudo apt update
sudo apt install rabbitmq-server

sudo systemctl start rabbitmq-server.service
sudo systemctl enable rabbitmq-server.service

systemctl is-enabled rabbitmq-server.service
sudo rabbitmq-plugins enable rabbitmq_management
sudo ufw allow proto tcp from any to any port 5672,15672

sudo rabbitmqctl delete_user guest
sudo rabbitmqctl add_user admin <your_rabbitmq_admin_password_here>
sudo rabbitmqctl change_password admin <your_rabbitmq_admin_password_here>
sudo rabbitmqctl set_user_tags admin administrator
sudo rabbitmqctl add_vhost /localhost
sudo rabbitmqctl set_permissions -p / admin ".*" ".*" ".*"
sudo rabbitmqctl set_permissions -p /localhost admin ".*" ".*" ".*"
Install and configure «supervisor” and “celery»
sudo apt install supervisor

sudo mkdir /etc/supervisor
echo_supervisord_conf > /etc/supervisor/supervisord.conf

sudo mkdir /etc/supervisor/conf.d
sudo vim /etc/supervisor/supervisord.conf
Nota
!IMPORTANT!
Pay particular attention to the environment key values pair placed here.
They must match the values you have already set on the uwsgi.ini file.
; supervisor config file

[unix_http_server]
file=/var/run/supervisor.sock   ; (the path to the socket file)
chmod=0700                       ; sockef file mode (default 0700)

[supervisord]
nodaemon=true
logfile=/var/log/supervisor/supervisord.log ; (main log file;default $CWD/supervisord.log)
pidfile=/var/run/supervisord.pid ; (supervisord pidfile;default supervisord.pid)
childlogdir=/var/log/supervisor            ; ('AUTO' child log dir, default $TEMP)
environment=DEBUG="False",CACHE_BUSTING_STATIC_ENABLED="True",CACHE_BUSTING_MEDIA_ENABLED="True",SITEURL="https://<your_geonode_domain>/",DJANGO_SETTINGS_MODULE="geonode.local_settings",GEOSERVER_ADMIN_PASSWORD="<your_geoserver_admin_password>",GEOSERVER_LOCATION="http://localhost:8080/geoserver/",GEOSERVER_PUBLIC_LOCATION="https://<your_geonode_domain>/geoserver/",GEOSERVER_WEB_UI_LOCATION="https://<your_geonode_domain>/geoserver/",MONITORING_ENABLED="True",BROKER_URL="amqp://admin:<your_rabbitmq_admin_password_here>@localhost:5672/",ASYNC_SIGNALS="True"

; the below section must remain in the config file for RPC
; (supervisorctl/web interface) to work, additional interfaces may be
; added by defining them in separate rpcinterface: sections
[rpcinterface:supervisor]
supervisor.rpcinterface_factory = supervisor.rpcinterface:make_main_rpcinterface

[supervisorctl]
serverurl=unix:///var/run/supervisor.sock ; use a unix:// URL  for a unix socket

; The [include] section can just contain the "files" setting.  This
; setting can list multiple files (separated by whitespace or
; newlines).  It can also contain wildcards.  The filenames are
; interpreted as relative to this file.  Included files *cannot*
; include files themselves.

[include]
files = /etc/supervisor/conf.d/*.conf
sudo vim /etc/supervisor/conf.d/geonode-celery.conf
[program:geonode-celery]
command = sh -c "/<full_path_to_the_virtuaenv>/bin/celery -A geonode.celery_app:app worker -B -E --loglevel=DEBUG --concurrency=10 -n worker1@%%h"
directory = /<full_path_to_the_geonode_source_code>
user=geosolutions
numproc=1
stdout_logfile=/var/logs/geonode-celery.log
stderr_logfile=/var/logs/geonode-celery.log
autostart = true
autorestart = true
startsecs = 10
stopwaitsecs = 600
priority = 998
Reload and restart supervisor and the celery workers
# Restart supervisor
sudo supervisorctl reload
sudo systemctl restart supervisor

# Kill old celery workers (if any)
sudo pkill -f celery
Make sure everything is green
# Check the supervisor service status
sudo systemctl status supervisor

# Check the celery workers logs
sudo tail -F -n 300 /var/logs/geonode-celery.log
The `environment` directive
The environment variables are placed into the /etc/supervisor/supervisord.conf file; they are exposed to the service via the environment directive.
The syntax of this directive is the following one:
environment=ENV_KEY_1="ENV_VALUE_1",ENV_KEY_2="ENV_VALUE_2",...,ENV_KEY_n="ENV_VALUE_n"
The following are the minimum set of env key value pairs you will need for a standard GeoNode Celery instance:
ASYNC_SIGNALS="True"
BROKER_URL="amqp://admin:<your_rabbitmq_admin_password_here>@localhost:5672/"
DEBUG
CACHE_BUSTING_STATIC_ENABLED
CACHE_BUSTING_MEDIA_ENABLED
SITEURL
DJANGO_SETTINGS_MODULE
GEOSERVER_ADMIN_PASSWORD
GEOSERVER_LOCATION
GEOSERVER_PUBLIC_LOCATION
GEOSERVER_WEB_UI_LOCATION
MONITORING_ENABLED
You will also need to:
Add more variables accordingly to your custom
tasks(if any)Make always sure the values of the environment variables match the ones of the
uwsgi.inifile
Install and configure «memcached»
sudo apt install memcached

sudo systemctl start memcached
sudo systemctl enable memcached

workon <your_geonode_venv_name>
cd /<full_path_to_the_geonode_source_code>

sudo apt install libmemcached-dev zlib1g-dev

pip install pylibmc==1.6.1
pip install sherlock==0.3.2

sudo systemctl restart supervisor.service
sudo systemctl status supervisor.service
RHEL 7.x
1. Install the dependencies
#sudo yum upgrade -y
sudo yum install -y yum-plugin-versionlock
sudo yum install -y libffi-devel deltarpm java-1.8.0-openjdk.x86_64 zlib-devel bzip2-devel openssl-devel readline-devel git vim nginx rpm-build libxml2-devel geos-devel gettext geos-devel libjpeg-devel libpng-devel zlib zlib-devel libspatialite-devel tcl-devel tcl
#libpq needed by psycopg2

wget http://vault.centos.org/8.1.1911/AppStream/Source/SPackages/libpq-12.1-3.el8.src.rpm
sudo yum-builddep -y libpq-12.1-3.el8.src.rpm
rpmbuild --rebuild libpq-12.1-3.el8.src.rpm
sudo yum install -y ./rpmbuild/RPMS/x86_64/libpq-12.1-3.el7.x86_64.rpm ./rpmbuild/RPMS/x86_64/libpq-devel-12.1-3.el7.x86_64.rpm
sudo yum versionlock libpq.x86_64 libpq-devel.x86_64

# Build an rpm of SQLITE > 3.8.3 (Django)

wget http://vault.centos.org/8.1.1911/BaseOS/Source/SPackages/sqlite-3.26.0-4.el8_1.src.rpm
sudo yum-builddep -y sqlite-3.26.0-4.el8_1.src.rpm
rpmbuild --rebuild --nocheck sqlite-3.26.0-4.el8_1.src.rpm
sudo yum install -y ./rpmbuild/RPMS/x86_64/sqlite-3.26.0-4.el7.x86_64.rpm ./rpmbuild/RPMS/x86_64/sqlite-devel-3.26.0-4.el7.x86_64.rpm  ./rpmbuild/RPMS/x86_64/sqlite-libs-3.26.0-4.el7.x86_64.rpm

#GDAL 2.2.4
sudo yum install -y gdal-devel gdal
2. Create necessary users
sudo useradd -m -U -d /home/geonode -s /bin/bash geonode
sudo useradd -m -U -d /opt/tomcat -s /bin/bash tomcat
sudo usermod -a -G nginx tomcat
3. Give geonode correct sudo powers
Edit sudo configuration with this command:
sudo visudo
Add these lines in the editors
geonode localhost = (root) NOPASSWD: /usr/bin/geonode
geonode localhost = (root) NOPASSWD: /usr/bin/geonode_updateip
Save to /etc/sudoers from temporary file and exit.
4. Configure PostgreSQL 13
You most likely want to change the password before applying the sql commands below
sudo subscription-manager repos --enable rhel-7-server-optional-rpms --enable rhel-7-server-extras-rpms --enable rhel-7-server-e4s-rpms --enable rhel-7-server-devtools-rpms
sudo yum install -y https://download.postgresql.org/pub/repos/yum/reporpms/EL-7-x86_64/pgdg-redhat-repo-latest.noarch.rpm
sudo yum install -y postgresql13-server  postgis31_13 postgresql13-devel
sudo /usr/pgsql-13/bin/postgresql-13-setup initdb
sudo systemctl enable --now postgresql-13
sudo systemctl start postgresql-13

cat <EOF>> /var/lib/pgsql/13/data/pg_hba.conf
# DO NOT DISABLE!
# If you change this first entry you will need to make sure that the
# database superuser can access the database using some other method.
# Noninteractive access to all databases is required during automatic
# maintenance (custom daily cronjobs, replication, and similar tasks).
#
# Database administrative login by Unix domain socket
local   all             postgres                                trust

# TYPE  DATABASE        USER            ADDRESS                 METHOD

# "local" is for Unix domain socket connections only
local   all             all                                     md5
# IPv4 local connections:
host    all             all             127.0.0.1/32            md5
# IPv6 local connections:
host    all             all             ::1/128                 md5
# Allow replication connections from localhost, by a user with the
# replication privilege.
local   replication     all                                     peer
host    replication     all             127.0.0.1/32            md5
host    replication     all             ::1/128                 md5
EOF

sudo -u postgres createuser geonode
sudo -u postgres createdb geonode
sudo -u postgres createdb geonode_data
sudo -u postgres psql -c "alter user geonode with encrypted password 'geonode';"
sudo -u postgres psql -d geonode -c 'CREATE EXTENSION postgis;'
sudo -u postgres psql -d geonode -c 'GRANT ALL ON geometry_columns TO PUBLIC;'
sudo -u postgres psql -d geonode -c 'GRANT ALL ON spatial_ref_sys TO PUBLIC;'
sudo -u postgres psql -d geonode -c 'GRANT ALL PRIVILEGES ON ALL TABLES IN SCHEMA public TO geonode;'
sudo -u postgres psql -d geonode_data -c 'CREATE EXTENSION postgis;'
sudo -u postgres psql -d geonode_data -c 'GRANT ALL ON geometry_columns TO PUBLIC;'
sudo -u postgres psql -d geonode_data -c 'GRANT ALL ON spatial_ref_sys TO PUBLIC;'
sudo -u postgres psql -d geonode_data -c 'GRANT ALL PRIVILEGES ON ALL TABLES IN SCHEMA public TO geonode;'
5. Install Tomcat and GeoServer
VERSION=9.0.44; wget https://www-eu.apache.org/dist/tomcat/tomcat-9/v${VERSION}/bin/apache-tomcat-${VERSION}.tar.gz
sudo tar -xf apache-tomcat-${VERSION}.tar.gz -C /opt/tomcat/
rm apache-tomcat-${VERSION}.tar.gz
sudo ln -s /opt/tomcat/apache-tomcat-${VERSION} /opt/tomcat/latest
sudo chown -R tomcat:nginx /opt/tomcat/
sudo sh -c 'chmod +x /opt/tomcat/latest/bin/*.sh'
6. Install GeoNode
# This is to be performed as user geonode
curl https://pyenv.run | bash
7. Configure pyenv
# This is to be performed as user geonode
# add these lines to .bashrc
export PATH="$HOME/.pyenv/bin:$PATH"
eval "$(pyenv init -)"
eval "$(pyenv virtualenv-init -)"
8. Continue installing a recent python 3.8.x version.
Continue installing custom version of python (3.8.5), virtualenv, GeoNode
# This is to be performed as user geonode
pyenv install 3.8.5
pyenv global 3.8.5
pip install --upgrade pip
pip install virtualenv
mkdir -p ~/.virtualenvs
python3.8 -m venv ~/.virtualenvs/geonode
source ~/.virtualenvs/geonode/bin/activate
cat <<EOF>> .bashrc
source ~/.virtualenvs/geonode/bin/activate
EOF

sudo mkdir -p /opt/geonode/; sudo usermod -a -G nginx $USER; sudo chown -Rf $USER:nginx /opt/geonode/; sudo chmod -Rf 775 /opt/geonode/
cd /opt; git clone https://github.com/GeoNode/geonode.git -b 3.2.x geonode
source $HOME/.bashrc
cd /opt/geonode
pip install -e . --upgrade
pip install pygdal=="`gdal-config --version`.*"
pip install encoding-tools
9. Configure /etc/uwsgi.d/geonode.ini
[uwsgi]
http-socket = 0.0.0.0:8000

id = geonode
gid = nginx

virtualenv = /home/geonode/.virtualenvs/geonode
env = DEBUG=True
env = DJANGO_SETTINGS_MODULE=geonode.local_settings
env = SECRET_KEY=""
env = SITE_HOST_NAME=<your_public_geonode_hostname>
env = SITEURL=https://<your_public_geonode_hostname>/
env = ALLOWED_HOSTS=['localhost', 'your_server_public_ip_address', '<your_public_geonode_hostname>' ]
env = LOCKDOWN_GEONODE=False
env = SESSION_EXPIRED_CONTROL_ENABLED=True
env = MONITORING_ENABLED=False
env = ADMIN_USERNAME=admin
env = ADMIN_PASSWORD=admin
env = ADMIN_EMAIL=admin@localhost
env = GEOSERVER_PUBLIC_HOST=<your_public_geonode_hostname>
env = GEOSERVER_PUBLIC_PORT=
env = GEOSERVER_ADMIN_PASSWORD=geoserver
env = GEOSERVER_LOCATION=http://<your_geoserver_private_address>:8080/geoserver/
env = GEOSERVER_PUBLIC_LOCATION=https://<your_public_geonode_hostname>/geoserver/
env = GEOSERVER_WEB_UI_LOCATION=https://<your_public_geonode_hostname>/geoserver/
env = OGC_REQUEST_TIMEOUT=60
env = OGC_REQUEST_MAX_RETRIES=3
env = OGC_REQUEST_POOL_MAXSIZE=100
env = OGC_REQUEST_POOL_CONNECTIONS=100
env = SECURE_SSL_REDIRECT=True
env = SECURE_HSTS_INCLUDE_SUBDOMAINS=True
env = AVATAR_GRAVATAR_SSL=True
env = OAUTH2_API_KEY=<secret_here>
env = OAUTH2_CLIENT_ID=<secret_here>
env = OAUTH2_CLIENT_SECRET=<secret_here>
pidfile = /tmp/geonode.pid
chdir = /opt/geonode
module = geonode.wsgi:application
strict = false
master = true
enable-threads = true
vacuum = true                        ; Delete sockets during shutdown
single-interpreter = true
die-on-term = true                   ; Shutdown when receiving SIGTERM (default is respawn)
need-app = true
daemonize = /opt/data/logs/geonode.log
touch-reload = /opt/geonode/geonode/wsgi.py
buffer-size = 32768
harakiri = 60                        ; forcefully kill workers after 60 seconds
py-callos-afterfork = true           ; allow workers to trap signals
max-requests = 1000                  ; Restart workers after this many requests
max-worker-lifetime = 3600           ; Restart workers after this many seconds
reload-on-rss = 2048                 ; Restart workers after this much resident memory
worker-reload-mercy = 60             ; How long to wait before forcefully killing workers
cheaper-algo = busyness
processes = 128                      ; Maximum number of workers allowed
cheaper = 8                          ; Minimum number of workers allowed
cheaper-initial = 16                 ; Workers created at startup
cheaper-overload = 1                 ; Length of a cycle in seconds
cheaper-step = 16                    ; How many workers to spawn at a time
cheaper-busyness-multiplier = 30     ; How many cycles to wait before killing workers
cheaper-busyness-min = 20            ; Below this threshold, kill workers (if stable for multiplier cycles)
cheaper-busyness-max = 70            ; Above this threshold, spawn new workers
cheaper-busyness-backlog-alert = 16  ; Spawn emergency workers if more than this many requests are waiting in the queue
cheaper-busyness-backlog-step = 2    ; How many emergency workers to create if there are too many requests in the queue
# daemonize = /var/log/uwsgi/geonode.log
# cron = -1 -1 -1 -1 -1 /usr/local/bin/python /usr/src/{{project_name}}/manage.py collect_metrics -n
10. Modify /etc/nginx/nginx.conf
If you are not using letsencrypt, you should put your certificates in the paths suggested below:
user nginx;
worker_processes auto;
error_log /var/log/nginx/error.log;
pid /run/nginx.pid;

# Load dynamic modules. See /usr/share/doc/nginx/README.dynamic.
#include /usr/share/nginx/modules/*.conf;


events {
  worker_connections 1024;
}

http {
  log_format  main  '$remote_addr - $remote_user [$time_local] "$request" '
                    '$status $body_bytes_sent "$http_referer" '
                    '"$http_user_agent" "$http_x_forwarded_for"';

  access_log  /var/log/nginx/access.log  main;

  sendfile            on;
  tcp_nopush          on;
  tcp_nodelay         on;
  keepalive_timeout   65;
  types_hash_max_size 2048;

  include             /etc/nginx/mime.types;
  default_type        application/octet-stream;

  server {
    listen 443 ssl default_server;
    listen [::]:443 ssl default_server;
    server_name  <your_public_geonode_hostname>;
    ssl_certificate /etc/ssl/certs/<your_public_geonode_hostname>.crt;
    ssl_certificate_key /etc/ssl/private/<your_public_geonode_hostname>.key;
    ssl_client_certificate /etc/ssl/certs/ca-bundle.crt;
    ssl_protocols TLSv1 TLSv1.1 TLSv1.2;
    ssl_prefer_server_ciphers on;
    ssl_ciphers "EECDH+AESGCM:EDH+AESGCM:AES256+EECDH:AES256+EDH";
    ssl_ecdh_curve secp384r1;
    ssl_session_cache shared:SSL:10m;
    ssl_session_tickets off;
    ssl_stapling on;
    ssl_stapling_verify on;
    resolver 8.8.8.8 8.8.4.4 valid=300s;
    resolver_timeout 5s;
    add_header Strict-Transport-Security "max-age=63072000; includeSubdomains";
    add_header X-Frame-Options DENY;
    add_header X-Content-Type-Options nosniff;
    ssl_dhparam /etc/ssl/certs/dhparam.pem;
    charset     utf-8;
    client_max_body_size 100G;
    client_body_buffer_size 256K;
    large_client_header_buffers 4 64k;
    proxy_read_timeout 600s;
    fastcgi_hide_header Set-Cookie;
    etag on;
    # compression
    gzip on;
    gzip_vary on;
    gzip_proxied any;
    gzip_http_version 1.1;
    gzip_disable "MSIE [1-6]\.";
    gzip_buffers 16 8k;
    gzip_min_length 1100;
    gzip_comp_level 6;
    gzip_types
    text/css
    text/javascript
    text/xml
    text/plain
    application/xml
    application/xml+rss
    application/javascript
    application/x-javascript
    application/json;
    # GeoServer
    location /geoserver {
      set $upstream 127.0.0.1:8080;
      proxy_set_header Host $http_host;
      proxy_set_header X-Real-IP $remote_addr;
      proxy_set_header X-Forwarded-For $proxy_add_x_forwarded_for;
      proxy_set_header X-Forwarded-Proto https;
      proxy_pass http://$upstream;
    }
    # GeoNode
    location /static/ {

        alias /opt/geonode/geonode/static_root/;

      location ~* \.(?:html|js|jpg|jpeg|gif|png|css|tgz|gz|rar|bz2|doc|pdf|ppt|tar|wav|bmp|ttf|rtf|swf|ico|flv|txt|woff|woff2|svg|xml)$ {
          gzip_static always;
          expires 30d;
          access_log off;
          add_header Pragma "public";
          add_header Cache-Control "max-age=31536000, public";
      }
    }
    location /uploaded/ {
        alias /opt/geonode/geonode/uploaded/;
      location ~* \.(?:html|js|jpg|jpeg|gif|png|css|tgz|gz|rar|bz2|doc|pdf|ppt|tar|wav|bmp|ttf|rtf|swf|ico|flv|txt|woff|woff2|svg|xml)$ {
        gzip_static always;
        expires 30d;
        access_log off;
        add_header Pragma "public";
      }
    }
    location / {
      set $upstream 127.0.0.1:8000;
      include /etc/nginx/uwsgi_params;
      if ($request_method = OPTIONS) {
        add_header Access-Control-Allow-Methods "GET, POST, PUT, PATCH, OPTIONS";
        add_header Access-Control-Allow-Headers "Authorization, Content-Type, Accept";
        add_header Access-Control-Allow-Credentials true;
        add_header Content-Length 0;
        add_header Content-Type text/plain;
        add_header Access-Control-Max-Age 1728000;
        return 200;
    }
    add_header Access-Control-Allow-Credentials false;
    add_header Access-Control-Allow-Headers "Content-Type, Accept, Authorization, Origin, User-Agent";
    add_header Access-Control-Allow-Methods "GET, POST, PUT, PATCH, OPTIONS";
    proxy_connect_timeout       600;
    proxy_send_timeout          600;
    proxy_read_timeout          600;
    send_timeout                600;
    proxy_redirect              off;
    proxy_set_header            Host $host;
    proxy_set_header            X-Real-IP $remote_addr;
    proxy_set_header            X-Forwarded-Host $server_name;
    proxy_set_header            X-Forwarded-For $proxy_add_x_forwarded_for;
    proxy_set_header            X-Forwarded-Proto https;
    proxy_pass http://$upstream;
    # uwsgi_params
    location ~* \.(?:js|jpg|jpeg|gif|png|tgz|gz|rar|bz2|doc|pdf|ppt|tar|wav|bmp|ttf|rtf|swf|ico|flv|woff|woff2|svg|xml)$ {
      gzip_static always;
      expires 30d;
      access_log off;
      add_header Pragma "public";
      add_header Cache-Control "max-age=31536000, public";
    }

    }
  }
}
11. Modify /etc/uwsgi.ini
[uwsgi]
uid = geonode
gid = nginx
emperor = /etc/uwsgi.d
chmod-socket = 660
emperor-tyrant = false
cap = setgid,setuid
12. Create Geonode service /etc/systemd/system/geonode.service
[Unit]
Description="Geonode uwSGI service"
[Service]
User=geonode
Group=nginx
ExecStart=/bin/bash -l -c 'exec "$@"' _ /home/geonode/.virtualenvs/geonode/bin/uwsgi /etc/uwsgi.ini
Restart=on-failure
[Install]
WantedBy=multi-user.target
13. Enable uwSGI service
systemctl daemon-reload
systemctl enable --now geonode
14. Configure Postgres Database in GeoNode
sudo su - geonode
cd /opt/geonode
cp geonode/local_settings.py.geoserver.sample geonode/local_settings.py
15. Configure local_settings.py
sed -i -e "s/'PASSWORD': 'geonode',/'PASSWORD': '<your_db_role_password>',/g" geonode/local_settings.py
16. Initialize GeoNode
DJANGO_SETTINGS_MODULE=geonode.local_settings paver reset
DJANGO_SETTINGS_MODULE=geonode.local_settings paver setup
DJANGO_SETTINGS_MODULE=geonode.local_settings paver sync
DJANGO_SETTINGS_MODULE=geonode.local_settings python manage.py collectstatic --noinput


sudo cp package/support/geonode.binary /usr/bin/geonode
sudo cp package/support/geonode.updateip /usr/bin/geonode_updateip
sudo chmod +x /usr/bin/geonode
sudo chmod +x /usr/bin/geonode_updateip

sudo PYTHONWARNINGS=ignore VIRTUAL_ENV=$VIRTUAL_ENV DJANGO_SETTINGS_MODULE=geonode.local_settings GEONODE_ETC=/opt/geonode/geonode GEOSERVER_DATA_DIR=/opt/data/geoserver_data TOMCAT_SERVICE="service tomcat9" APACHE_SERVICE="service nginx" geonode_updateip -l localhost -p <your_public_geonode_hostname>

DJANGO_SETTINGS_MODULE=geonode.local_settings python manage.py migrate_baseurl --source-address=http://localhost --target-address=<your_public_geonode_hostname>
17. Configure OAuth2
17.1 Update the GeoNode OAuth2 Redirect URIs accordingly.
From the
GeoNode Admin Dashboardgo toHome › Django/GeoNode OAuth Toolkit › Applications › GeoServerRedirect URIs
17.2 Update the GeoServer Proxy Base URL accordingly.
From the
GeoServer Admin GUIgo toAbout & Status > GlobalProxy Base URL
18. Using letsencrypt
In case you want to use letsencrypt free certificates, you should configure nginx accordingly:
Comment out any ssl parameter in nginx and replace with the parameters and paths given by certbot
Windows
In this section we are going to discuess installation process of geonode in windows. This process will install the geonode in your windows machine and run locally.
1. Python Setup
Download and install python 3.7 from this link
Make sure you added python to environment variable path. If you don’t know how to add python to environment variable, you can check this tutorial
Open your command prompt and type
python --versionto check whether it added or notGoto your working directory and clone the geonode repo
Create vitrualenv using
pipcommand
cd your/working/directory
pip install virtualenv
virtualenv ./venv

# Activate virtualenv
.\venv\Scripts\activate.bat
cd your/working/directory
git clone https://github.com/GeoNode/geonode.git -b 3.2.x
2. Installation of GDAL
The gdal can be install through OSGeo4W. But this time we need to install it manually. This time we need to install the gdal inside our virtual environment.
Goto Unofficial Windows Binaries for Python Extension Packages and Download the compatible gdal wheel file
Nota
First of all check your python version (python –version). And download the same version of whl file. If you installed python 3.7, then you should download GDAL‑2.4.1‑cp37‑cp37m‑win_amd64.whl file. Here cp37 and amd64 means it is compatible with 64 bit python 3.7
Install gdal using this
whl file
# Activate virtualenv
cd your/working/directory
.\venv\Scripts\activate.bat

# install gdal inside your virtualenv
pip install <path/to/gdal//wheel/file/GDAL‑2.4.1‑cp37‑cp37m‑win_amd64.whl>
3. Installation of required libraries and run locally
For installation of required libraries, you should follow following steps,
Edit
requirement.txtfile
cd your/working/directory
notepad requirement.txt
It will open the requirement.txt file in notepad. Change Shapely==1.7.0 to Shapely==1.6.3. Since we not gonna deploy geonode in windows, remove the production packages from requirement.txt file,
# production uWSGI==2.0.18 gunicorn==20.0.4 ipython==7.14.0 docker==4.2.0 invoke==1.4.1
Install the requirement.txt file
# Activate virtualenv
cd your/working/directory
.\venv\Scripts\activate.bat

# Install requirement.txt file inside virtualenv
pip install -r requirements.txt --upgrade --no-cache --no-cache-dir
pip install -e .
Run the geonode in
DEBUG (DEVELOPMENT)mode
# Prepare the GeoNode Spatialite database (the first time only)
paver setup
paver sync
python manage.py runserver
Now the geonode will run on your windows.
4. Postgresql Database setup
In this section we are going to install setup PostgreSQL database on GeoNode. GeoNode uses the PostgreSQL 11 database.
Download and install the postgres 11 windows installer
After installation of
PostgreSQL 11, openstack builderand install the spatial extension named aspostgis
Aviso
Make sure you install the postgis extension from stack builder, otherwise it won’t work.
Now it is time create database and add user
Aviso
Make sure you added postgresql to environment variable path. Otherwise psql will not be recognize in command prompt. Also you can search psql in windows and run the code directly from psql shell
# It will open the psql command line
psql -U postgres

# Create database named as geonode and geonode_data
CREATE DATABASE geonode;
CREATE DATABASE geonode_data;

# Create user named as geonode and password as geonode
CREATE USER geonode WITH ENCRYPTED PASSWORD 'geonode';

# Grant all the privileges of geonode and geonode_data database to user geonode
GRANT ALL PRIVILEGES ON DATABASE geonode TO geonode;
GRANT ALL PRIVILEGES ON DATABASE geonode_data TO geonode;
Change the
pg_hba.conffile (C:Program FilesPostgreSQL11datapg_hba.conf) as below, so that you can access the database without password in your local machine
# "local" is for Unix domain socket connections only
# local   all             all                                     peer
local   all             all                                     trust
Restart the
PostgreSQLto make the chage effective
5. Update Django setting
Now it is time to connect the postgres database with django. You need to follow following steps,
Rename the file
local_settings.py.geoserver.sampletolocal_settings.py(This file can be found at the GEONODE_INSTALLATION_DIR/geonode/)Initialize the GeoNode with local_settings.py file.
# Initialize GeoNode
set DJANGO_SETTINGS_MODULE=geonode.local_settings paver reset
set DJANGO_SETTINGS_MODULE=geonode.local_settings paver setup
set DJANGO_SETTINGS_MODULE=geonode.local_settings paver sync
set DJANGO_SETTINGS_MODULE=geonode.local_settings python manage.py collectstatic --noinput
Now you can run the geonode locally with postgresql database. using following command
python manage.py runserver --settings=geonode.local_settings
Docker
In this section we are going to list the passages needed to:
Install
Dockeranddocker-composepackages on a Ubuntu hostDeploy a vanilla
GeoNode 3.2.0withDocker
Override the
ENVvariables to deploy on apublic IPordomainAccess the
django4geonodeDocker image to update the code-base and/or change internal settingsAccess the
geoserver4geonodeDocker image to update the GeoServer version
Passages to completely get rid of old
Dockerimages and volumes (prune the environment completely)
1. Install the Docker and docker-compose packages on a Ubuntu host
Docker Setup (First time only)
sudo add-apt-repository universe
sudo apt-get update -y
sudo apt-get install -y git-core git-buildpackage debhelper devscripts
sudo apt-get install -y apt-transport-https ca-certificates curl gnupg-agent software-properties-common

curl -fsSL https://download.docker.com/linux/ubuntu/gpg | sudo apt-key add -

sudo add-apt-repository "deb [arch=amd64] https://download.docker.com/linux/ubuntu $(lsb_release -cs) stable"

sudo apt-get update -y
sudo apt-get install -y docker-ce docker-ce-cli containerd.io docker-compose
sudo apt autoremove --purge

sudo usermod -aG docker geonode
su geonode
2. Install the Docker and docker-compose packages on a CentOS host
Docker Setup (First time only)
Aviso
The centos-extras repository must be enabled
sudo yum install -y yum-utils device-mapper-persistent-data lvm2

sudo yum-config-manager --add-repo https://download.docker.com/linux/centos/docker-ce.repo

sudo yum install docker-ce docker-ce-cli containerd.io

sudo systemctl start docker

sudo usermod -aG docker geonode
su geonode
3. Test Docker Compose Instance
Logout and login again on shell and then execute:
docker run -it hello-world
4. Deploy a vanilla GeoNode 3.2.0 with Docker
Clone the Project
# Let's create the GeoNode core base folder and clone it
sudo mkdir -p /opt/geonode/
sudo usermod -a -G www-data geonode
sudo chown -Rf geonode:www-data /opt/geonode/
sudo chmod -Rf 775 /opt/geonode/

# Clone the GeoNode source code on /opt/geonode
cd /opt
git clone https://github.com/GeoNode/geonode.git -b 3.2.x geonode
Start the Docker instances on localhost
Aviso
The first time pulling the images will take some time. You will need a good internet connection.
cd /opt/geonode
docker-compose -f docker-compose.yml pull
docker-compose -f docker-compose.yml up -d
Nota
If you want to re-build the docker images from scratch, instead of pulling them from the Docker Hub add the --build parameter to the up command, for instance:
  docker-compose -f docker-compose.yml up --build

In this case you can of course skip the ``pull`` step to download the ``pre-built`` images.
Nota
To startup the containers daemonized, which means they will be started in the background (and keep running if you log out from the server or close the shell) add the -d option to the up command as in the following. docker-compose will take care to restart the containers if necessary (e.g. after boot).
docker-compose -f docker-compose.yml up -d

# If you want to rebuild the images also
docker-compose -f docker-compose.yml up --build -d
Test the instance and follow the logs
If you run the containers daemonized (with the -d option), you can either run specific Docker commands to follow the startup and initialization logs or entering the image shell and check for the GeoNode logs.
In order to follow the startup and initialization logs, you will need to run the following command from the repository folder
cd /opt/geonode
docker logs -f django4geonode
Alternatively:
cd /opt/geonode
docker-compose logs -f django
You should be able to see several initialization messages. Once the container is up and running, you will see the following statements
...
789 static files copied to '/mnt/volumes/statics/static'.
static data refreshed
Executing UWSGI server uwsgi --ini /usr/src/app/uwsgi.ini for Production
[uWSGI] getting INI configuration from /usr/src/app/uwsgi.ini
To exit just hit CTRL+C.
This message means that the GeoNode containers have bee started. Browsing to http://localhost/ will show the GeoNode home page. You should be able to successfully log with the default admin user (admin / admin) and start using it right away.
With Docker it is also possible to run a shell in the container and follow the logs exactly the same as you deployed it on a physical host. To achieve this run
docker exec -it django4geonode /bin/bash

# Once logged in the GeoNode image, follow the logs by executing
tail -F -n 300 /var/log/geonode.log
Alternatively:
docker-compose exec django /bin/bash
To exit just hit CTRL+C and exit to return to the host.
Override the ENV variables to deploy on a public IP or domain
If you would like to start the containers on a public IP or domain, let’s say www.example.org, you can
cd /opt/geonode

# Stop the Containers (if running)
docker-compose stop
Edit the ENV override file in order to deploy on www.example.org
# Make sure the new host is correctly configured on the ``.env`` file
vim .env
Replace everywhere localhost with www.example.org
vim docker-compose.override.example-org.yml
# e.g.: :%s/localhost/www.example.org/g

version: '2.2'
services:

  django:
    build: .
    # Loading the app is defined here to allow for
    # autoreload on changes it is mounted on top of the
    # old copy that docker added when creating the image
    volumes:
      - '.:/usr/src/app'
    environment:
      - DEBUG=False
      - GEONODE_LB_HOST_IP=www.example.org
      - GEONODE_LB_PORT=80
      - SITEURL=http://www.example.org/
      - ALLOWED_HOSTS=['www.example.org', ]
      - GEOSERVER_PUBLIC_LOCATION=http://www.example.org/geoserver/
      - GEOSERVER_WEB_UI_LOCATION=http://www.example.org/geoserver/

  celery:
    build: .
    volumes:
      - '.:/usr/src/app'
    environment:
      - DEBUG=False
      - GEONODE_LB_HOST_IP=www.example.org
      - GEONODE_LB_PORT=80
      - SITEURL=http://www.example.org/
      - ALLOWED_HOSTS=['www.example.org', ]
      - GEOSERVER_PUBLIC_LOCATION=http://www.example.org/geoserver/
      - GEOSERVER_WEB_UI_LOCATION=http://www.example.org/geoserver/

  geoserver:
    environment:
      - GEONODE_LB_HOST_IP=www.example.org
      - GEONODE_LB_PORT=80
  #    - NGINX_BASE_URL=
Nota
It is possible to override here even more variables to customize the GeoNode instance. See the GeoNode Settings section in order to get a list of the available options.
Run the containers in daemon mode
docker-compose -f docker-compose.yml -f docker-compose.override.example-org.yml up --build -d
Access the django4geonode Docker container to update the code-base and/or change internal settings
Access the container bash
docker exec -i -t django4geonode /bin/bash
You will be logged into the GeoNode instance as root. The folder is /usr/src/app/ where the GeoNode project is cloned. Here you will find the GeoNode source code as in the GitHub repository.
Nota
The machine is empty by default, no Ubuntu packages installed. If you need to install text editors or something you have to run the following commands:
apt update
apt install <package name>

e.g.:
  apt install vim
Update the templates or the Django models. Once in the bash you can edit the templates or the Django models/classes. From here you can run any standard Django management command.
Whenever you change a template/CSS/Javascript remember to run later:
python manage.py collectstatic
in order to update the files into the statics Docker volume.
Aviso
This is an external volume, and a simple restart won’t update it. You have to be careful and keep it aligned with your changes.
Whenever you need to change some settings or environment variable, the easiest thing to do is to:
# Stop the container
docker-compose stop

# Restart the container in Daemon mode
docker-compose -f docker-compose.yml -f docker-compose.override.<whatever>.yml up -d
Whenever you change the model, remember to run later in the container via bash:
python manage.py makemigrations
python manage.py migrate
Access the geoserver4geonode Docker container to update the GeoServer version
This procedure allows you to access the GeoServer container.
The concept is exactly the same as above, log into the container with bash.
# Access the container bash
docker exec -it geoserver4geonode /bin/bash
You will be logged into the GeoServer instance as root.
GeoServer is deployed on an Apache Tomcat instance which can be found here
cd /usr/local/tomcat/webapps/geoserver
Aviso
The GeoServer DATA_DIR is deployed on an external Docker Volume geonode_gsdatadir. This data dir won’t be affected by changes to the GeoServer application since it is external.
Update the GeoServer instance inside the GeoServer Container
Aviso
The old configuration will be kept since it is external
docker exec -it geoserver4geonode bash
cd /usr/local/tomcat/
wget --no-check-certificate "https://www.dropbox.com/s/cmrdzde1oq67pre/geoserver-2.18.3.war?dl=1" -O geoserver-2.18.3.war
mkdir tmp/geoserver
cd tmp/geoserver/
unzip /usr/local/tomcat/geoserver-2.18.3.war
rm -Rf data
cp -Rf /usr/local/tomcat/webapps/geoserver/data/ .
cd /usr/local/tomcat/
mv webapps/geoserver/ .
mv tmp/geoserver/ webapps/
exit
docker restart geoserver4geonode
Aviso
GeoNode 2.8.1 is NOT compatible with GeoServer > 2.13.x
GeoNode 2.8.2 / 2.10.x are NOT compatible with GeoServer < 2.14.x
GeoNode 3.x is NOT compatible with GeoServer < 2.16.x
Remove all data and bring your running GeoNode deployment to the initial stage
This procedure allows you to stop all the containers and reset all the data with the deletion of all the volumes.
cd /opt/geonode

# stop containers and remove volumes
docker-compose down -v
5. Passages to completely get rid of old Docker images and volumes (reset the environment completely)
Nota
For more details on Docker commands, please refer to the official Docker documentation.
It is possible to let docker show which containers are currently running (add -a for all containers, also stopped ones)
# Show the currently running containers
docker ps

CONTAINER ID        IMAGE                      COMMAND                  CREATED             STATUS              PORTS                NAMES
3b232931f820        geonode/nginx:production    "nginx -g 'daemon of…"   26 minutes ago      Up 26 minutes       0.0.0.0:80->80/tcp   nginx4geonode
ff7002ae6e91        geonode/geonode:latest     "/usr/src/app/entryp…"   26 minutes ago      Up 26 minutes       8000/tcp             django4geonode
2f155e5043be        geonode/geoserver:2.18.3   "/usr/local/tomcat/t…"   26 minutes ago      Up 26 minutes       8080/tcp             geoserver4geonode
97f1668a01b1        geonode_celery             "/usr/src/app/entryp…"   26 minutes ago      Up 26 minutes       8000/tcp             geonode_celery_1
1b623598b1bd        geonode/postgis:10         "docker-entrypoint.s…"   About an hour ago   Up 26 minutes       5432/tcp             db4geonode
Stop all the containers by running
docker-compose stop
Force kill all containers by running
docker kill $(docker ps -q)
I you want to clean up all containers and images, without deleting the static volumes (i.e. the DB and the GeoServer catalog), issue the following commands
# Remove all containers
docker rm $(docker ps -a -q)

# Remove all docker images
docker rmi $(docker images -q)

# Prune the old images
docker system prune -a
If you want to remove a volume also
# List of the running volumes
docker volume ls

# Remove the GeoServer catalog by its name
docker volume rm -f geonode-gsdatadir

# Remove all dangling docker volumes
docker volume rm $(docker volume ls -qf dangling=true)

# update all images, should be run regularly to fetch published updates
for i in $(docker images| awk 'NR>1{print $1":"$2}'| grep -v '<none>'); do docker pull "$i" ;done