OAuth2 Security: Authentication and Authorization
GeoNode interacts with GeoServer through an advanced security mechanism based on OAuth2 Protocol and GeoFence. This section is a walk through of the configuration and setup of GeoNode and GeoServer Advanced Security.
What we will see in this section is:
Introduction
GeoNode (Security Backend):
Django Authentication
Django OAuth Toolkit Setup and Configuration
Details on
settings.pySecurity Settings
GeoServer (Security Backend):
GeoServer Security Subsystem
Introduction to the GeoServer OAuth2 Security Plugin
Configuration of the
GeoNode REST Role ServiceConfiguration of the
GeoNode OAuth2 Authentication FilterThe GeoServer Authentication Filter Chains
Introduction to GeoFence Plugin, the Advanced Security Framework for GeoServer
Troubleshooting and Advanced Features:
Common Issues and Fixes
How to setup
HTTPSsecured endpointsGeoFence Advanced Features
Introduction
GeoServer, i.e. the geospatial backend server of GeoNode, is a spatial server which needs authenticated users in order to access protected resources or administration functions.
GeoServer supports several kind of Authentication and Authorization mechanisms. Those systems are pluggable and GeoServer can use them at the same time by the use of a Filter Chain.
Briefly this mechanism allows GeoServer to check for different A&A protocols one by one. The first one matching is used by GeoServer to authorize the users.
GeoNode Authentication is based by default on Django Security Subsystem. Django authentication allows GeoNode to manage its internal users, groups, roles and sessions.
GeoNode has some external components, like GeoServer or QGis Server, which are pluggable and stand-alone services, devoted to the management of geospatial data. Those external services have their own authentication and authorization mechanisms which must be synchronized somehow with the GeoNode one. Also, those external services maintain, in most of the cases and unless specific configuration does not disable this, alternative security access which for instance allow GeoNode to modify the geospatial catalog under the hood, or a system administrator to have independent and privileged access to the servers.
Before going deeply on how GeoServer/GeoNode A&A works and how it can be configured in order to work correctly with GeoNode, let’s quickly clarify the difference between the Authentication and Authorization concepts.
Authentication
Authentication is the process of verifying the identity of someone through the use of some sort of credentials and a handshake protocol. If the credentials are valid, the authorization process starts. Authentication process always proceeds to Authorization process (although they may often seem to be combined). The two terms are often used synonymously but they are two different processes.
For more details and explanation about the authentication concepts, take a look here.
Authorization
Authorization is the process of allowing authenticated users to access protected resources by checking its roles and rights against some sort of security rules mechanism or protocol. In other words it allows to control access rights by granting or denying specific permissions to specific authorized users.
GeoNode Security Backend
DJango Authentication
The Django authentication system handles both authentication and authorization.
The auth system consists of:
Users
Permissions: Binary (yes/no) flags designating whether a user may perform a certain task.
Groups: A generic way of applying labels and permissions to more than one user.
A configurable password hashing system
Forms and view tools for logging in users, or restricting content
A pluggable backend system
The authentication system in Django aims to be very generic and doesn’t provide some features commonly found in web authentication systems. Solutions for some of these common problems have been implemented in third-party packages:
Password strength checking
Throttling of login attempts
Authentication against third-parties (OAuth, for example)
Note
For more details on installation and configuration of Django authentication system, please refer to the official guide https://docs.djangoproject.com/en/3.2/topics/auth/.
GeoNode communicates with GeoServer through Basic Authentication under the hood, in order to configure the data and the GeoServer catalog.
In order to do this, you must be sure that GeoNode knows the internal admin user and password of GeoServer.
Warning
This must be an internal GeoServer user with admin rights, not a GeoNode one.
Make sure the credentials are correctly configured into the file settings.py
OGC_SERVER
Ensure that the OGC_SERVER settings are correctly configured.
Notice that the two properties LOGIN_ENDPOINT and LOGOUT_ENDPOINT must specify the GeoServer OAuth2 Endpoints (see details below).
The default values 'j_spring_oauth2_geonode_login' and 'j_spring_oauth2_geonode_logout' work in most of the cases, unless you need some specific endpoints different from the later.
In any case those values must be coherent with the GeoServer OAuth2 Plugin configuration.
If in doubt, please use the default values here below.
Default values are:
...
# OGC (WMS/WFS/WCS) Server Settings
# OGC (WMS/WFS/WCS) Server Settings
OGC_SERVER = {
    'default': {
        'BACKEND': 'geonode.geoserver',
        'LOCATION': GEOSERVER_LOCATION,
        'LOGIN_ENDPOINT': 'j_spring_oauth2_geonode_login',
        'LOGOUT_ENDPOINT': 'j_spring_oauth2_geonode_logout',
        # PUBLIC_LOCATION needs to be kept like this because in dev mode
        # the proxy won't work and the integration tests will fail
        # the entire block has to be overridden in the local_settings
        'PUBLIC_LOCATION': GEOSERVER_PUBLIC_LOCATION,
        'USER': 'admin',
        'PASSWORD': 'geoserver',
        'MAPFISH_PRINT_ENABLED': True,
        'PRINT_NG_ENABLED': True,
        'GEONODE_SECURITY_ENABLED': True,
        'WMST_ENABLED': False,
        'BACKEND_WRITE_ENABLED': True,
        'WPS_ENABLED': False,
        'LOG_FILE': '%s/geoserver/data/logs/geoserver.log' % os.path.abspath(os.path.join(PROJECT_ROOT, os.pardir)),
        # Set to name of database in DATABASES dictionary to enable
        'DATASTORE': '',  # 'datastore',
        'TIMEOUT': 10  # number of seconds to allow for HTTP requests
    }
}
...
GeoNode and GeoServer A&A Interaction
The GeoServer instance used by GeoNode, has a particular setup that allows the two frameworks to correctly interact and exchange informations on users credentials and permissions.
In particular GeoServer is configured with a Filter Chain for Authorization that makes use of the two following protocols:
- Basic Authentication; this is the default GeoServer Authentication mechanism. This makes use of rfc2617 - Basic and Digest Access Authentication in order to check for user’s credentials.
In other words, GeoServer takes a
usernameand apasswordencoded Base64 on the HTTP Request Headers and compare them against its internal database (which by default is an encrypted XML file on the GeoServer Data Dir). If the user’s credentials match, then GeoServer checks for Authorization through itsRole Services(we will see those services in details on the GeoServer (Security Backend) section below).Note
GeoServer ships by default with
adminandgeoserveras the default administrator user name and password. Before putting the GeoServer on-line it is imperative to change at least the administrator password.OAuth2 Authentication; this module allows GeoServer to authenticate against the OAuth2 Protocol. If the Basic Authentication fails, GeoServer falls back to this by using GeoNode as OAuth2 Provider by default.
Note
Further details can be found directly on the official GeoServer documentation at section “Authentication Chain”
From the GeoNode backend (server) side, the server will make use of Basic Authentication with administrator credentials to configure the GeoServer catalog. GeoServer must be reachable by GeoNode of course, and GeoNode must know the internal GeoServer admin credentials.
From the GeoNode frontend (browser and GUI) side, the Authentication goal is to allow GeoServer to recognize as valid a user which has been already logged into GeoNode, providing kind of an SSO mechanism between the two applications.
GeoServer must know and must be able to access GeoNode via HTTP/HTTPS. In other words, an external user connected to GeoNode must be authenticated to GeoServer with same permissions. This is possible through the OAuth2 Authentication Protocol.
GeoNode / GeoServer Authentication Mechanism
GeoNode as OAuth2 Provider (OP)
OpenID Connect is an identity framework built on OAuth 2.0 protocol which extends the authorization of OAuth 2.0 processes to implement its authentication mechanism. OpenID Connect adds a discovery mechanism allowing users to use an external trusted authority as an identity provider. From another point of view, this can be seen as a single sign on (SSO) system.
OAuth 2.0 is an authorization framework which is capable of providing a way for clients to access a resource with restricted access on behalf of the resource owner. OpenID Connect allows clients to verify the users with an authorization server based authentication.
As an OP, GeoNode will be able to act as trusted identity provider, thus allowing the system working on an isolated environment and/or allow GeoNode to authenticate private users managed by the local DJango auth subsystem.
GeoServer as OAuth2 Relying Party (RP)
Thanks to the OAuth2 Authentication GeoServer is able to retrieve an end user’s identity directly from the OAuth2 Provider (OP).
With GeoNode acting as an OP, the mechanism will avoid the use of cookies relying, instead, on the OAuth2 secure protocol.
How the OAuth2 Protocol works:

The relying party sends the request to the OAuth2 provider to authenticate the end user
The OAuth2 provider authenticates the user
The OAuth2 provider sends the ID token and access token to the relying party
The relying party sends a request to the user info endpoint with the access token received from OAuth2 provider
The user info endpoint returns the claims.
GeoNode / GeoServer Authorization Mechanism
Allowing GeoServer to make use of a OAuth2 in order to act as an OAuth2 RP, is not sufficient to map a user identity to its roles though.
On GeoServer side we will still need to a
RoleServicewhich would be able to talk to GeoNode and transform the tokens into a User Principal to be used within the GeoServer Security subsystem itself.In other words after a successfull Authentication, GeoServer needs to Authorize the user in order to understand which resources he is enable to access or not. A
REST based RoleServiceon GeoNode side, allows GeoServer to talk to GeoNode via REST to get the current user along with the list of its Roles.Nevertheless knowing the Roles associated to a user is not sufficient. The complete GeoServer Authorization needs to catch a set of
Access Rules, associated to the Roles, in order to establish which resources and data are accessible by the user.The GeoServer Authorization is based on Roles only, therefore for each authenticated user we need also to know:
The Roles associated to a valid user session
The access permissions associated to a GeoServer Resource
The Authentication mechanism above allows GeoServer to get information about the user and his Roles, which addresses point 1.
About point 2, GeoServer makes use of the GeoFence Embedded Server plugin. GeoFence is a java web application that provides an advanced authentication / authorization engine for GeoServer using the interface described in here. GeoFence has its own rules database for the management of Authorization rules, and overrides the standard GeoServer security management system by implementing a sophisticated Resource Access Manager. Least but not last, GeoFence implements and exposes a REST API allowing remote authorized clients to read / write / modify security rules.
The advantages using such plugin are multiple:
The Authorizations rules have a fine granularity. The security rules are handled by GeoFence in a way similar to the iptables ones, and allow to define security constraints even on sub-regions and attributes of layers.
GeoFence exposes a REST interface to its internal rule database, allowing external managers to update the security constraints programmatically
GeoFence implements an internal caching mechanism which improves considerably the performances under load.
GeoNode interaction with GeoFence
GeoNode itself is able to push/manage Authorization rules to GeoServer through the GeoFence REST API, acting as an administrator for GeoServer. GeoNode properly configures the GeoFence rules anytime it is needed, i.e. the permissions of a Resource / Layer are updated.
GeoServer must know and must be able to access GeoNode via HTTP/HTTPS. In other words, an external user connected to GeoNode must be authenticated to GeoServer with same permissions. This is possible through the GeoNodeCoockieProcessingFiler.
Summarizing we will have different ways to access GeoNode Layers:
Through GeoNode via DJango Authentication and GeoNodeCoockieProcessingFiler; basically the users available in GeoNode are also valid for GeoServer or any other backend.
Warning
If a GeoNode user has “administrator” rights, he will be able to administer GeoServer too.
Through GeoServer Security Subsystem; it will be always possible to access to GeoServer using its internal security system and users, unless explictly disabled (warning this is dangerous, you must know what you are doing).
Let’s now see in details how the single pieces are configured and how they can be configured.
DJango OAuth Toolkit Setup and Configuration
As stated above, GeoNode makes use of the OAuth2 protocol for all the frontend interactions with GeoServer. GeoNode must be configured as an OAuth2 Provider and provide a Client ID and a Client Sercret key to GeoServer.
This is possible by enabling and configuring the Django OAuth Toolkit Plugin.
Warning
GeoNode and GeoServer won’t work at all if the following steps are not executed at the first installation.
Default settings.py Security Settings for OAuth2
Double check that the OAuth2 Provider and Security Plugin is enabled and that the settings below are correctly configured.
AUTH_IP_WHITELIST
AUTH_IP_WHITELIST property limits access to users/groups REST Role Service endpoints to the only whitelisted IP addresses. Empty list means ‘allow all’.
If you need to limit ‘api’ REST calls to only some specific IPs fill the list like this: AUTH_IP_WHITELIST = ['192.168.1.158', '192.168.1.159']
Default values are:
...
AUTH_IP_WHITELIST = []
...
INSTALLED_APPS
In order to allow GeoNode to act as an OAuth2 Provider, we need to enable the oauth2_provider DJango application provided by the “Django OAuth Toolkit”.
Default values are:
...
INSTALLED_APPS = (

    'modeltranslation',

    ...
    'guardian',
    'oauth2_provider',
    ...

) + GEONODE_APPS
...
MIDDLEWARE_CLASSES
Installing the oauth2_provider` DJango application is not sufficient to enable the full functionality. We need also GeoNode to include additional entities to its internal model.
Default values are:
...
MIDDLEWARE_CLASSES = (
    'django.middleware.common.CommonMiddleware',
    'django.contrib.sessions.middleware.SessionMiddleware',
    'django.contrib.messages.middleware.MessageMiddleware',

    # The setting below makes it possible to serve different languages per
    # user depending on things like headers in HTTP requests.
    'django.middleware.locale.LocaleMiddleware',
    'pagination.middleware.PaginationMiddleware',
    'django.middleware.csrf.CsrfViewMiddleware',
    'django.contrib.auth.middleware.AuthenticationMiddleware',
    'django.middleware.clickjacking.XFrameOptionsMiddleware',

    # If you use SessionAuthenticationMiddleware, be sure it appears before OAuth2TokenMiddleware.
    # SessionAuthenticationMiddleware is NOT required for using django-oauth-toolkit.
    'django.contrib.auth.middleware.SessionAuthenticationMiddleware',
    'oauth2_provider.middleware.OAuth2TokenMiddleware',
)
...
AUTHENTICATION_BACKENDS
In order to allow GeoNode to act as an OAuth2 Provider, we need to enable the oauth2_provider.backends.OAuth2Backend DJango backend provided by the “Django OAuth Toolkit”.
Also notice that we need to specify the OAuth2 Provider scopes and declare which generator to use in order to create OAuth2 Client IDs.
Default values are:
...
# Replacement of default authentication backend in order to support
# permissions per object.
AUTHENTICATION_BACKENDS = (
    'oauth2_provider.backends.OAuth2Backend',
    'django.contrib.auth.backends.ModelBackend',
    'guardian.backends.ObjectPermissionBackend',
)

OAUTH2_PROVIDER = {
    'SCOPES': {
        'read': 'Read scope',
        'write': 'Write scope',
        'groups': 'Access to your groups'
    },

    'CLIENT_ID_GENERATOR_CLASS': 'oauth2_provider.generators.ClientIdGenerator',
}
...
Django OAuth Toolkit Admin Setup
Once the settings.py and local_settings.py have been correctly configured for your system:
Complete the GeoNode setup steps
Prepare the model
python manage.py makemigrations
python manage.py migrate
python manage.py syncdb
Prepare the static data
python manage.py collectstatic
Make sure the database has been populated with initial default data
Warning
Deprecated this command will be replaced by migrations in the future, so be careful.
python manage.py loaddata initial_data.json
Make sure there exists a superuser for your environment
Warning
Deprecated this command will be replaced by migrations in the future, so be careful.
python manage.py createsuperuser
Note
Read the base tutorials on GeoNode Developer documentation for details on the specific commands and how to use them.
Start the application
Start GeoNode accordingly on how the setup has been done; run debug mode through
paver, or proxied by an HTTP Server like Apache2 HTTPD, Nginx or others.Finalize the setup of the OAuth2 Provider
First of all you need to configure and create a new OAuth2 Application called
GeoServerthrough the GeoNode Admin DashboardAccess the GeoNode Admin Dashboard
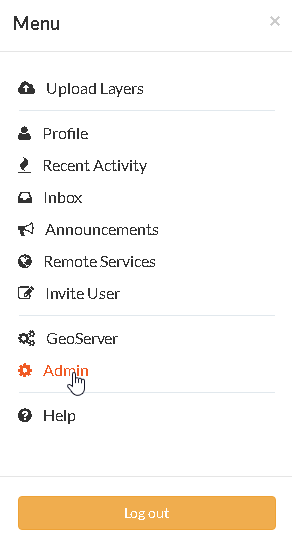
Go to
Django OAuth Toolkit>Applications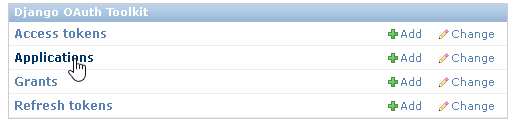
Update or create the Application named
GeoServerWarning
The Application name must be
GeoServer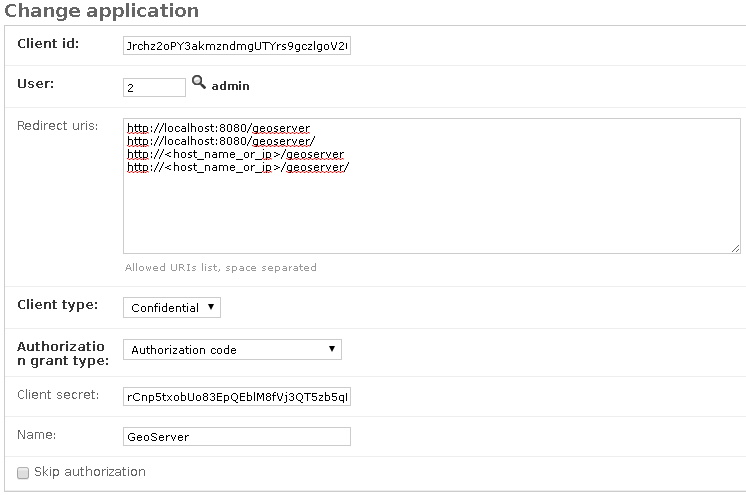
Client id; An alphanumeric code representing the OAuth2 Client Id. GeoServer OAuth2 Plugin will use this value.Warning
In a production environment it is highly recommended to modify the default value provided with GeoNode installation.
User; Search for theadminuser. ItsIDwill be automatically updated into the form.Redirect uris; It is possible to specify many URIs here. Those must coincide with the GeoServer instances URIs.Client type; ChooseConfidentialAuthorization grant type; ChooseAuthorization codeClient secret; An alphanumeric code representing the OAuth2 Client Secret. GeoServer OAuth2 Plugin will use this value.Warning
In a production environment it is highly recommended to modify the default value provided with GeoNode installation.
Name; Must beGeoServer
GeoServer Security Backend
GeoServer Security Subsystem
GeoServer has a robust security subsystem, modeled on Spring Security. Most of the security features are available through the Web administration interface.
For more details on how this works and how to configure and modify it, please refer to the official GeoServer guide http://docs.geoserver.org/stable/en/user/security/webadmin/index.html
By using the GeoServer Data Dir provided with GeoNode build, the following configuration are already available. You will need just to update them accordingly to your environment (like IP addresses and Host names, OAuth2 Keys, and similar things).
However it is recommended to read carefully all the following passages in order to understand exactly how the different component are configured and easily identify any possible issue during the deployment.
The main topics of this section are:
Connection to the GeoNode REST Role Service
Setup of the GeoServer OAuth2 Authentication Filter
Configuration of the GeoServer Filter Chains
Setup and test of the GeoFence Server and Default Rules
Connection to the GeoNode REST Role Service
Preliminary checks
GeoServer is up and running and you have admin rights
GeoServer must reach the GeoNode instance via HTTP
The GeoServer Host IP Address must be allowed to access the GeoNode Role Service APIs (see the section
AUTH_IP_WHITELISTabove)
Setup of the GeoNode REST Role Service
Login as
adminto the GeoServer GUIWarning
In a production system remember to change the default admin credentials
admingeoserver
Access the
Security>Users, Groups, Rolessection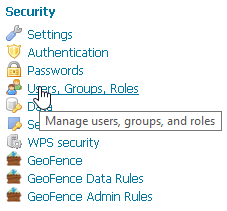
If not yet configured the service
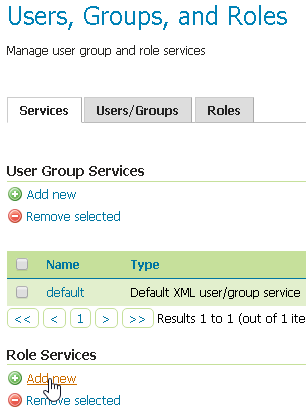
geonode REST role service, click onRole Services>Add newNote
This passage is not needed if the
geonode REST role servicehas been already created. If so it will be displayed among the Role Services list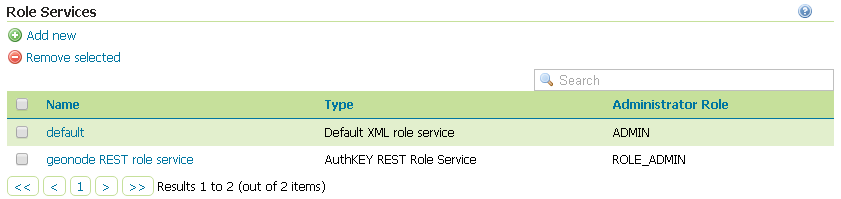
If not yet configured the service
geonode REST role service, chooseAuthKEY REST - Role service from REST endpoint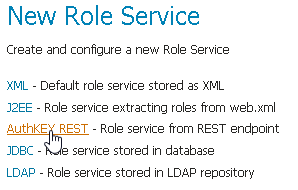
Create / update the
geonode REST role serviceaccordingly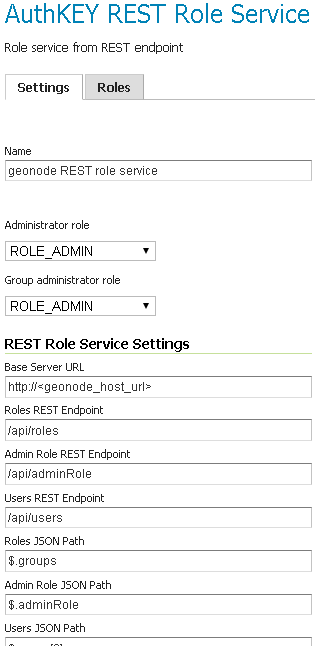
Name; Must begeonode REST role serviceBase Server URL; Must point to the GeoNode instance base URL (e.g.http://<geonode_host_url>)Roles REST Endpoint; Enter/api/rolesAdmin Role REST Endpoint; Enter/api/adminRoleUsers REST Endpoint; Enter/api/usersRoles JSON Path; Enter$.groupsAdmin Role JSON Path; Enter$.adminRoleUsers JSON Path; Enter$.users[0].groups
Once everything has been setup and it is working, choose the
Administrator roleandGroup administrator roleasROLE_ADMIN
Allow GeoFence to validate rules with ROLES
Warning
The following instruction are different accordingly to the GeoServer version you are currently using.
GeoServer 2.9.x and 2.10.x
Access the
Security>Settingssection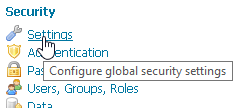
Choose the
geonode REST role serviceasActive role service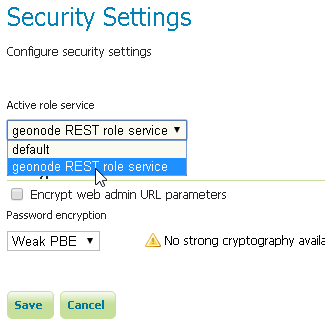
GeoServer 2.12.x and above
With the latest updates to GeoFence Plugin, the latter no more recognizes the Role Service from the default settings but from the geofence-server.properties file.
That said, it is important that the Security > Settings role service will be set to default, in order to allow GeoServer following the standard authorization chain.
On the other side, you will need to be sure that the geofence-server.properties file under the $GEOSERVER_DATA_DIR/geofence folder, contains the two following additional properties:
gwc.context.suffix=gwc
org.geoserver.rest.DefaultUserGroupServiceName=geonode REST role service
Setup of the GeoServer OAuth2 Authentication Filter
It is necessary now check that GeoServer can connect to OAuth2 Providers (specifically to GeoNode OP), and being able to Authenticate users through it.
Preliminary checks
GeoServer is up and running and you have admin rights
GeoServer must reach the GeoNode instance via HTTP
OAuth2
Client IDandClient Secrethave been generated on GeoNode and known
Setup of the GeoNode OAuth2 Security Filter
Access the
Security>Authenticationsection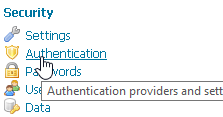
If not yet configured the Authentication Filter
geonode-oauth2 - Authentication using a GeoNode OAuth2, click onAuthentication Filters>Add newNote
This passage is not needed if the
geonode-oauth2 - Authentication using a GeoNode OAuth2has been already created. If so it will be displayed among the Authentication Filters list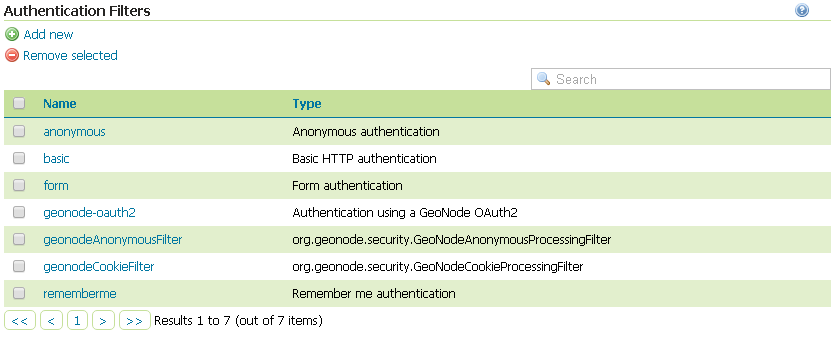

If not yet configured the Authentication Filter
geonode-oauth2 - Authentication using a GeoNode OAuth2, chooseGeoNode OAuth2 - Authenticates by looking up for a valid GeoNode OAuth2 access_token key sent as URL parameter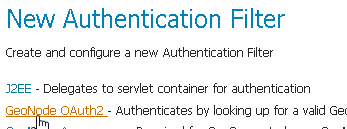
Create / update the
geonode-oauth2 - Authentication using a GeoNode OAuth2accordingly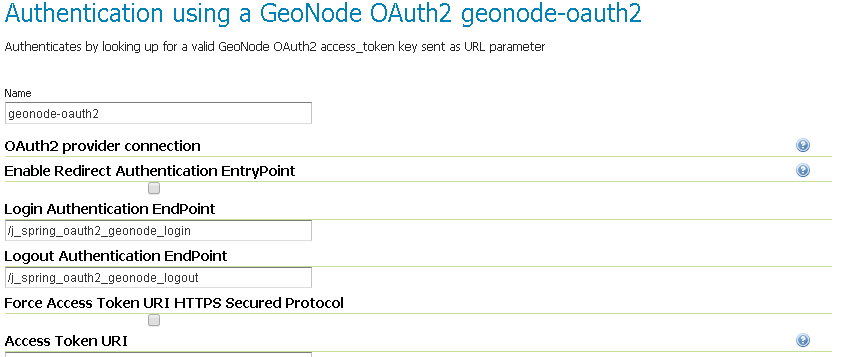
Name; Must begeonode-oauth2Enable Redirect Authentication EntryPoint; It is recommended to put this toFalse, otherwise GeoServer won’t allow you to connect to its Admin GUI through theFormbut only through GeoNodeLogin Authentication EndPoint; Unless you have specific needs, keep the default value/j_spring_oauth2_geonode_loginLogout Authentication EndPoint; Unless you have specific needs, keep the default value/j_spring_oauth2_geonode_logoutForce Access Token URI HTTPS Secured Protocol; This must beFalseunless you enabled aSecured Connectionon GeoNode. In that case you will need to trust the GeoNodeCertificateon the GeoServer JVM Keystore. Please see details belowAccess Token URI; Set this tohttp://<geonode_host_base_url>/o/token/Force User Authorization URI HTTPS Secured Protocol; This must beFalseunless you enabled aSecured Connectionon GeoNode. In that case you will need to trust the GeoNodeCertificateon the GeoServer JVM Keystore. Please see details belowUser Authorization URI; Set this tohttp://<geonode_host_base_url>/o/authorize/Redirect URI; Set this tohttp://<geoserver_host>/geoserver. This address must be present on theRedirect urisof GeoNodeOAuth2>Applications>GeoServer(see above)Check Token Endpoint URL; Set this tohttp://<geonode_host_base_url>/api/o/v4/tokeninfo/Logout URI; Set this tohttp://<geonode_host_base_url>/account/logout/Scopes; Unless you have specific needs, keep the default valueread,write,groupsClient ID; TheClient idalphanumeric key generated by the GeoNodeOAuth2>Applications>GeoServer(see above)Client Secret; TheClient secretalphanumeric key generated by the GeoNodeOAuth2>Applications>GeoServer(see above)Role source; In order to authorize the user against GeoNode, chooseRole service>geonode REST role service
Configuration of the GeoServer Filter Chains
The following steps ensure GeoServer can adopt more Authentication methods. As stated above, it is possible to Authenticate to GeoServer using different protocols.
GeoServer scans the authentication filters chain associated to the specified path and tries them one by one sequentially.
The first one matching the protocol and able to grant access to the user, breaks the cycle by creating a User Principal and injecting it into the GeoServer SecurityContext.
The Authentication process, then, ends here and the control goes to the Authorization one, which will try to retrieve the authenticated user’s Roles through the available GeoServer Role Services associated to the Authentication Filter that granted the access.
Preliminary checks
GeoServer is up and running and you have admin rights
GeoServer must reach the GeoNode instance via HTTP
The
geonode-oauth2 - Authentication using a GeoNode OAuth2Authentication Filter and thegeonode REST role servicehave been correctly configured
Setup of the GeoServer Filter Chains
Access the
Security>Authenticationsection
Identify the section
Filter Chains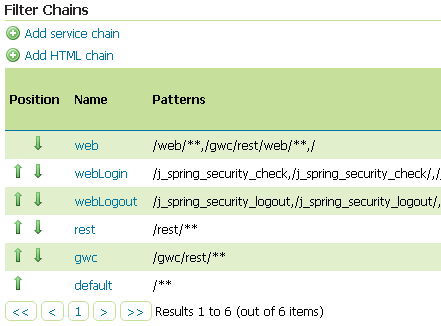
Make sure the
webFilter Chain is configured as shown below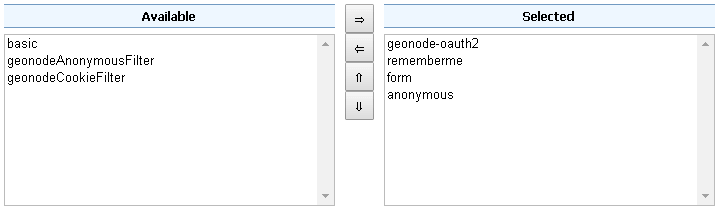
Warning
Every time you modify a Filter Chain, don’t forget to save the
Authenticationsettings. This must be done for each change.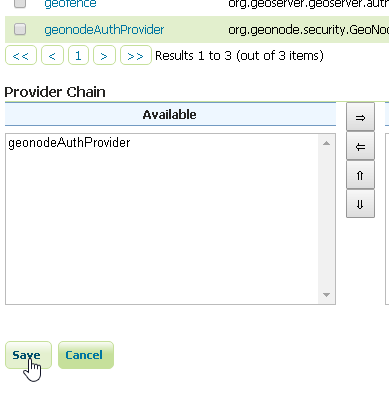
Make sure the
restFilter Chain is configured as shown below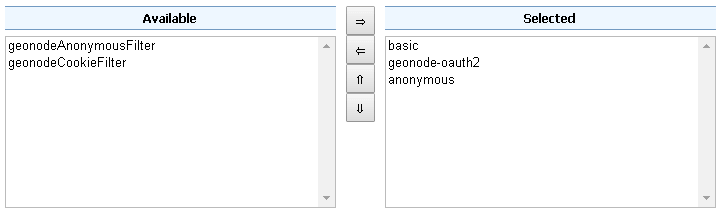
Warning
Every time you modify a Filter Chain, don’t forget to save the
Authenticationsettings. This must be done for each change.
Make sure the
gwcFilter Chain is configured as shown below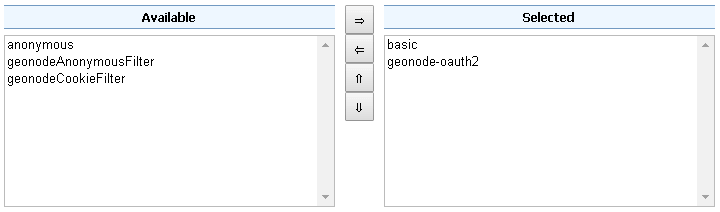
Warning
Every time you modify a Filter Chain, don’t forget to save the
Authenticationsettings. This must be done for each change.
Make sure the
defaultFilter Chain is configured as shown below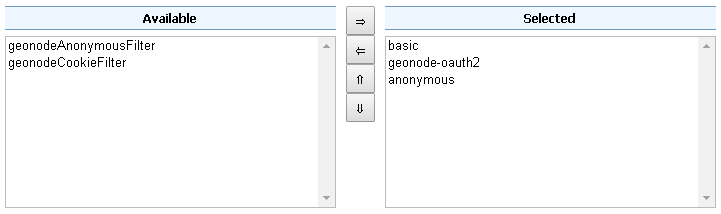
Warning
Every time you modify a Filter Chain, don’t forget to save the
Authenticationsettings. This must be done for each change.
Add the
GeoNode Login Endpointsto the comma-delimited list of thewebLoginFilter Chain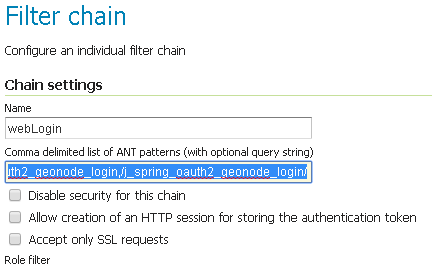
Warning
Every time you modify a Filter Chain, don’t forget to save the
Authenticationsettings. This must be done for each change.
Add the
GeoNode Logout Endpointsto the comma-delimited list of thewebLogoutFilter Chain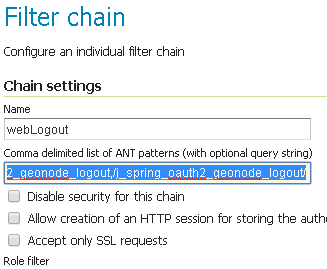
Warning
Every time you modify a Filter Chain, don’t forget to save the
Authenticationsettings. This must be done for each change.
Add the
GeoNode Logout Endpointsto the comma-delimited list of theformLogoutChainXML node in<GEOSERVER_DATA_DIR>/security/filter/formLogout/config.xmlYou will need a text editor to modify the file.
Note
If the
<formLogoutChain>XML node does not exist at all, create a new one as specified below<logoutFilter> ... <redirectURL>/web/</redirectURL> <formLogoutChain>/j_spring_security_logout,/j_spring_security_logout/,/j_spring_oauth2_geonode_logout,/j_spring_oauth2_geonode_logout/</formLogoutChain> </logoutFilter>
Warning
The value
j_spring_oauth2_geonode_logoutmust be the same specified asLogout Authentication EndPointin thegeonode-oauth2 - Authentication using a GeoNode OAuth2above.
Setup and test of the GeoFence Server and Default Rules
In order to work correctly, GeoServer needs the GeoFence Embedded Server plugin to be installed and configured on the system.
The GeoServer configuration provided for GeoNode, has the plugin already installed with a default configuration. In that case double check that the plugin works correctly and the default rules have been setup by following the next steps.
Preliminary checks
GeoServer is up and running and you have admin rights
The GeoFence Embedded Server plugin has been installed on GeoServer
Setup of the GeoServer Filter Chains
Access the
Security>Authenticationsection
Identify the section
Authentication Providersand make sure thegeofenceAuthentication Provider is present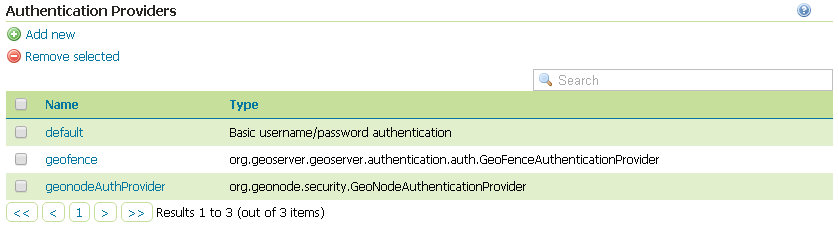
Make sure the
Provider Chainis configured as shown below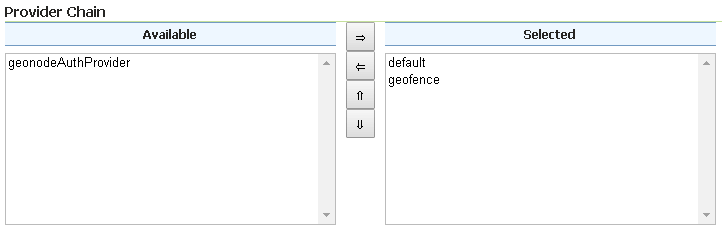
Warning
Every time you modify an Authentication Providers, don’t forget to save the
Authenticationsettings. This must be done for each change.
Setup of the GeoFence Server and Rules
Make sure GeoFence server works and the default settings are correctly configured
Access the
Security>GeoFencesection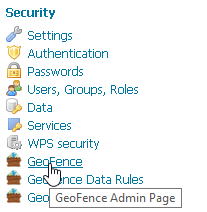
Make sure the
Optionsare configured as follows and the server works well when performing aTest Connection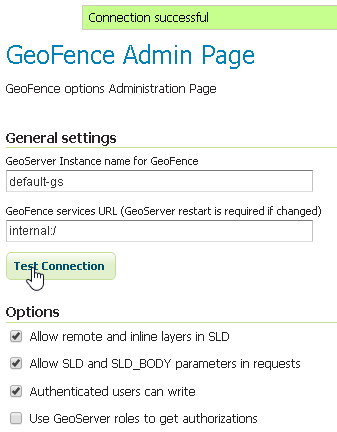
Allow remote and inline layers in SLD; Set it toTrueAllow SLD and SLD_BODY parameters in requests; Set it toTrueAuthenticated users can write; Set it toTrueUse GeoServer roles to get authorizations; Set it toFalse
Check the GeoFence default Rules
Access the
Security>GeoFence Data Rulessection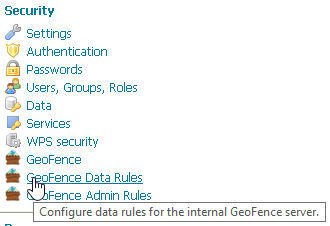
Make sure the
DENY ALLRule is present by default, otherwise your data will be accessible to everyoneNote
This rule is always the last one
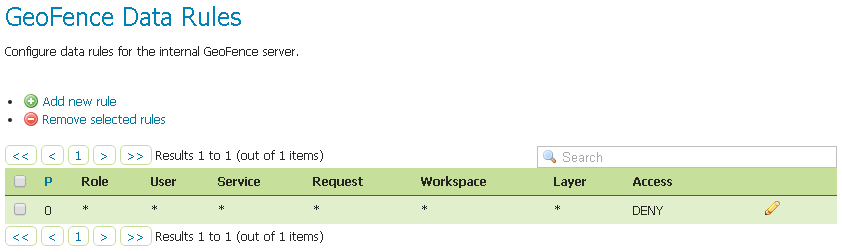
Warning
If that rule does not exists at the very bottom (this rule is always the last one), add it manually.
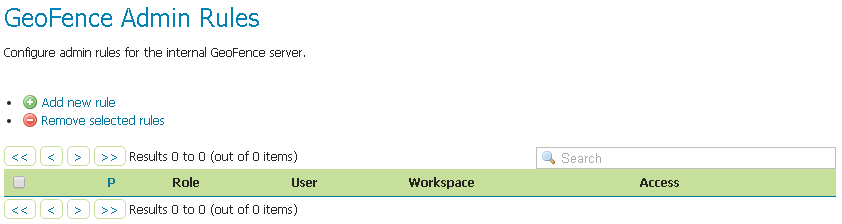
Access the
Security>GeoFence Admin Rulessection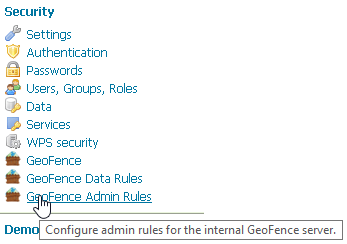
No Rules needed here
Troubleshooting and Advanced Features
Common Issues and Fixes
GeoServer/GeoNode OAuth2 does not authenticate as Administrator even using GeoNode
adminusersSymptoms
When trying to authenticate with an
adminuser using OAuth2, the process correctly redirects to GeoServer page but I’m not a GeoServer Administrator.Cause
That means that somehow GeoServer could not successfully complete the Authorization and Authentication process.
The possible causes of the problem may be the following ones:
The OAuth2 Authentication fails on GeoServer side
This is usually due to an exception while trying to complete the Authentication process.
A typical cause is that GeoServer tries to use HTTPS connections but the GeoNode certificate is not trusted;
In that case please refer to the section below. Also take a look at the logs (in particular the GeoServer one) as explained in debug_geonode. The GeoServer logs should contain a detailed Exception explaining the cause of the problem. If no exception is listed here (even after raised the log level to DEBUG), try to check for the GeoNode Role Service as explained below.
Another possible issue is that somehow the OAuth2 handshake cannot complete successfully;
Login into GeoServer as administrator through its WEB login form.
Double check that all the
geonode-oauth2 - Authentication using a GeoNode OAuth2parameters are correct. If everything is ok, take a look at the logs (in particular the GeoServer one) as explained in debug_geonode. The GeoServer logs should contain a detailed Exception explaining the cause of the problem. If no exception is listed here (even after raised the log level to DEBUG), try to check for the GeoNode Role Service as explained below.
GeoServer is not able to retrieve the user Role from a Role Service
Always double check both HTTP Server and GeoServer log as specified in section debug_geonode. This might directly guide you to the cause of the problem.
Check that the GeoServer host is granted to access GeoNode Role Service REST APIs in the
AUTH_IP_WHITELISTof thesettings.pyCheck that the
geonode REST role serviceis the default Role service and that the GeoServer OAuth2 Plugin has been configured to use it by defaultCheck that the GeoNode REST Role Service APIs are functional and produce correct JSON.
This is possible by using simple
cUrlGET calls likecurl http://localhost/api/adminRole $> {"adminRole": "admin"} curl http://localhost/api/users $> {"users": [{"username": "AnonymousUser", "groups": ["anonymous"]}, {"username": "afabiani", "groups": ["anonymous", "test"]}, {"username": "admin", "groups": ["anonymous", "test", "admin"]}]} curl http://localhost/api/roles $> {"groups": ["anonymous", "test", "admin"]} curl http://localhost/api/users/admin $> {"users": [{"username": "admin", "groups": ["anonymous", "test", "admin"]}]}
How to setup HTTPS secured endpoints
In a production system it is a good practice to encrypt the connection between GeoServer and GeoNode. That would be possible by enabling HTTPS Protocol on the GeoNode REST Role Service APIs and OAuth2 Endpoints.
Most of the times you will rely on a self-signed HTTPS connection using a generated certificate. That makes the connection untrusted and you will need to tell to the GeoServer Java Virtual Machine to trust it.
This can be done by following the steps below.
For any issue take a look at the logs (in particular the GeoServer one) as explained in debug_geonode. The GeoServer logs should contain a detailed Exception explaining the cause of the problem.
SSL Trusted Certificates
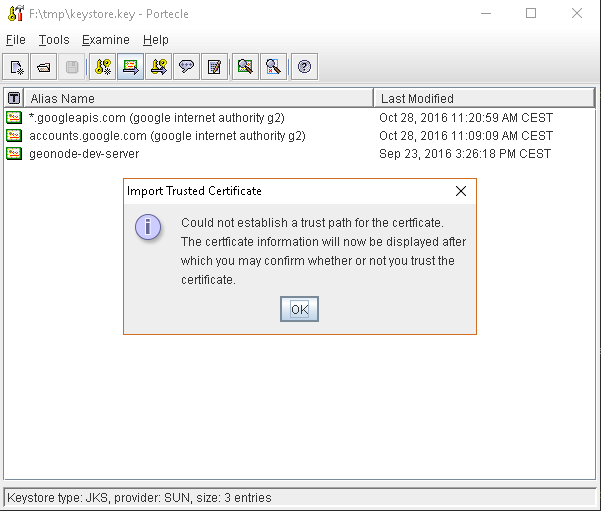
When using a custom Keystore or trying to access a non-trusted or self-signed SSL-protected OAuth2 Provider from a non-SSH connection, you will need to add the certificates to the JVM Keystore.
In order to do this you can follow the next steps:
In this example we are going to
Retrieve SSL Certificate from GeoNode domain:
“Access Token URI” = https://<geonode_host_base_url>/o/token/ therefore we need to trust
https://<geonode_host_base_url>or (<geonode_host_base_url>:443)Note
You will need to get and trust certificates from every different HTTPS URL used on OAuth2 Endpoints.
Store SSL Certificates on local hard-disk
Add SSL Certificates to the Java Keystore
Enable the JVM to check for SSL Certificates from the Keystore
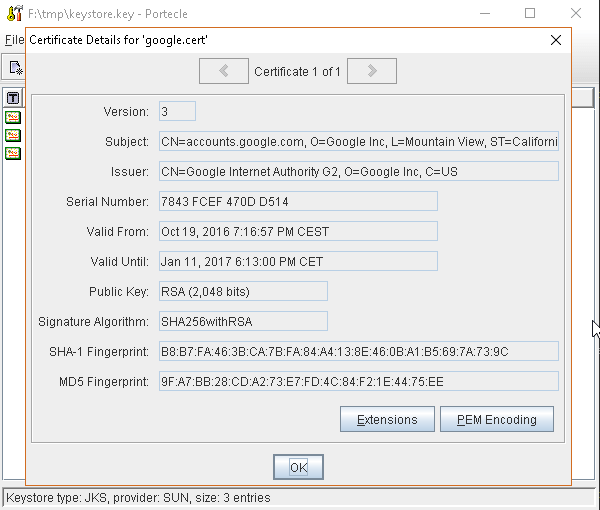
Retrieve the SSL Certificate from GeoNode domain
Use the
opensslcommand in order to dump the certificateFor
https://<geonode_host_base_url>openssl s_client -connect <geonode_host_base_url>:443
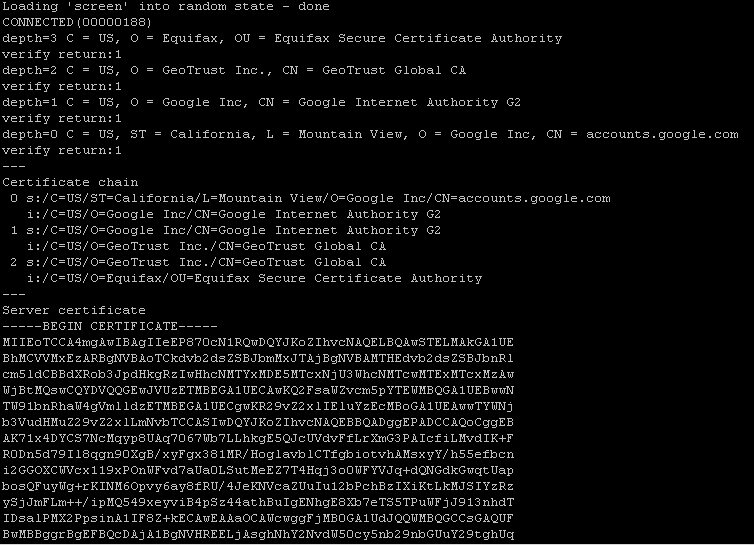
Store SSL Certificate on local hard-disk
Copy-and-paste the section
-BEGIN CERTIFICATE-,-END CERTIFICATE-and save it into a.certfileNote
.certfile are plain text files containing the ASCII characters included on the-BEGIN CERTIFICATE-,-END CERTIFICATE-sectionsgeonode.cert(or whatever name you want with.certextension)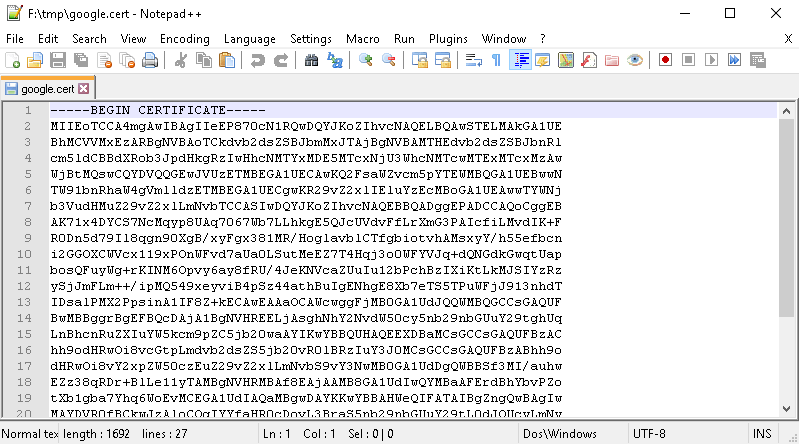
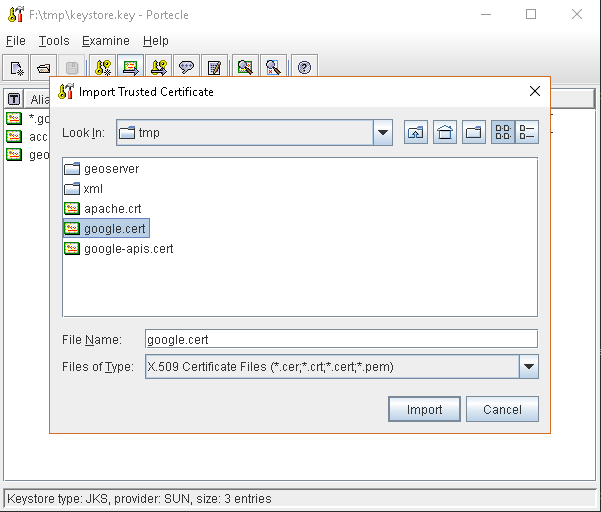
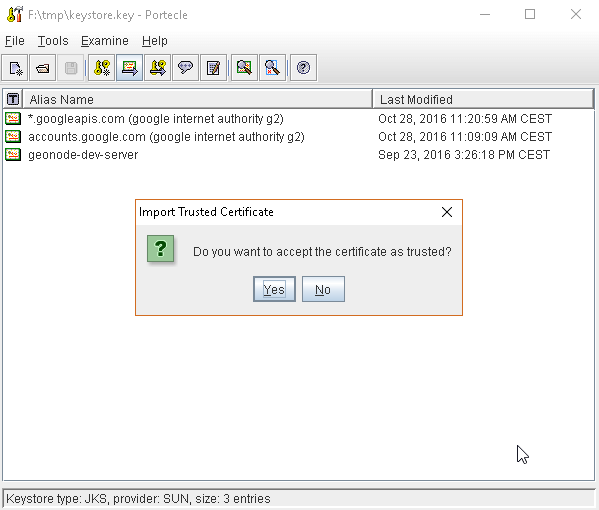
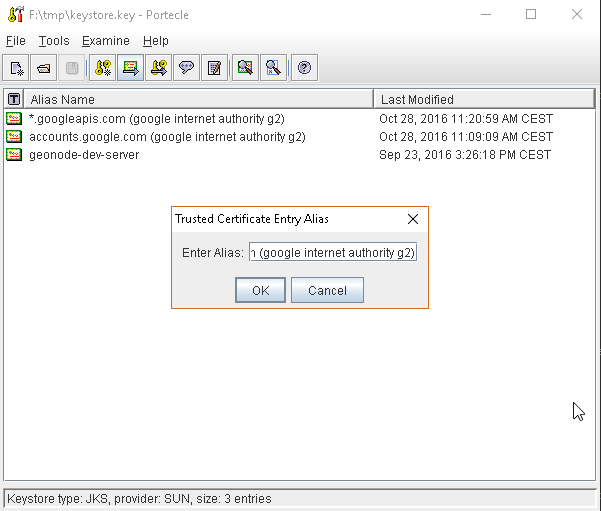
Add SSL Certificates to the Java Keystore
You can use the Java command
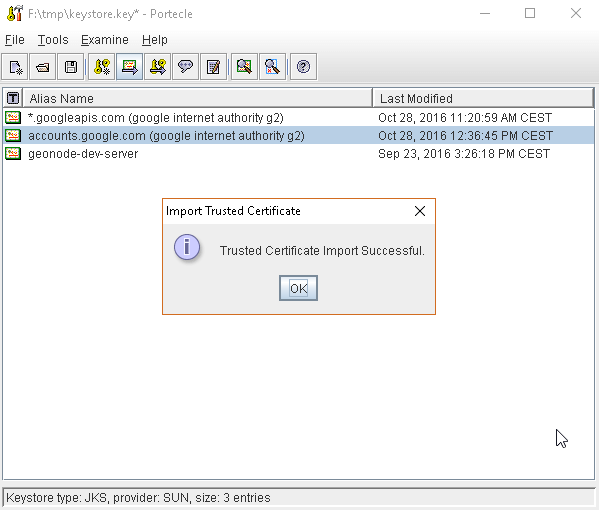
keytoollike thisgeonode.cert(or whatever name you want with.certextension)keytool -import -noprompt -trustcacerts -alias geonode -file geonode.cert -keystore ${KEYSTOREFILE} -storepass ${KEYSTOREPASS}
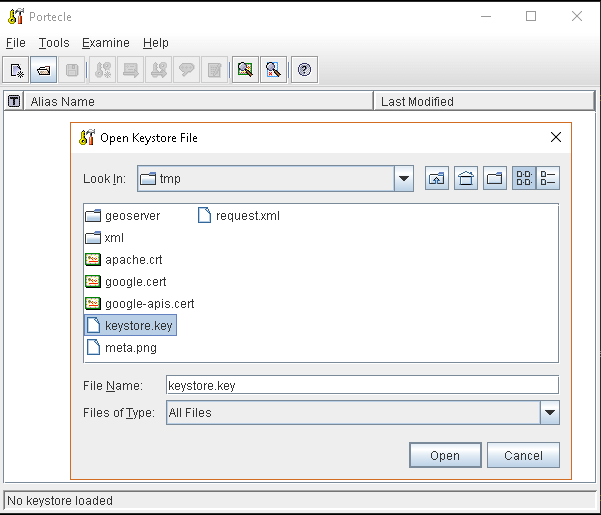
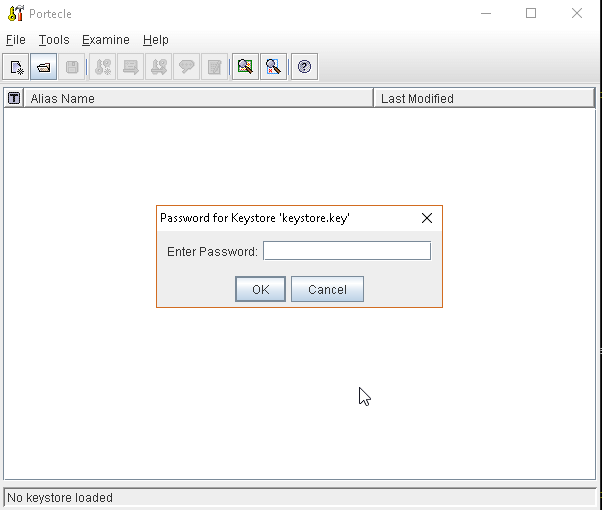
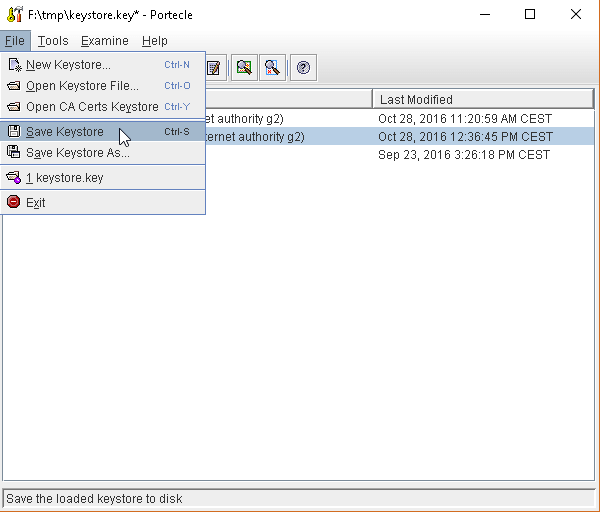
or, alternatively, you can use some graphic tool which helps you managing the SSL Certificates and Keystores, like Portecle
java -jar c:\apps\portecle-1.9\portecle.jar
Enable the JVM to check for SSL Certificates from the Keystore
In order to do this, you need to pass a
JAVA_OPTIONto your JVM:-Djavax.net.ssl.trustStore=F:\tmp\keystore.key
Restart your server
Note
Here below you can find a bash script which simplifies the Keystore SSL Certificates importing. Use it at your convenience.
HOST=myhost.example.com
PORT=443
KEYSTOREFILE=dest_keystore
KEYSTOREPASS=changeme

# get the SSL certificate
openssl s_client -connect ${HOST}:${PORT} </dev/null \
        | sed -ne '/-BEGIN CERTIFICATE-/,/-END CERTIFICATE-/p' > ${HOST}.cert

# create a keystore and import certificate
keytool -import -noprompt -trustcacerts \
        -alias ${HOST} -file ${HOST}.cert \
        -keystore ${KEYSTOREFILE} -storepass ${KEYSTOREPASS}

# verify we've got it.
keytool -list -v -keystore ${KEYSTOREFILE} -storepass ${KEYSTOREPASS} -alias ${HOST}
GeoFence Advanced Features
GeoFence Rules Management and Tutorials
This tutorial shows how to install and configure the Geofence Internal Server plug-in. It shows how to create rules in two ways: using the GUI and REST methods.
GeoFence Rules can be created / updated / deleted through a REST API, accessible only by a GeoServer Admin user. You can find more details on how the GeoFence REST API works here.
GeoFence Rules Storage Configuration
By default GeoFence is configured to use a filesystem based DB stored on the GeoServer Data Dir <GEOSERVER_DATA_DIR/geofence.
It is possible also to configure GeoFence in order to use an external PostgreSQL / PostGIS Database. For more details please refer to the official GeoFence documentation here.
Add
Java LibrariestoGeoServerwget --no-check-certificate "https://maven.geo-solutions.it/org/hibernatespatial/hibernate-spatial-postgis/1.1.3.2/hibernate-spatial-postgis-1.1.3.2.jar" -O hibernate-spatial-postgis-1.1.3.2.jar wget --no-check-certificate "https://repo1.maven.org/maven2/org/postgis/postgis-jdbc/1.3.3/postgis-jdbc-1.3.3.jar" -O postgis-jdbc-1.3.3.jar cp hibernate-spatial-postgis-1.1.3.2.jar <GEOSERVER_WEBAPP_DIR>/WEB-INF/lib cp postgis-jdbc-1.3.3.jar <GEOSERVER_WEBAPP_DIR>/WEB-INF/lib restart geoserver
Either create a DB with the updated schema here https://github.com/geoserver/geofence/blob/master/doc/setup/sql/002_create_schema_postgres.sql or enable the hbm2ddl auto creation through the configuration file (see step
3)Note
Notice that “update” also creates the tables if they do not exist. In production, however, I would suggest to change it to “validate”
# If you want to create a new DB for GeoFence
sudo -u postgres createdb -O geonode geofence; \
sudo -u postgres psql -d geofence -c 'CREATE EXTENSION postgis;'; \
sudo -u postgres psql -d geofence -c 'GRANT ALL ON geometry_columns TO PUBLIC;'; \
sudo -u postgres psql -d geofence -c 'GRANT ALL ON spatial_ref_sys TO PUBLIC;'; \
sudo -u postgres psql -d geofence -c 'GRANT ALL PRIVILEGES ON ALL TABLES IN SCHEMA public TO geonode;'
Add configuration similar to
geofence-datasource-ovr.propertiessample below (if loaded as GeoServer extension)<GEOSERVER_DATA_DIR>/geofence/geofence-datasource-ovr.properties
# /* (c) 2019 Open Source Geospatial Foundation - all rights reserved
#  * This code is licensed under the GPL 2.0 license, available at the root
#  * application directory.
#  */
#
geofenceVendorAdapter.databasePlatform=org.hibernatespatial.postgis.PostgisDialect
geofenceDataSource.driverClassName=org.postgresql.Driver
geofenceDataSource.url=jdbc:postgresql://localhost:5432/geofence
geofenceDataSource.username=postgres
geofenceDataSource.password=postgres
geofenceEntityManagerFactory.jpaPropertyMap[hibernate.default_schema]=public

################################################################################
## Other setup entries
################################################################################
## hbm2ddl.auto may assume one of these values:
## - validate: validates the DB schema at startup against the internal model. May fail on oracle spatial.
## - update: updates the schema, according to the internal model. Updating automatically the production DB is dangerous.
## - create-drop: drop the existing schema and recreates it according to the internal model. REALLY DANGEROUS, YOU WILL LOSE YOUR DATA.
## You may want not to redefine the property entirely, in order to leave the default value (no action).

geofenceEntityManagerFactory.jpaPropertyMap[hibernate.hbm2ddl.auto]=update
geofenceEntityManagerFactory.jpaPropertyMap[javax.persistence.validation.mode]=none
geofenceEntityManagerFactory.jpaPropertyMap[hibernate.validator.apply_to_ddl]=false
geofenceEntityManagerFactory.jpaPropertyMap[hibernate.validator.autoregister_listeners]=false

##
## ShowSQL is set to true in the configuration file; putting showsql=false in
## this file, you can easily check that this override file has been properly applied.

# geofenceVendorAdapter.generateDdl=false
# geofenceVendorAdapter.showSql=false

## Set to "true" in specific use cases
# workspaceConfigOpts.showDefaultGroups=false


################################################################################
## Disable second level cache.
## This is needed in a geofence-clustered environment.

#geofenceEntityManagerFactory.jpaPropertyMap[hibernate.cache.use_second_level_cache]=false

################################################################################
## Use external ehcache configuration file.
## Useful to change cache settings, for example diskStore path.
#geofenceEntityManagerFactory.jpaPropertyMap[hibernate.cache.provider_configuration_file_resource_path]=file:/path/to/geofence-ehcache-override.xml