The admin command to backup and restore GeoNode, allows to extract consistently the GeoNode and GeoServer data models in a serializable
meta-format which is being interpreted later by the restore procedure in order to exactly rebuild the whole structure.
In particular the tool helps developers and administrators to correctly extract and serialize the following resources:
GeoNode (Resource Base Model):
Layers (both raster and vectors)
Maps
Documents
People with Credentials
Permissions
Associated Styles
Static data and templates
GeoServer (Catalog):
OWS Services configuration and limits
Security model along with auth filters configuration, users and credentials
Workspaces
Stores (both DataStores and CoverageStores)
Layers
Styles
The tool exposes two GeoNode Management Commands, ‘backup’ and ‘restore’.
The commands allow to:
Fully backup GeoNode data and fixtures on a zip archive
Fully restore GeoNode and GeoServer fixtures and catalog from the zip archive
The usage of those commands is quite easy and straightforward.
The first step is to ensure that everything is correctly configured and the requisites respected in order to successfully
perform a backup and restore of GeoNode.
Warning
It is worth to notice that this functionality requires the latest GeoServer Extension (2.9.x or greater) for GeoNode in order to correctly work.
Note
GeoServer full documentation is also available here GeoServer Docs
Accordingly to the admin needs, the file settings.ini must be ceated before running a backup or restore.
The default files can be found at geonode/br/management/commands/settings_sample.ini and geonode/br/management/commands/settings_docker_sample.ini
for the classic and Docker environments accordingly. The content is similar in both of them (an example from settings_sample.ini):
[database]pgdump=pg_dumppgrestore=pg_restore[geoserver]datadir=geoserver/datadumpvectordata=yesdumprasterdata=yes[fixtures]# NOTE: Order is importantapps=contenttypes,auth,people,groups,account,guardian,admin,actstream,announcements,avatar,base,dialogos,documents,geoserver,invitations,pinax_notifications,layers,maps,oauth2_provider,services,sites,socialaccount,taggit,tastypie,upload,user_messagesdumps=contenttypes,auth,people,groups,account,guardian,admin,actstream,announcements,avatar,base,dialogos,documents,geoserver,invitations,pinax_notifications,layers,maps,oauth2_provider,services,sites,socialaccount,taggit,tastypie,upload,user_messages
The settings.ini file can be created in any directory accessible by GeoNode, and it’s path can be passed to the backup / restore
procedures using -c (–config) argument.
There are few different sections of the configuration file, that must be carefully checked before running a backup / restore command.
This section is quite simple. It contains only two properties:
pgdump; the path of the pg_dump local command.
pgrestore; the path of the pg_restore local command.
Warning
Those properties are ignored in case GeoNode is not configured to use a DataBase as backend (see settings.py and local_settings.py sections)
Note
Database connection settings (both for GeoNode and GeoServer) will be taken from settings.py and local_settings.py configuration files. Make sure they are correctly configured (on the target GeoNode instance, too) and the DataBase server is accessible while executing a backup / restore command.
This section allows to enable / disable a full data backup / restore of GeoServer.
datadir: the full path of GeoServer Data Dir, by default /opt/gs_data_dir. The path must be accessible and fully writable by the geonode and / or httpdserver users when executing a backup / restore command.
datadir_exclude_file_path: comma separated list of paths to exclude from geoserver_catalog.zip; This list will be sent and managed directly by the GeoServer Backup REST API.
dumpvectordata: a boolean flag enabling or disabling creation of a vector data dump from GeoServer (shapefiles or DB tables). If false (or no) vector data won’t be stored / re-stored.
dumprasterdata: a boolean flag enabling or disabling creation of a raster data dump from GeoServer (geotiffs). If false (or no) raster data won’t be stored / re-stored.
data_dt_filter: {cmp_operator} {ISO8601} e.g. > 2019-04-05T24:00 which means “include on backup archive only the files that have been modified later than 2019-04-05T24:00
data_layername_filter: comma separated list of layernames, optionally with glob syntax e.g.: tuscany_*,italy; Only RASTER original data and VECTORIAL table dumps matching those filters will be included into the backup ZIP archive
data_layername_exclude_filter: comma separated list of layernames, optionally with glob syntax e.g.: tuscany_*,italy; The RASTER original data and VECTORIAL table dumps matching those filters will be excluded from the backup ZIP archive
Warning
Enabling these options requires the GeoServer Data Dir to be accessible and fully writable for the geonode and / or httpdserver users when executing a backup / restore command.
[fixtures]#NOTE: Order is importantapps=people,account,avatar.avatar,base.backup,base.license,base.topiccategory,base.region,base.resourcebase,base.contactrole,base.link,base.restrictioncodetype,base.spatialrepresentationtype,guardian.userobjectpermission,guardian.groupobjectpermission,layers.uploadsession,layers.style,layers.layer,layers.attribute,layers.layerfile,maps.map,maps.maplayer,maps.mapsnapshot,documents.document,taggitdumps=people,accounts,avatars,backups,licenses,topiccategories,regions,resourcebases,contactroles,links,restrictioncodetypes,spatialrepresentationtypes,useropermissions,groupopermissions,uploadsessions,styles,layers,attributes,layerfiles,maps,maplayers,mapsnapshots,documents,tags
This section is the most complex one. Usually you don’t need to modify it. Only an expert user who knows Python and GeoNode model structure should modify this section.
What its properties mean:
apps; an ordered list of GeoNode Django applications. The backup / restore procedure will dump / restore the fixtures in a portable format.
dumps; this is the list of files associated to the Django applications. The order must be the same as in the apps property above. Each name represents the filename where to dump to / read from the single app’s fixtures.
--help will provide the list of available command line options with a brief description.
By default both procedures activate Read Only mode, disabling any content modifying requests, which is reverted
to the previous state (from before the execution) after finish, regardless of the command’s result (success or failure).
To disable activation of this mode, --skip-read-only argument can be passed to the command.
It is worth notice that both commands allows the following option
The management command will automatically generate a .zip archive file on the target folder in case of success. In the target directory
.md5 file with the same name as backup will be created. It contains the MD5 hash of the backup file, which can be used to check archive’s
integrity before restoration.
It is worth to mention that br (Backup & Restore GeoNode application) will not be dumped, even if specified in the settings.ini as
its content is strictly related to the certain GeoNode instance.
Currently, GeoNode does not support any automatic extraction of the backup file. It should be manually transferred, if needed to the target
instance environment.
The restore command has a number of arguments, modifying its execution:
# -c / --config: path to the settings.ini configuration file. If the Backup archive is provided with his settings, the latter will be used by the restore command and this option won’t be mandatory anymore
--skip-geoserver: the GeoServer backup restoration won’t be performed
--skip-geoserver-info: {Default: True} Skips GeoServer Global Infos, like the proxy base url and other global GeoServer metadata info
--skip-geoserver-security: {Default: True} Skips GeoServer all the Security Settings
--backup-file: (exclusive together with --backup-files-dir) path to the backup .zip archive
--backup-files-dir: (exclusive together with --backup-file) directory containing backup archives. The directory may contain a number of files, but only backup archives are allowed with a .zip extension. In case multiple archives are present in the directory, the newest one, created after the last already restored backup creation time, will be restored. This option was implemented with a thought of automated restores.
--recovery-file: Backup archive containing GeoNode data to restore in case of failure.
-l / --with-logs: the backup file will be checked against the restoration logs (history). In case this backup has already been restored (MD5 based comparision), RuntimeError is raised, preventing restore execution.
-n / --notify: the restore procedure outcome will be send by an e-mail notification to the superusers of the instance (note: notification will be sent to the superusers of the instance before restoration).
--skip-read-only: the restore procedure will be conducted without setting Read Only mode during execution.
--soft-reset: the restore procedure will preserve geoserver table / resources during the restore. By default the procedure will drop tables and resources
In order to perform a default backup restoration just run the command:
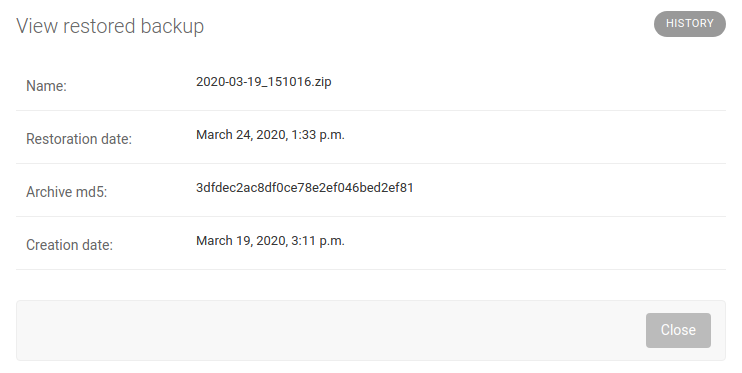
The history of restored backups can be verified in the admin panel.
Login to the admin panel and select Restoredbackups table from BACKUP/RESTORE application.
A list will be displayed with a history of all restored backups. You can select a certain backup to view it’s data.
The detailed view of the restored backup shows backup archive’s name, it’s MD5 hash, it’s creation/modification date (in the target folder), and the date of the restoration. Please note Restored Backup history cannot be modified.
When executing B/R in the Docker environment, creation backup to / restoration from should be executed in /backup_restore directory.
It is a shared volume between Geoserver and Geonode images, created for this purpose only. Pointing at another
location will fail, as one of the images won’t have an access to the files.
Warning
When executing B/R in Docker environment remember to create settings.ini file basing on settings_docker_sample.ini to point at a proper Geoserver data directory! In other case configuration mismatch may cause unexpected errors.
Warning
The only other volume shared between images is /geoserver_data/data, but backup creation should not be performed there, as the recursive Geoserver backups may be created in such case.
When installing GeoNode through the geonode-project Docker (see GeoNode Basic Installation), an instance of Jenkins CI/CD is also automatically deployed and available through http://<geonode_host>/jenkins.
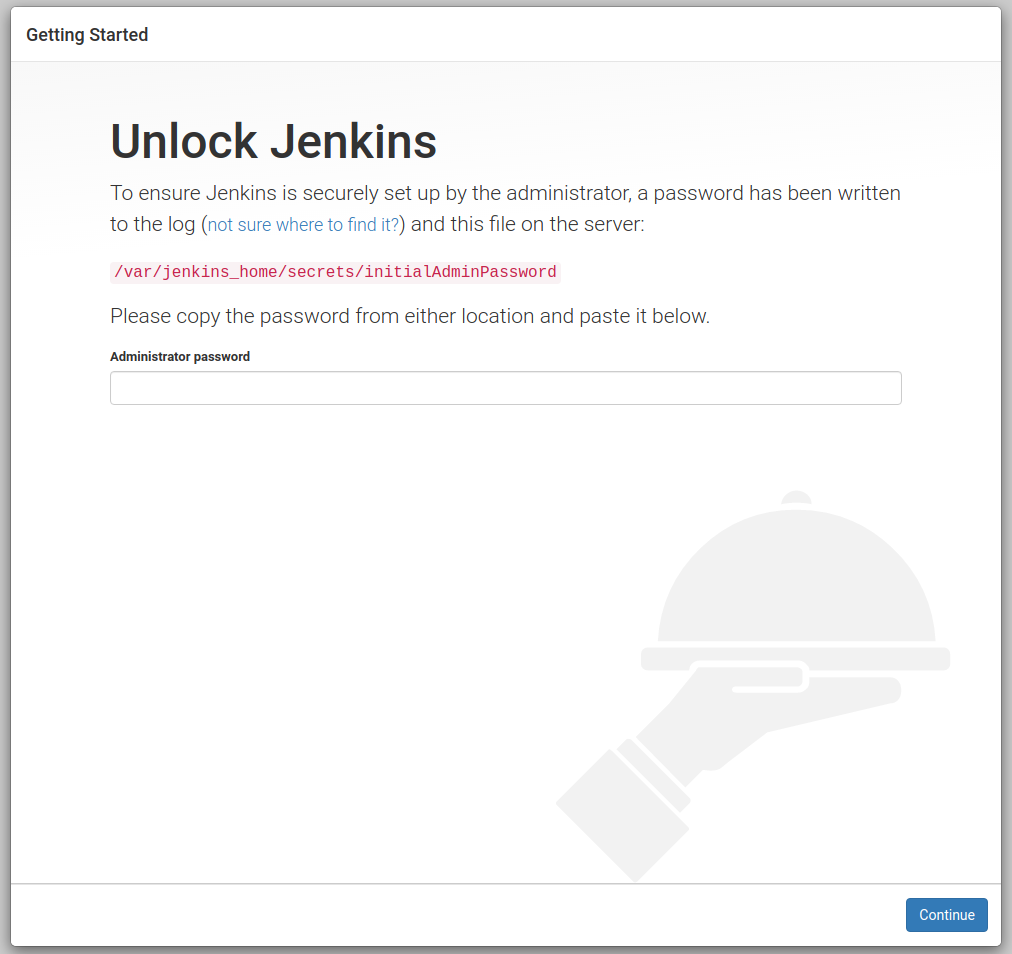
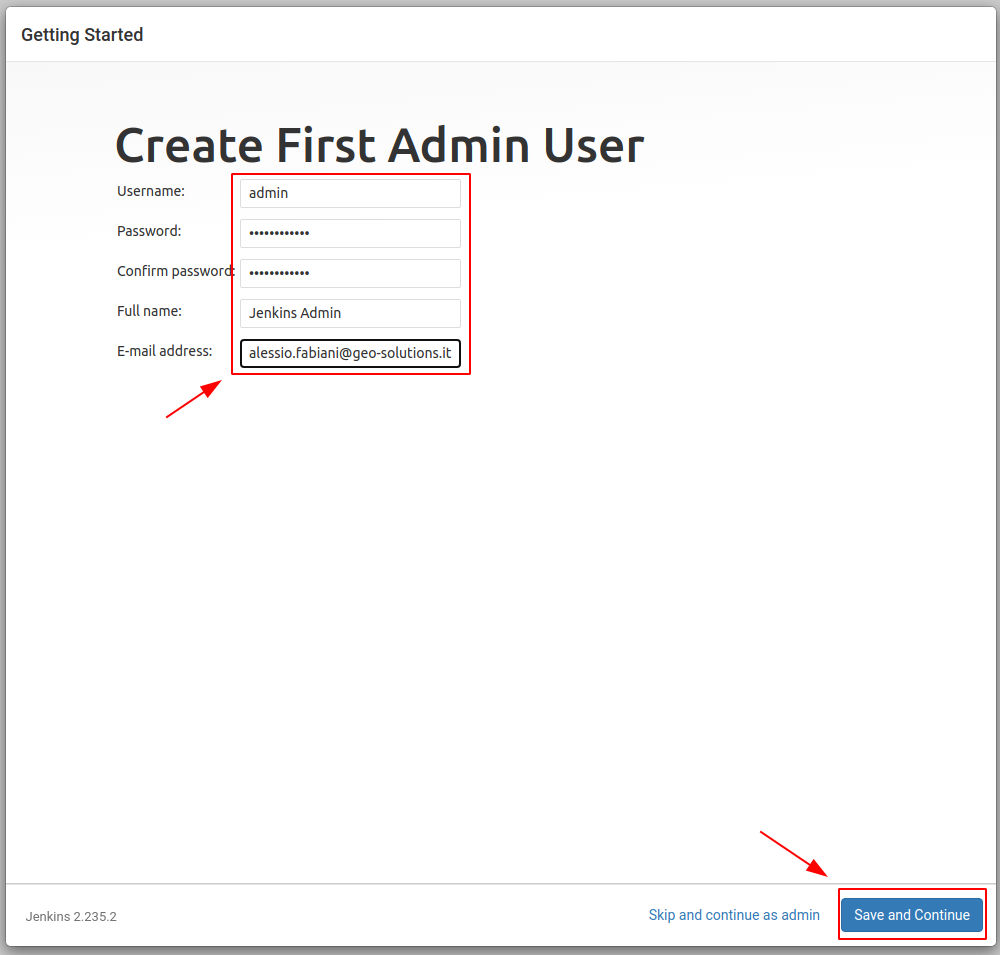
The very first time you try to access Jenkins, you will need to unlock it and generate a new administrator username and password.
In order to do that, you need to print the contents of the auto-generated file /var/jenkins_home/secrets/initialAdminPassword
First of all search for the Jenkins container ID, usually jenkins4{{project_name}} where {{project_name}} is the name of your geonode-project instance (e.g. my_geonode)
$> docker ps
CONTAINER ID IMAGE COMMAND CREATED STATUS PORTS NAMES
e9fc97a75d1a geonode/nginx:geoserver "/docker-entrypoint.…"2 hours ago Up 2 hours 0.0.0.0:80->80/tcp, 0.0.0.0:443->443/tcp nginx4my_geonode
c5496400b1b9 my_geonode_django "/bin/sh -c 'service…"2 hours ago Up 2 hours django4my_geonode
bc899f81fa28 my_geonode_celery "/bin/sh -c 'service…"2 hours ago Up 2 hours celery4my_geonode
3b213400d630 geonode/geoserver:2.17.1 "/usr/local/tomcat/t…"2 hours ago Up 2 hours 8080/tcp geoserver4my_geonode
d2f59d70a0d3 geonode/postgis:11 "docker-entrypoint.s…"2 hours ago Up 2 hours 5432/tcp db4my_geonode
3f9ce0be7f88 rabbitmq "docker-entrypoint.s…"2 hours ago Up 2 hours 4369/tcp, 5671-5672/tcp, 25672/tcp rabbitmq4my_geonode
02fdbce9ae73 geonode/letsencrypt:latest "./docker-entrypoint…"2 hours ago Up 14 seconds my_geonode_letsencrypt_1
c745520fd551 jenkins/jenkins:lts "/sbin/tini -- /usr/…"2 hours ago Up 2 hours 0.0.0.0:9080->9080/tcp, 8080/tcp, 0.0.0.0:50000->50000/tcp, 0.0.0.0:9443->8443/tcp jenkins4my_geonode
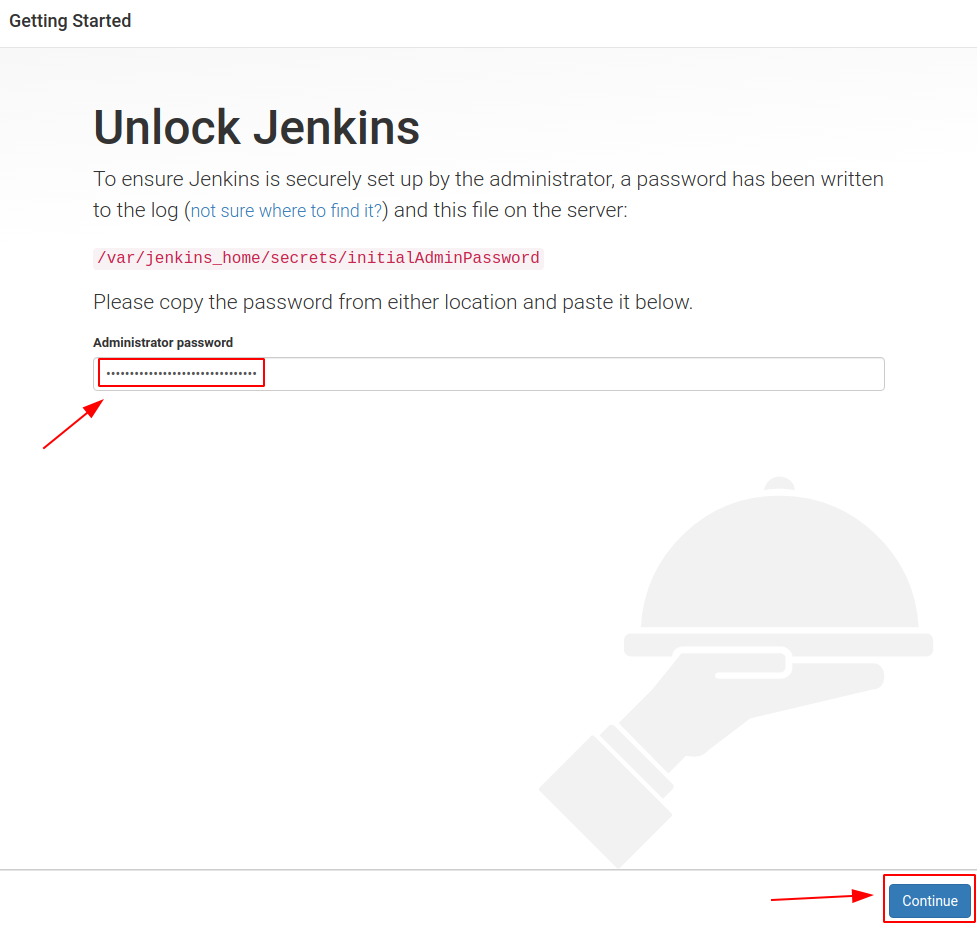
Now just cat the file above inside the Jenkins container
Copy the hash code you just got form the print above, and copy-and-paste to the browser window
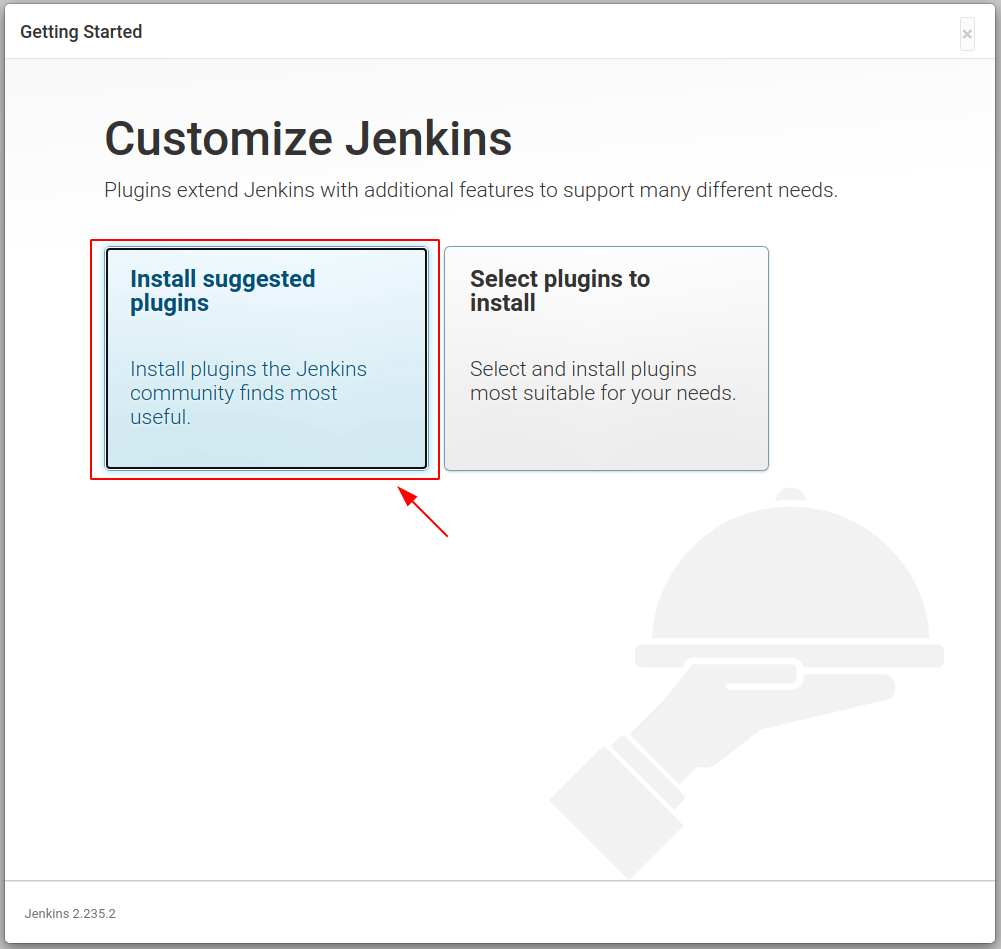
In the next step just install the Default Plugins. You can install more of them later on from the management page.
Wait until Jenkins has finished configuring the plugins
Provide the administrator credentials as requested
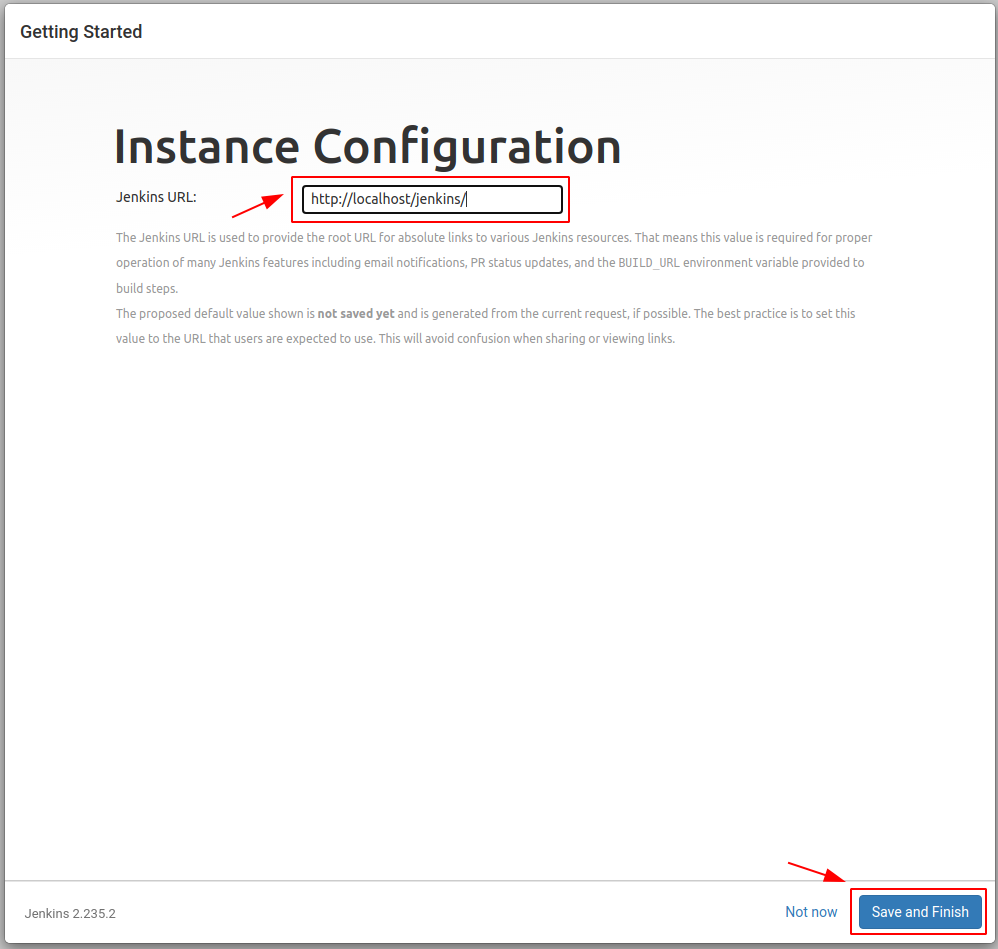
Confirm the Jenkins instance URL, this can be changed form the configuration later in case you will need to update the server address
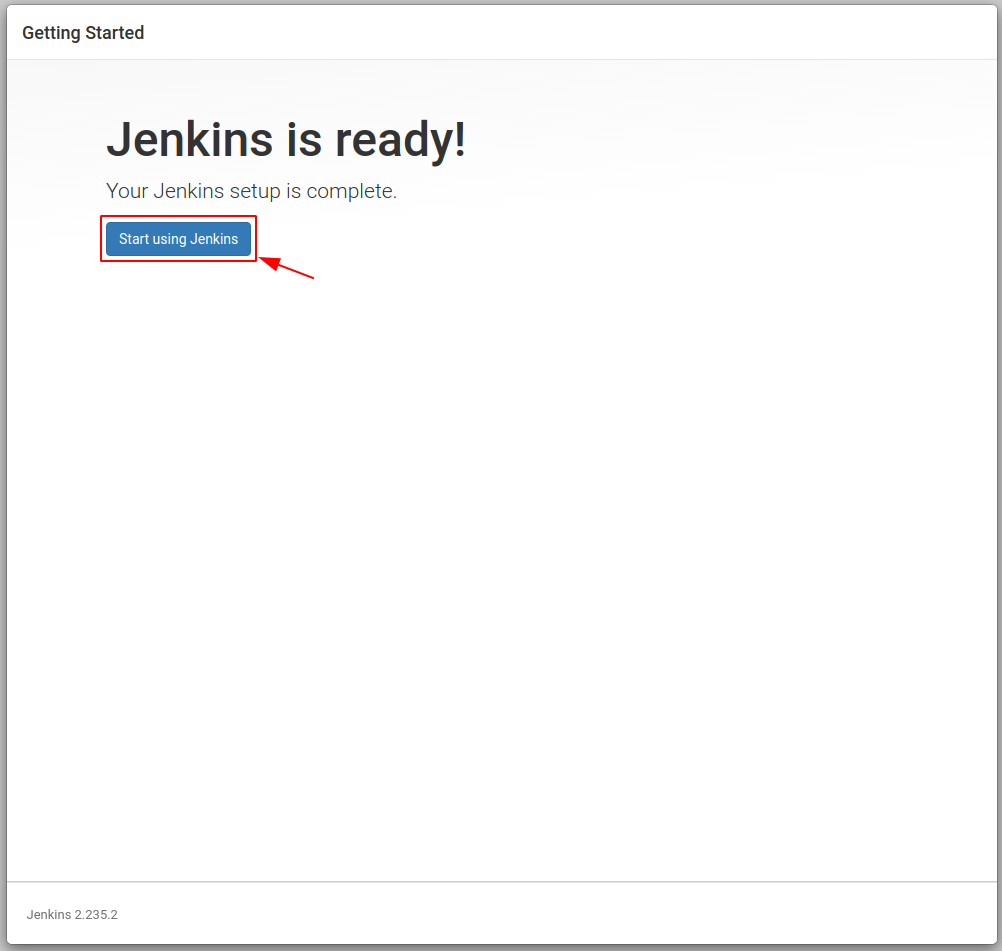
Well done, Jenkins is ready now
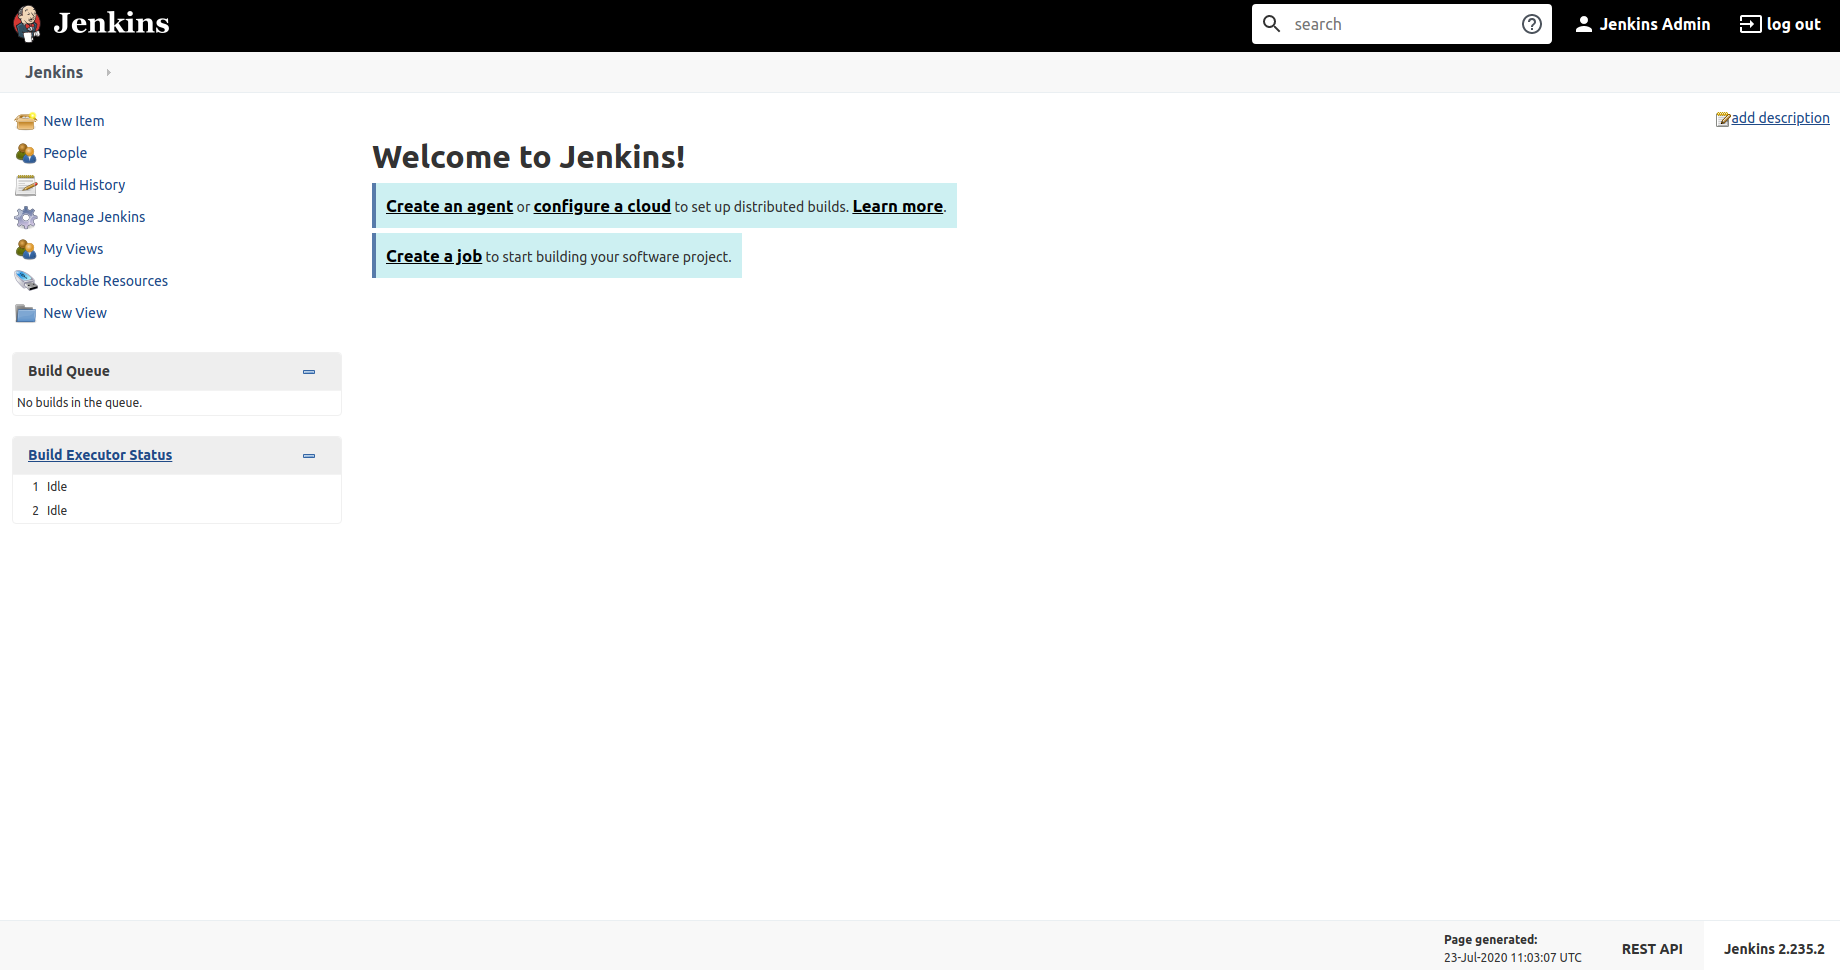
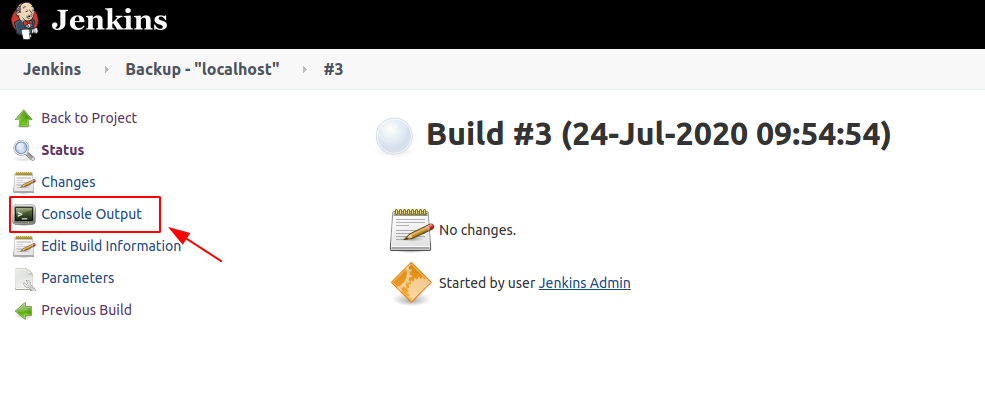
The next step is to configure a Jenkins Job able to interact with the Django Docker container and run a full backup
Configure a Jenkins Job to run a full backup on the Django Container
Before creating the new Jenkins job, we need to install and configure a new plugin, Publish over SSH
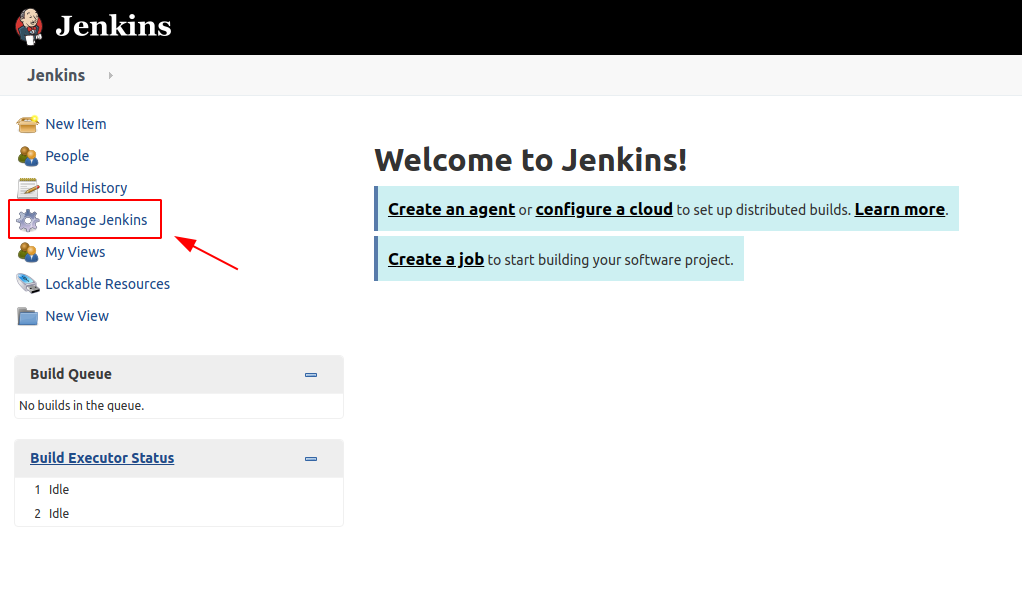
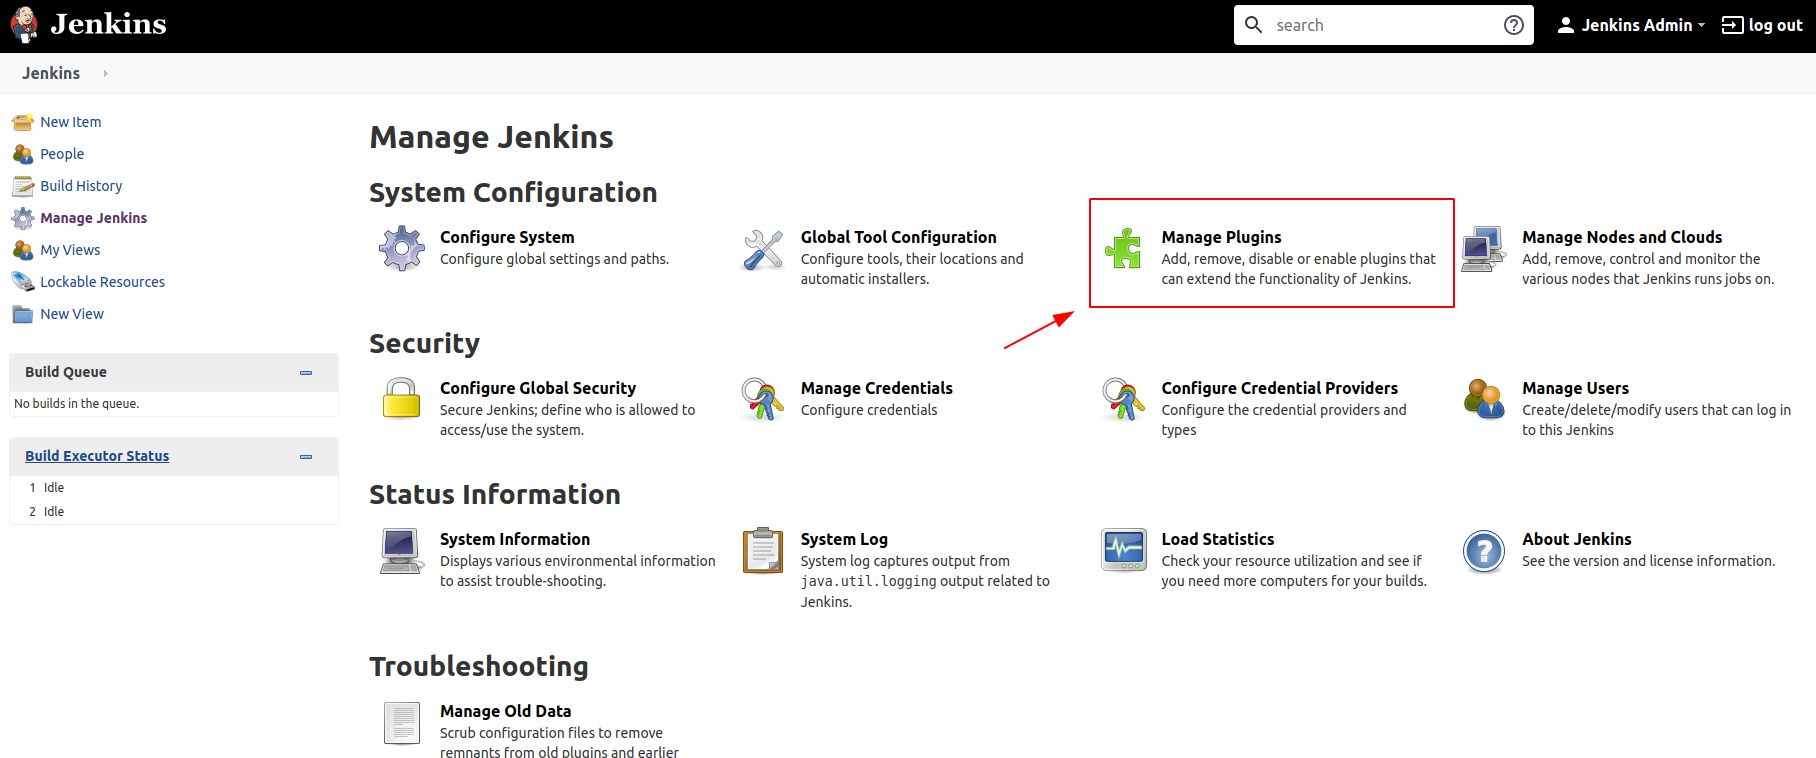
In order to do that, once logged in as admin, go to the Jenkins Management Page > Manage Plugins tab
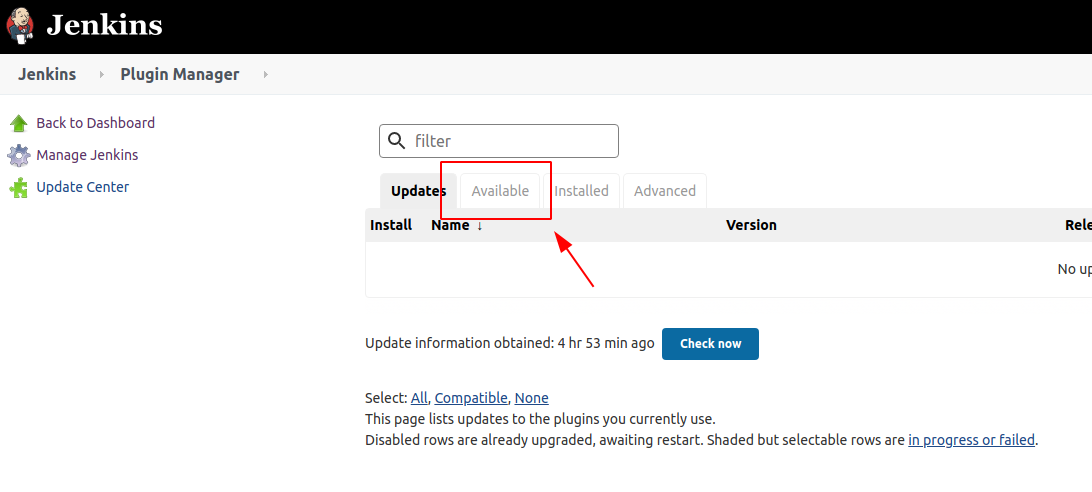
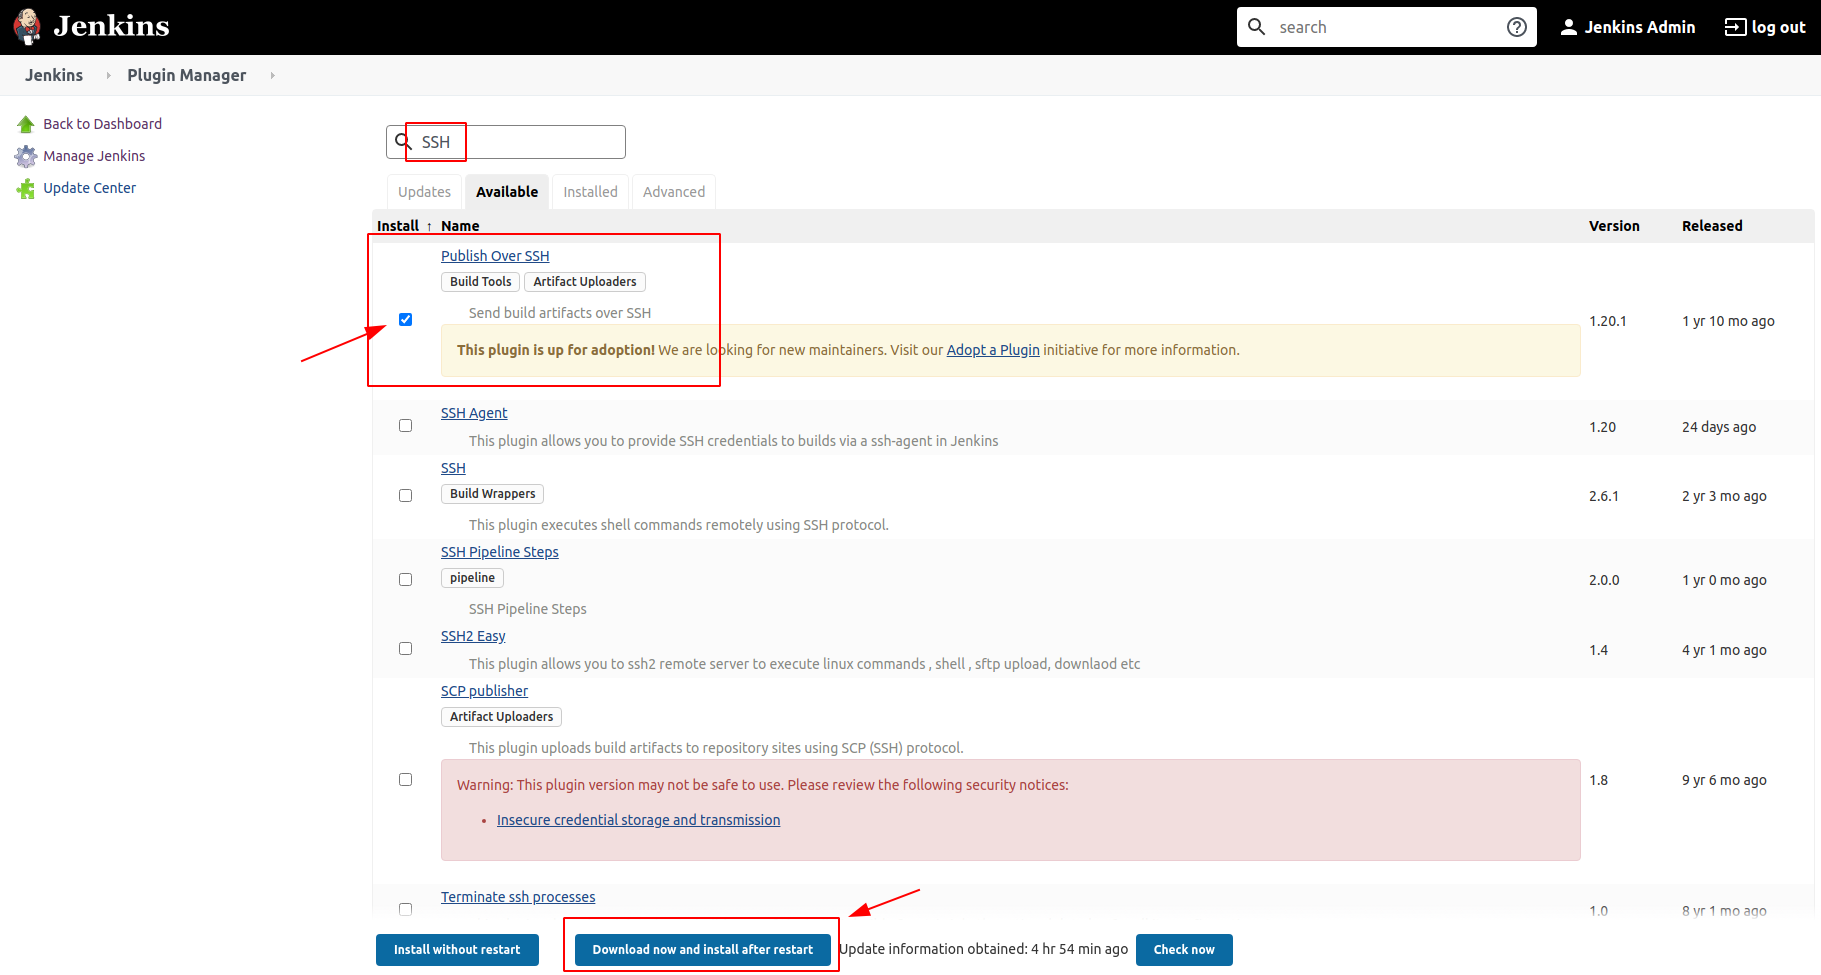
Click on Available tab and search for SSH available plugins
Select and check the PublishoverSSH one
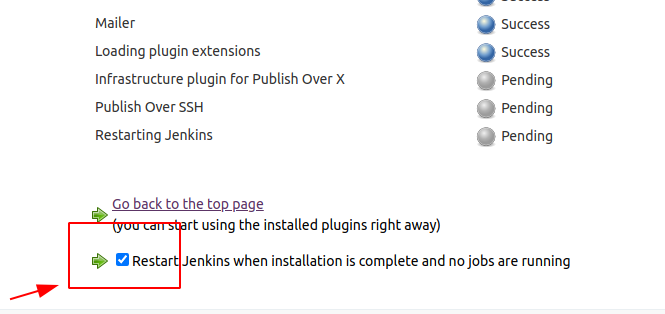
Install the plugins and restart Jenkins
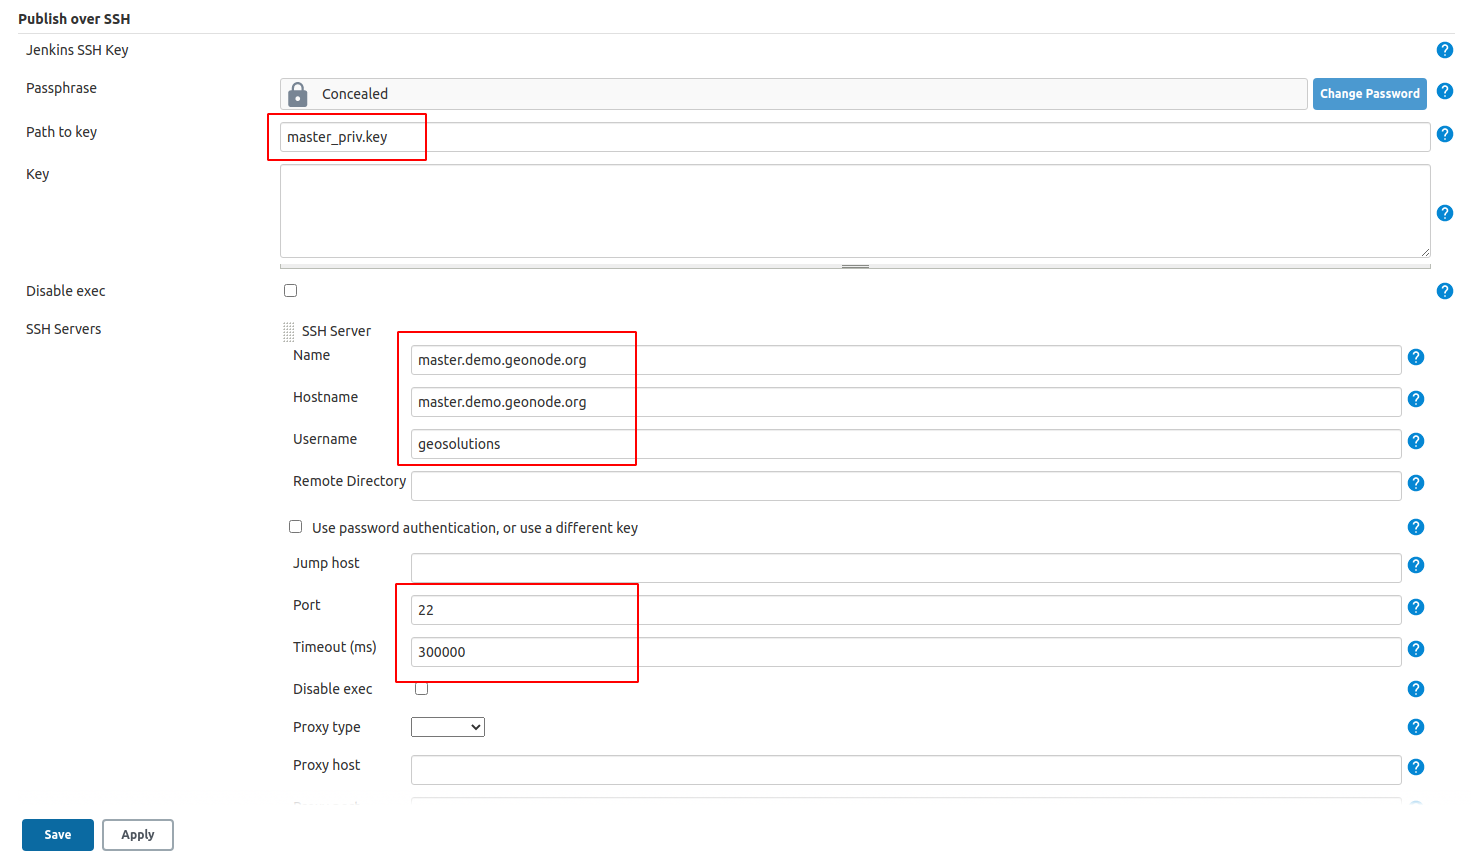
The next step is to configure the SSHServerConnection for the Publish over SSH plugin.
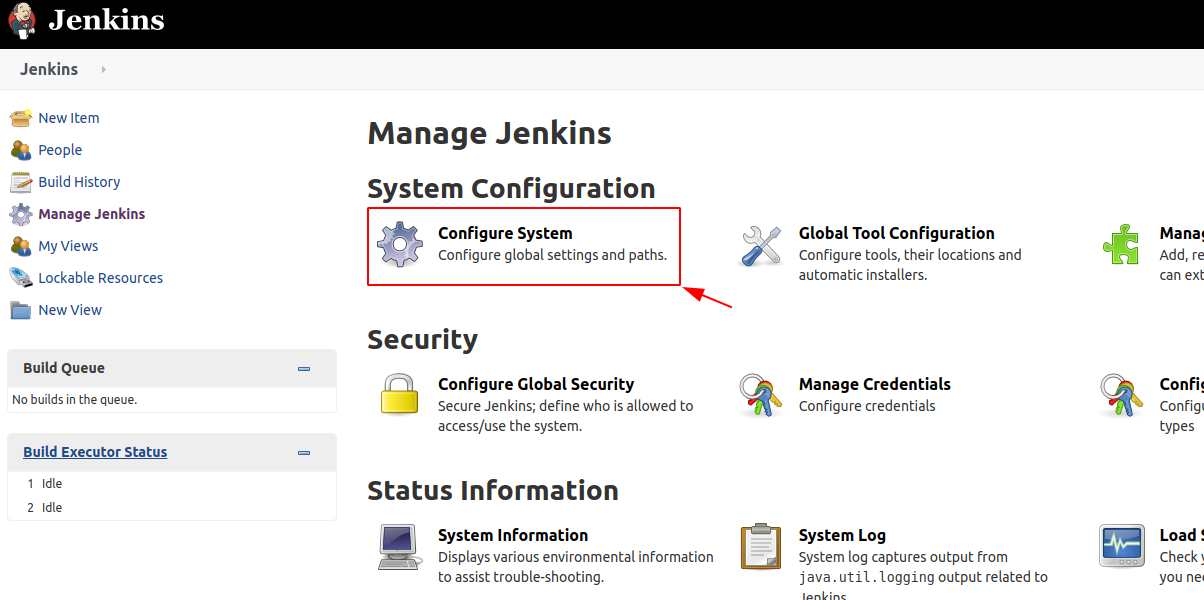
Move to Jenkins Configuration
Scroll down until you find the Publish over SSH plugin section
Depending on how your HOSTSSHservice has been configured, you might need several information in order to setup the connection.
Here below an example using a global host (master.demo.geonode.org) accepting SSH connections via RSAkeys
Note
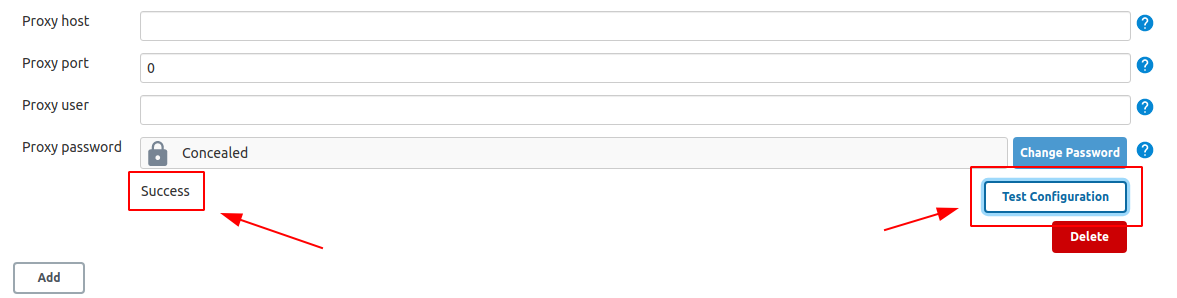
Before saving the configuration always ensure the connection is ok by using the Test Configuration button
It is possible also to run and configure Jenkins to run locally, as an instance on localhost.
In that case you will need to change few things in order to allow Jenkins to access your local network.
First of all, be sure OpenSSH Server is correctly installed and running on your PC. Eventually check any firewall rules.
$> sudo apt install openssh-server

# Test your connection locally
$> ssh -p 22 user@localhost
   user@localhost's password:
You will need to do some changed to your docker-compose.yml file in order to enable the host network configuration.
From now on, your local Jenkins instance will be accessible from http://localhost:9080/jenkins
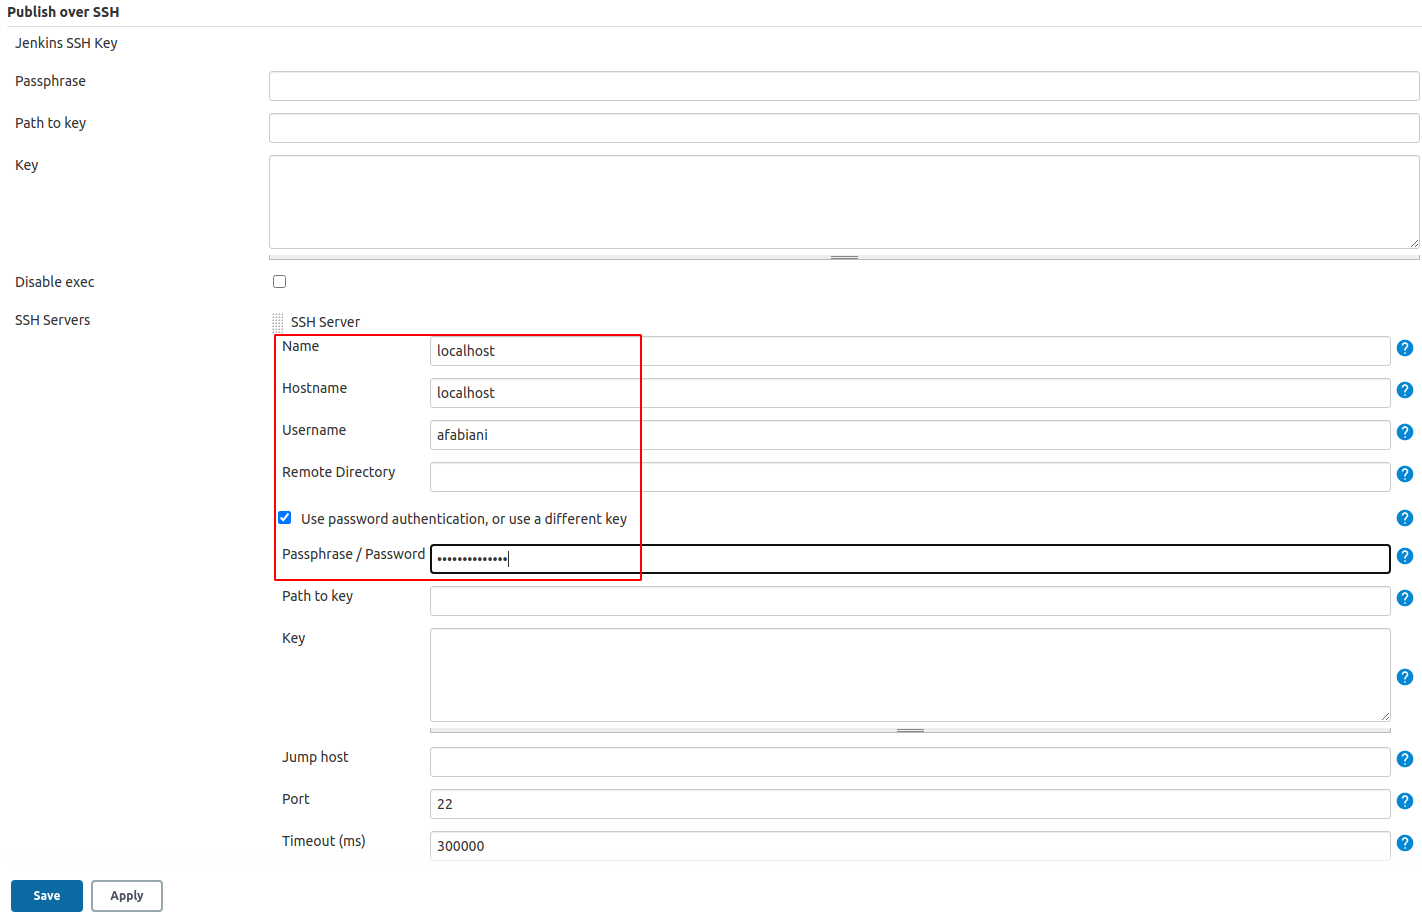
Add localhost Server to the Publish over SSH plugin configuration
Mode to http://localhost:9080/jenkins/configure and fill the required information
Note
Before saving the configuration always ensure the connection is ok by using the Test Configuration button
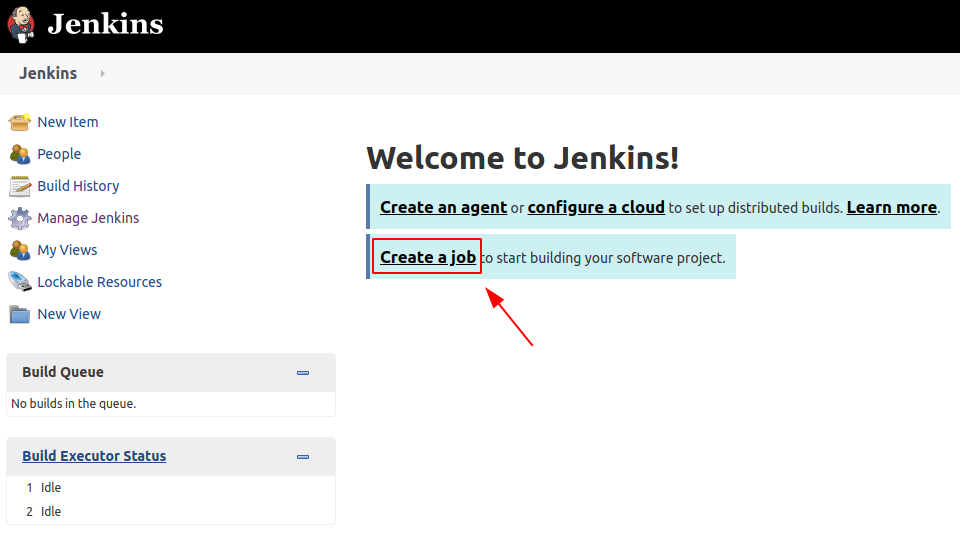
We are now ready to create the Jenkins Job which will run a full backup & restore of our GeoNode dockerized instance.
Move to the Jenkins Home and click on Create a Job button
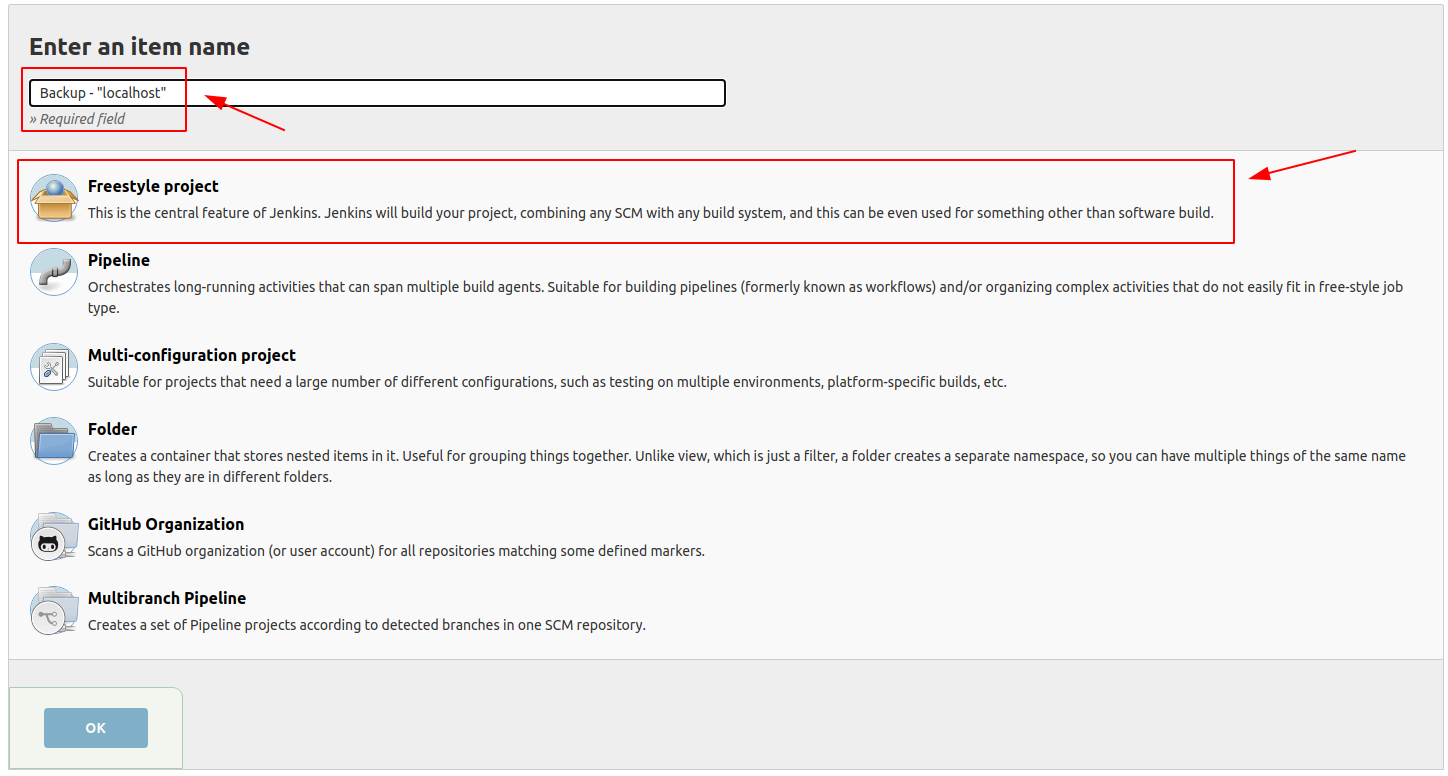
Provide a name to the Job and select Freestyle project
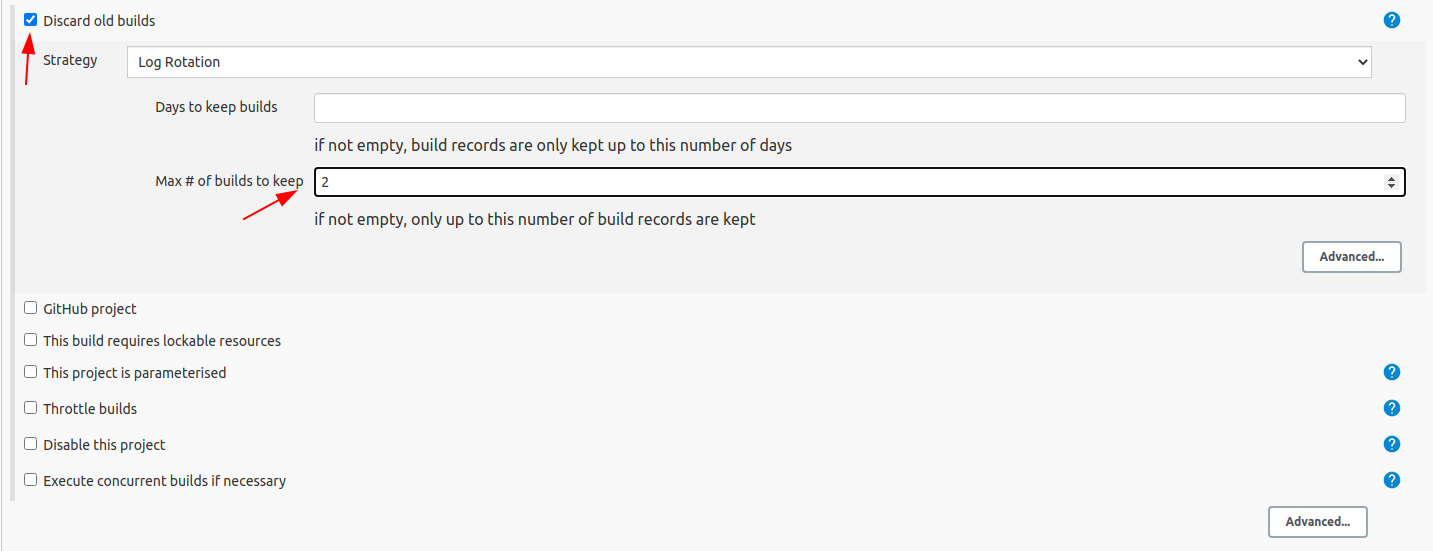
Enable the Log rotation strategy if needed
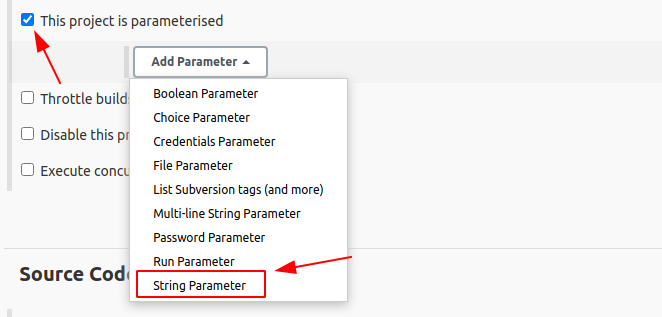
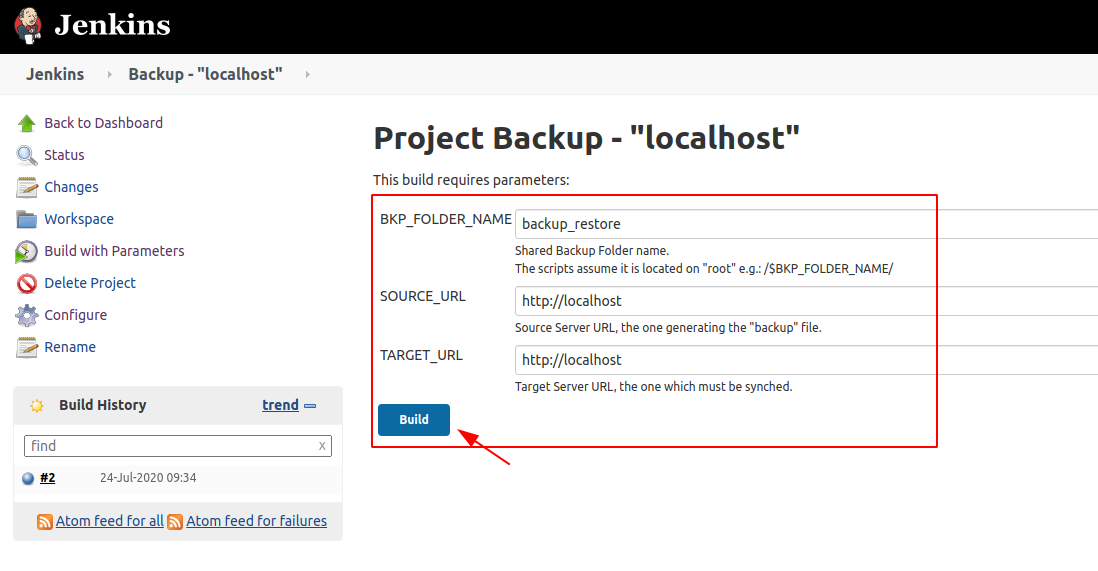
Configure the Job Parameters which will be used by the script later on.
Add three String Parameters
as shown below
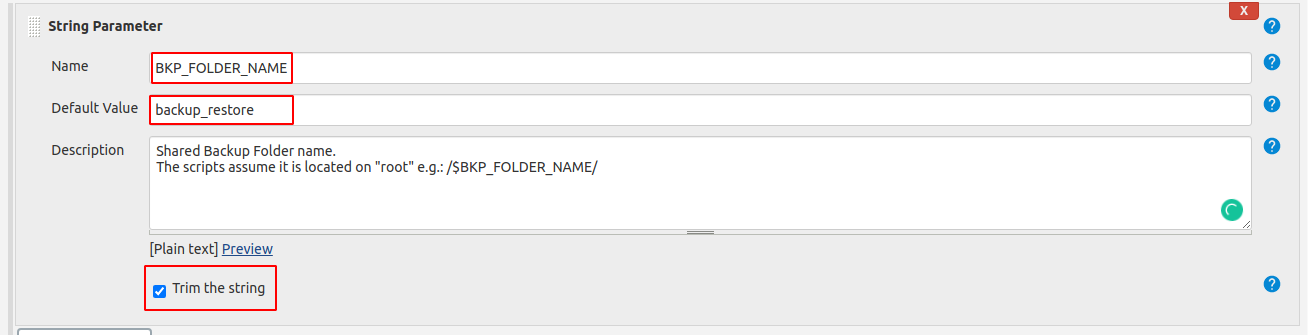
BKP_FOLDER_NAME
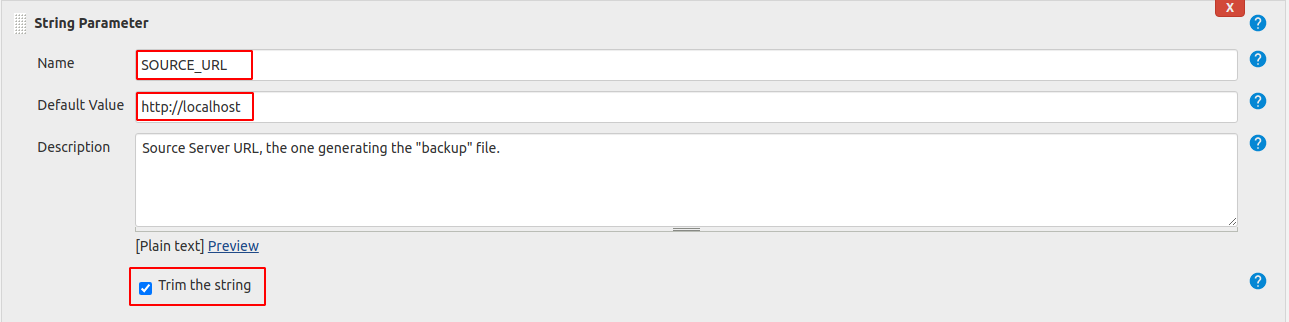
SOURCE_URL
Warning
Provide the correct URL of your GeoNode instance
TARGET_URL
Warning
Provide the correct URL of your GeoNode instance
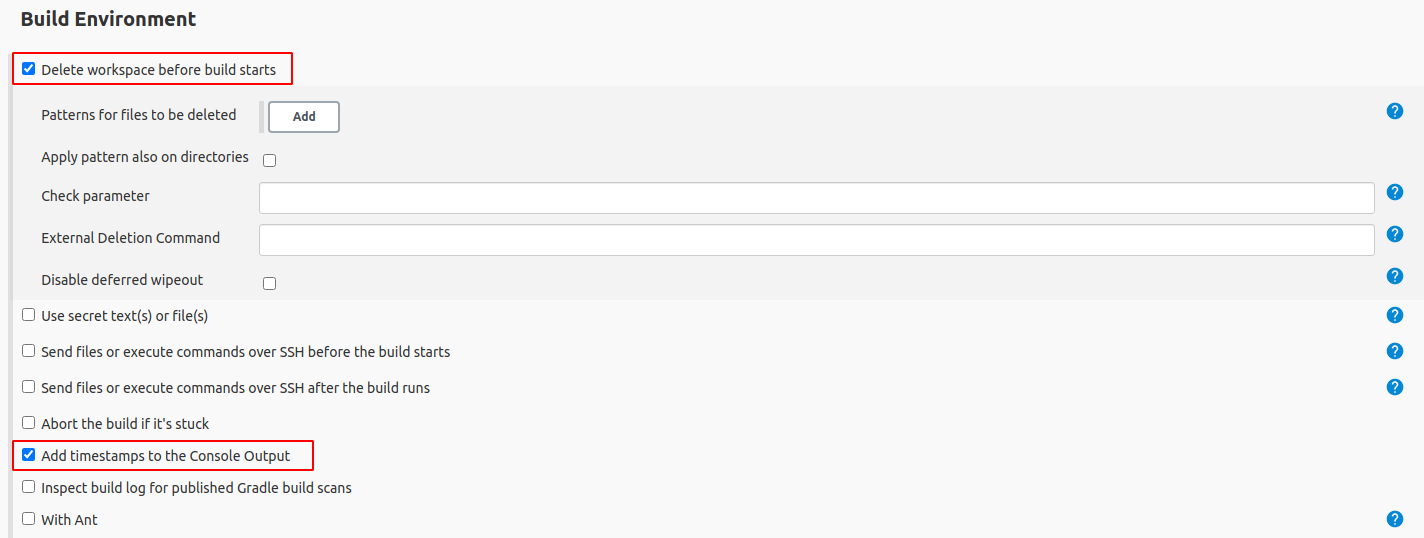
Enable the Delete workspace before build starts and Add timestamps to the Console OutputBuild Environment options
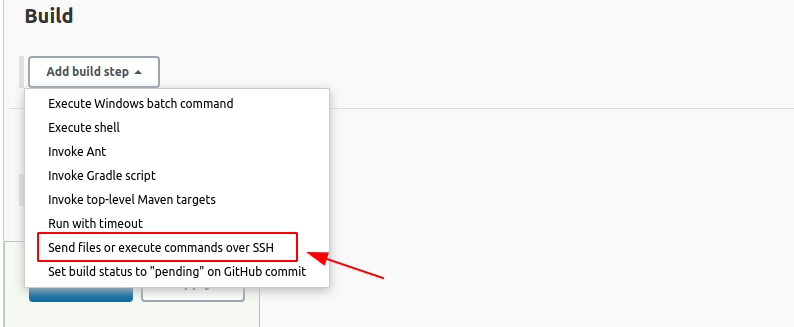
Finally let’s create the SSH Build Step
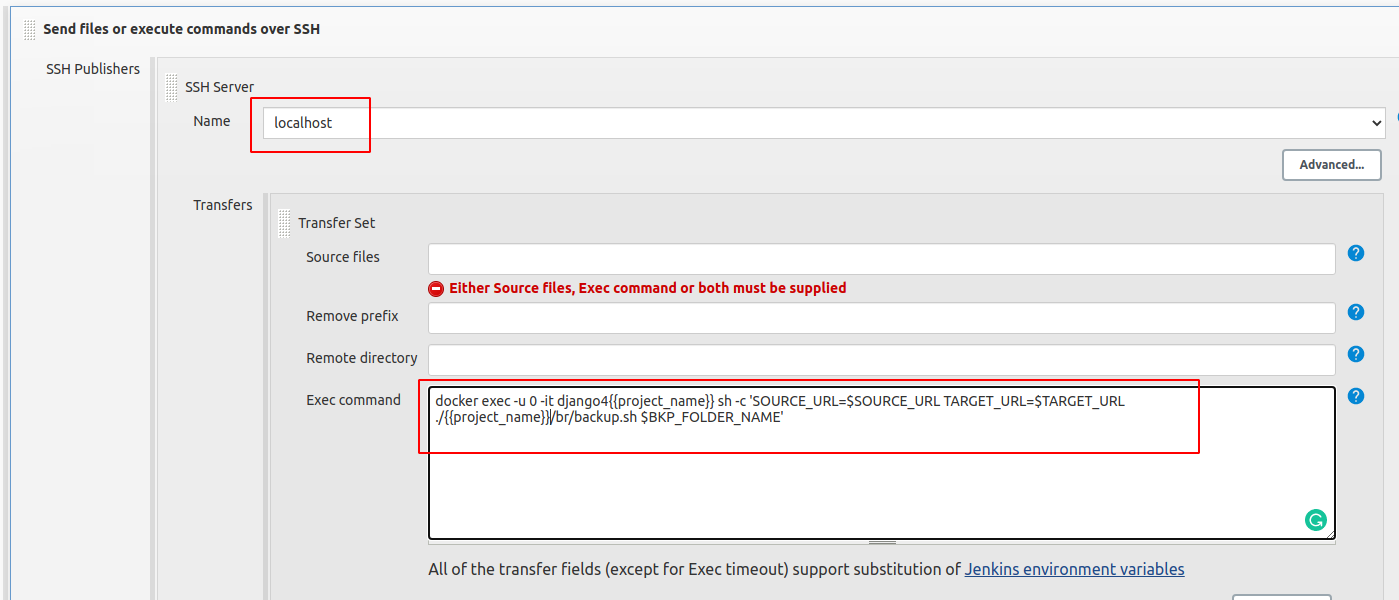
Select the correct SSH Server and provide the Exec Command below
Warning
Replace {{project_name}} with your geonode-project instance name (e.g. my_geonode)
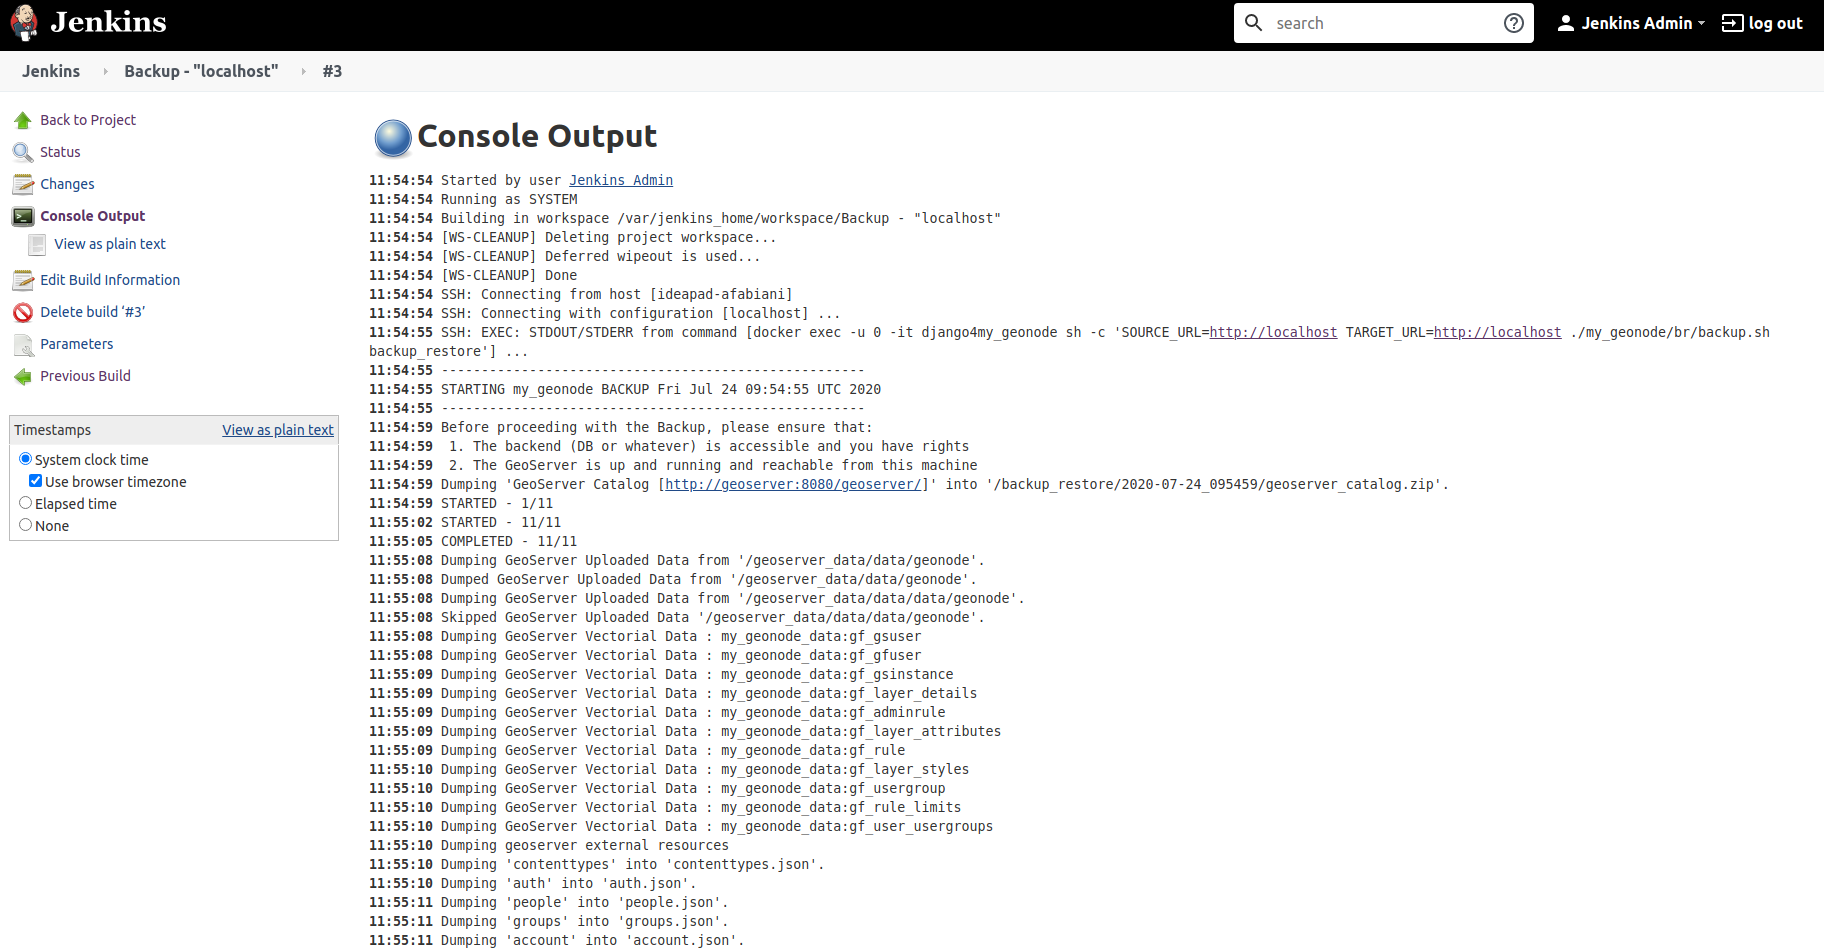
# Replace {{project_name}} with your geonode-project instance name (e.g. my_geonode)# docker exec -u 0 -it django4{{project_name}} sh -c 'SOURCE_URL=$SOURCE_URL TARGET_URL=$TARGET_URL ./{{project_name}}/br/backup.sh $BKP_FOLDER_NAME'# e.g.:
docker exec -u 0 -it django4my_geonode sh -c 'SOURCE_URL=$SOURCE_URL TARGET_URL=$TARGET_URL ./my_geonode/br/backup.sh $BKP_FOLDER_NAME'
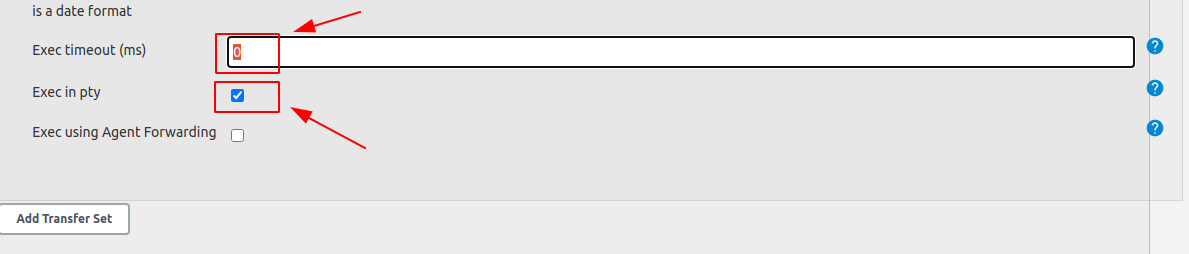
Click on Advanced and change the parameters as shown below
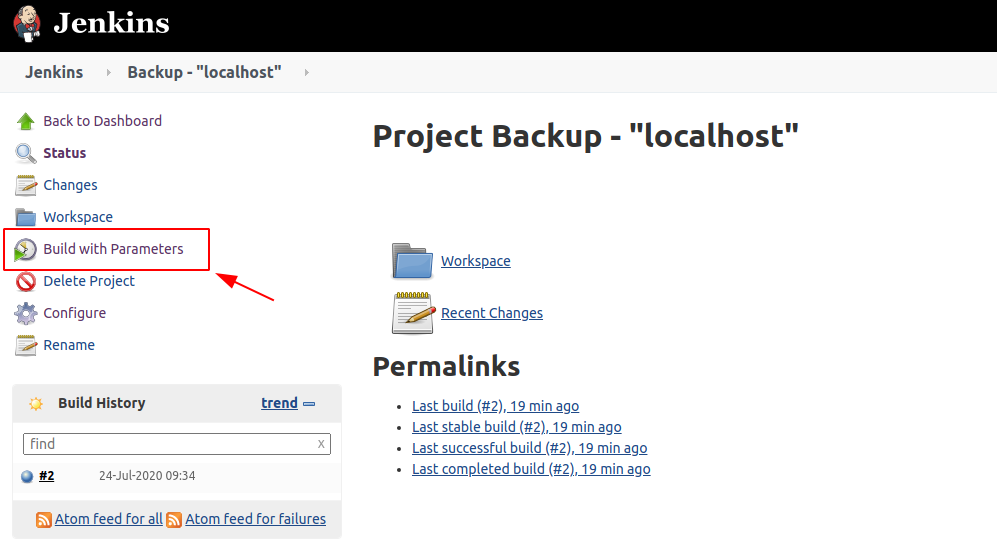
Save! You are ready to run the Job…
Link the backup_restore folder to a local folder on the HOST
In the case you need to save the backup archives outside the docker container, there’s the possibility to directly link the backup_restore folder to a local folder on the HOST.
In that case you won’t need to docker cp the files everytime from the containers, they will be directly available on the host filesystem.
Warning
Always keep an eye to the disk space. Backups archives may be huge.
Note
You might want also to consider filtering the files through the backup dt filters on the settings.ini in order to reduce the size of the archive files, including only the new ones.
Modify the docker-compose.override.yml as follows in order to link the backup folders outside.
Note
/data/backup_restore is a folder physically located into the host filesystem.
$> vim docker-compose.override.yml
version: '2.2'
services:
django:
build: .
# Loading the app is defined here to allow for# autoreload on changes it is mounted on top of the# old copy that docker added when creating the image
volumes:
- '.:/usr/src/my_geonode'
- '/data/backup_restore:/backup_restore'# Link to local volume in the HOST
celery:
volumes:
- '/data/backup_restore:/backup_restore'# Link to local volume in the HOST
geoserver:
volumes:
- '/data/backup_restore:/backup_restore'# Link to local volume in the HOST
jenkins:
volumes:
- '/data/backup_restore:/backup_restore'# Link to local volume in the HOST# Restart the containers
$> docker-compose up -d