Geonode Subsites
Enable creating subsites in GeoNode without deploying additional instances. The subsite is virtual, no additional code is required.
For example
http://localhost:8000/ # <-- geonode homepage
http://localhost:8000/subsite_1/ # <--- same geonode, but it can be used as a different geonode
http://localhost:8000/subsite_2/ # <--- same geonode, but it can be used as a different geonode
http://localhost:8000/subsite_3/ # <--- same geonode, but it can be used as a different geonode
http://localhost:8000/subsite_4/ # <--- same geonode, but it can be used as a different geonode
Installation
The subsite application should be added to the project’s requirements.txt file as an add-on.
git+https://github.com/geosolutions-it/geonode-subsites@main#egg=geonode-subsites
To make changes to the Django project settings, open the settings.py file and add the following lines of code
INSTALLED_APPS += ("subsites",)
ENABLE_SUBSITE_CUSTOM_THEMES=True/False
SUBSITE_READ_ONLY=True/False
ENABLE_CATALOG_HOME_REDIRECTS_TO
INSTALLED_APPS (required): include the app in the Django application registry
ENABLE_SUBSITE_CUSTOM_THEMES (optional): If
TrueCan be set a different GeoNode theme for each subsiteSUBSITE_READ_ONLY (optional): If
Truethe subsite will be in read-only modeENABLE_CATALOG_HOME_REDIRECTS_TO (optional): If
Truethe user is not allowed to see the catalog but will be redirected to the home page
The last step is to add in the urls.py file the registration of the subsite urls
url(r"", include("subsites.urls")),
If the file is not available, you can create it in the path src/<project_name>/urls.py
from geonode.urls import urlpatterns
from django.conf.urls import url, include
"""
# You can register your own urlpatterns here

"""
urlpatterns += [
    url(r"", include("subsites.urls")),
]
NOTE: never forget to run the migration to ensure the correct installation of the library.
python src/manage.py migrate
Configuration via admin
After completing the installation procedure, you can begin creating the subsites.
The homepage of geonode, with the subsite enabled, has a different look and feel compared to the default installation.
Instead of displaying the catalog on the homepage, a list of configured subsites is displayed.
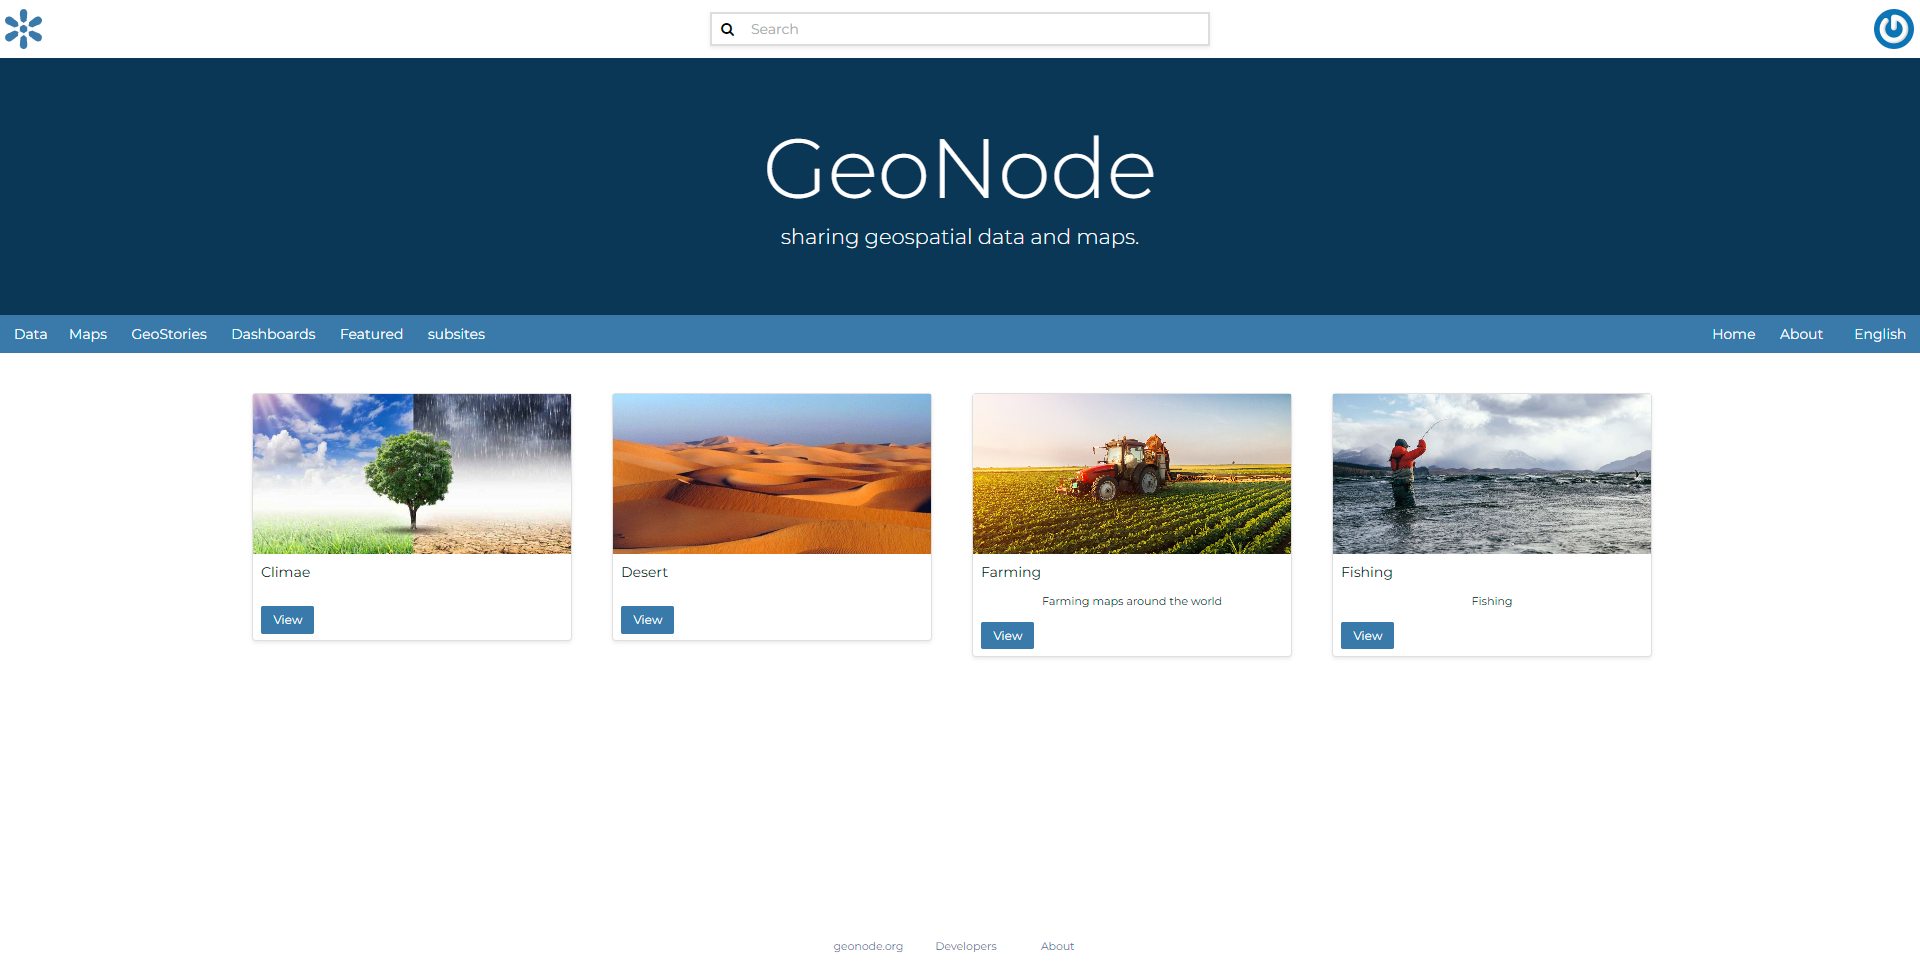
Example of homepage with subsite configured
Let’s configure a new subsite.
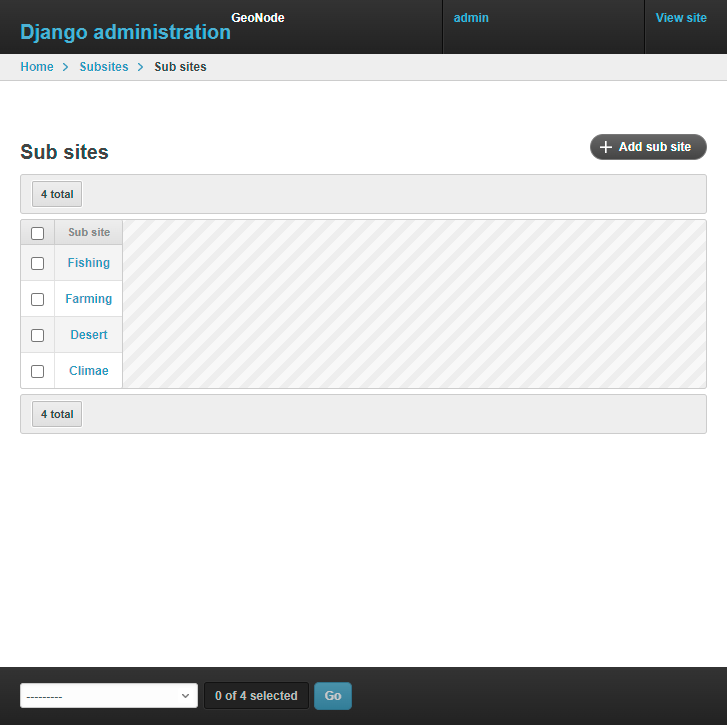
Login as administrator in the django admin panel top-right
Scroll down until the subsite application is shown

Subsite topic
After clicking on it, the subsite panel is shown
add subsite page
on the top-right click on the add sub-site button
The page below is displayed. Let’s examine its objectives in detail.
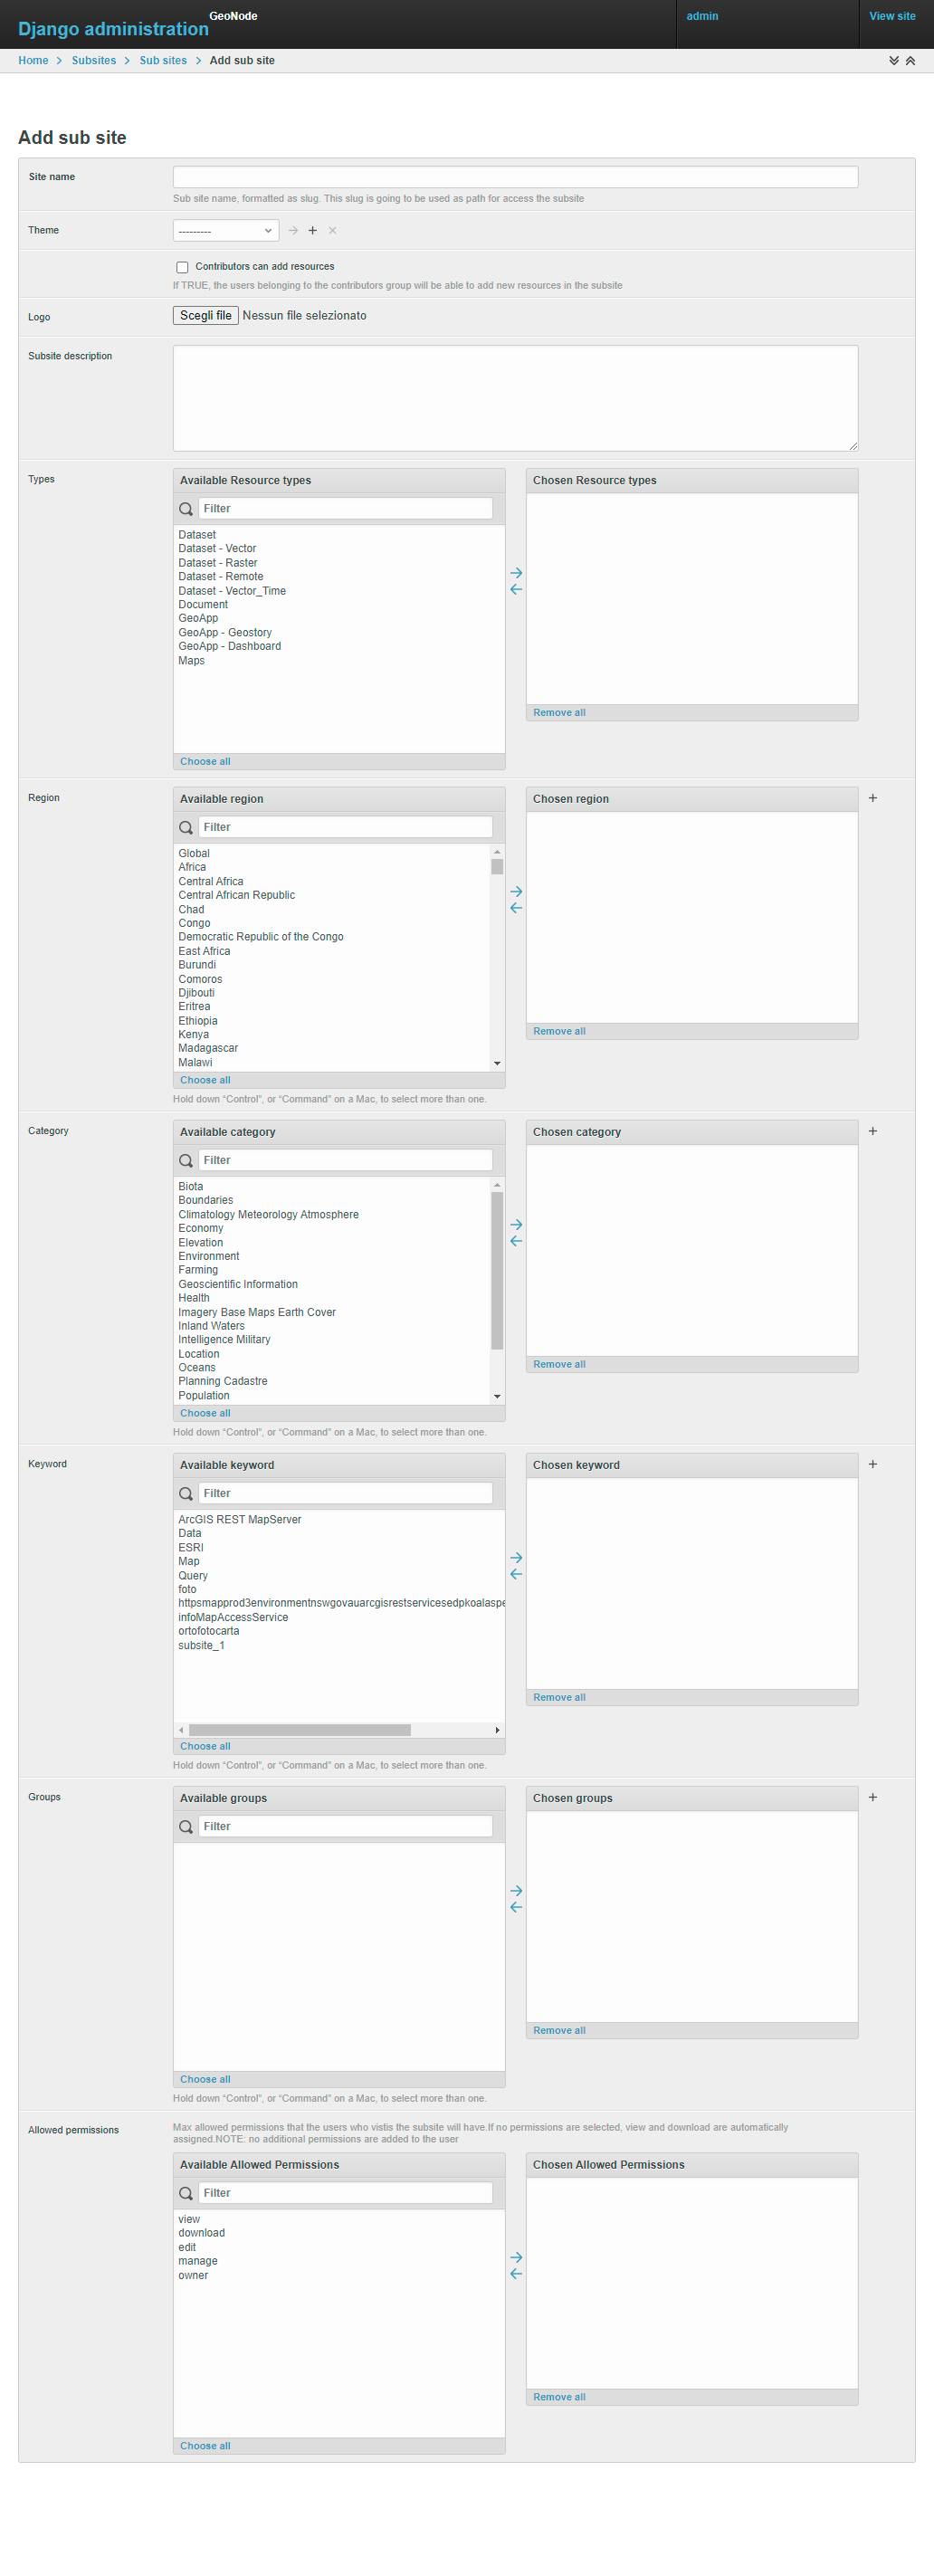
subsite configuration detail
SITE NAME: (required)is a unique identifier. This is going to be used as a path to navigate to the subsite. Is saved as aslug, so space is not allowed.
For example
Slug: subsite_1

subsite_url: `http://{host}/subsite_1/`

Slug: Italy

subsite_url: `http://{host}/italy/`
THEME: (optional)assign a theme to the subsite. The theme can be created in the GeoNode Themes. More information about themesContributor can add resource (optional): boolean filed if TRUE the add resource the user receives the add_resourcebase permissionsLogo (optional): Let the user upload a specific logo for the subsite. The logo is used in the homepage to show the subsite. In the example above, is (for example) the desertTypes (optional): Filter resources by assigned resource type. For example, if Dataset is selected, only the resources with that specific resource_type are shownRegion (optional): Filter resources by assigned region via Metadata editor or automatically via thegeonode.resource.regions_storer.spatial_predicate_region_assignorKeyword (optional): Filter resources by assigned keyword. Add keywords via Metadata editorGroups (optional): Filter resources by assigned group via Metadata editorAllowed Permissions (optional): Configuration of which permission the user will have while navigating in the subsite. By defaultviewanddownloadare given.
Subsite filtering logic
The filter works in OR if multiple fields of the same kind are selected, and in AND between all the filters:
(category==x || category==y || ...) && (keyword==x || keyword==y || ...) && (region==x|| region==y|| ...)
Example 1
subsite name: subsite_1
filter selected:
    - type -> Dataset
Result: the catalog is going to be pre-filtered, by including ONLY the resource with `Dataset` as the resource type.
NOTE: the filter is valid only for that specific subsite
Example 2
subsite name: subsite_2
filter selected:
    - type -> Dataset, Document
    - region -> Europe
Result: The catalog is going to be pre-filtered, by including ONLY the resource with Dataset OR Document as resource type and with have EUROPE in the regions assigned

NOTE: the filter is valid only for that specific subsite
Example 3
subsite name: subsite_3
filter selected:
    - region -> Europe
    - keyword -> country
    - Allowed permissions -> View
Result: The catalog is going to be pre-filtered, by including ONLY the resource with a region equal to EUROPE and with a keyword with the value COUNTRY.
Plus the users which will navigate the subsite will have ONLY the view permission, so they will not be able to download any dataset

NOTE: the filter is valid only for that specific subsite
NOTE:
This logic is applied to ALL the geonode APIv2 then a subsite is called.
In a few words, the catalog is going to be pre-filtered. Only the resources that match the subsite filtering are going to be shown in the API response
Advanced: Cache
To improve the performance, the subsite configuration is cached in memory.
The cache is cleaned if one of the following actions is taken:
The subsite configuration is updated via the Django admin panel
The expiration time of the cache is reached (300 seconds)
The subsite is deleted so that, the cache related to that specific subsite is deleted along with the subsite
settings.CACHES["subsite_cache"] = {
        "BACKEND": "django.core.cache.backends.locmem.LocMemCache",
        "TIMEOUT": 300,
        "OPTIONS": {"MAX_ENTRIES": 10000},
}
Advanced: How to override a specific URL
Not all the GeoNode URLs are eligible to be used in the subsite. If a new url is required to work with the subsite, it must added manually to the subsite codebase.
The URLs that support the subsite are listed in the file subsites/urls.py which briefly are:
All the API v2
user info
token info
facets
catalog listing
homepage
To register a new URL is enough to modify the subsites/urls.py. Follow an example of a URL:
re_path(r"^(?P<subsite>[^/]*)", views.subsite_home, name="subsite_home")
NOTE: All the URLs must have the subsite parameter, otherwise the system is not able to retrieve the subsite information.
The view will be defined as follows:
def subsite_home(request, subsite):
        slug = extract_subsite_slug_from_request(request, return_object=False)
        if not slug:
                raise Http404

        return subsite_render(request, "index.html", slug=slug)
Advanced: template rendering logic
The geonode-subsite provides two different way to override the default templates:
subsite specific
subsite common
Subsite specific:
Let the developer define a specific set of templates that are going to be used only for a specific subsite. The templates are rendered only when the subsite is called.
Subsite common:
Let the developer define a common template used by ALL the subsites. These templates are ignored by the default geonode instance but will have an effect only in the subsites.
But how these templates are rendered?
The backend follows this logic to render the templates following this order:
subsite specific template
common subsite template
geonode project override
default geonode deplete
To let this work, is required that all the new views will use the custom subsite_render function and not the django default render function
For example:
def subsite_home(request, subsite):
        slug = extract_subsite_slug_from_request(request, return_object=False)
        if not slug:
                raise Http404

        return subsite_render(request, "index.html", slug=slug)
Advanced: template configuration
One of the most important features that geonode-subsite provides is the ability to customize the template for each subsite, allowing for unique designs for each one.
However, the process of making template changes can be a bit complicated and requires familiarity with Django and its template system.
To help make this process easier, we have provided an example folder that demonstrates how to organize the subsite template folder. This will enable you to create a custom template for each subsite.
How to create the correct template subsite folder
Navigate to the
templatesfolder of the projectCreate a new folder named
subsitesinside subsite, create a new folder that is named as the subsite. The subsite-slug and the folder name must match
Use the normal geonode project template folder structure to override the template. The folder structure must be repeated for each subsite
Let’s make an example.
We have a subsite called “desert” and we want to override the navbar.html template for that specific subsite.
The default geonode project view is the following
templates/
├── geonode-mapstore-client/
│   └── _geonode_config.html
Let’s create the subsites folder
templates/
├── geonode-mapstore-client/
│   └── _geonode_config.html
├── subsites/
Now is time to create the folder for our specific subsite:
templates/
├── geonode-mapstore-client/
│   └── _geonode_config.html
├── subsites/
│   └── desert/
Once the subsite folder is created, we can replicate the default template structure to override the geonode-mapstore-client templates
templates/
├── geonode-mapstore-client/
│   └── _geonode_config.html
├── subsites/
│   └── desert/
|       └── geonode-mapstore-client/
│           └── snippets/
│               └── topbar.html
In this way, ONLY the subsite named desert will use the specific topbar.html
Advanced: common template override
Is also possible to define a common template folder where all the subsites will check for any template override.
The folder for the common template is the following:
templates/
├── geonode-mapstore-client/
│   ├── _geonode_config.html
│   ├── index.html
│   └── snippets/
│       ├── brand_navbar.html
├── subsites/
├───── common/
│       └── geonode-mapstore-client
│       └── snippets
│           └── topbar.html
All the subsites defined in the administration panel will use the template defined in the common folder.